

Scénario
Une société d'événementiel planifie une conférence d'une journée qui doit répondre aux exigences suivantes :
- 450 billets seront vendus via le site web WordPress existant de l'organisateur de l'événement en utilisant WooCommerce.
- L'acheteur doit sélectionner un type de billet (délégué, standard, étudiant ou VIP) qui déterminera le coût du billet.
- Chaque type de billet dispose d'un nombre déterminé de billets, soit un total de 450 billets.
- Les billets peuvent être achetés par une personne au nom d'un certain nombre de participants.
- Les courriels relatifs aux billets doivent être envoyés directement aux participants individuels.
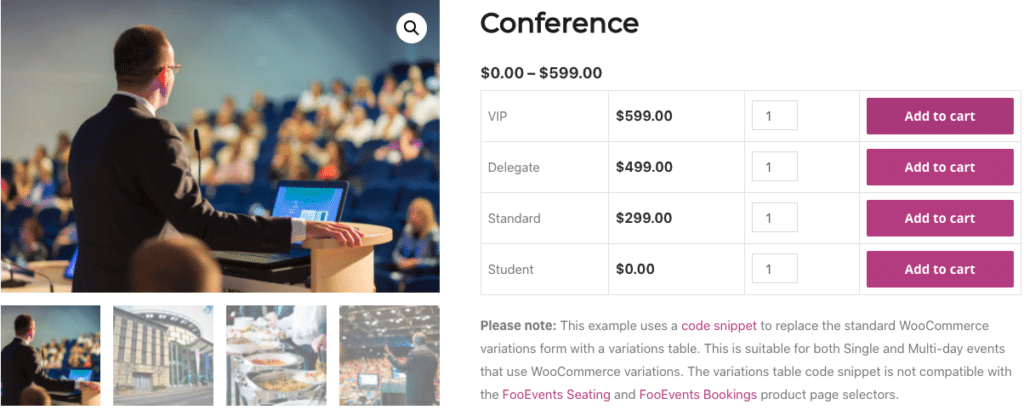
- Les variations doivent être affichées dans une grille de tableaux.
- Les champs suivants doivent être saisis pour chaque participant : Prénom, nom, courriel, téléphone, entreprise, fonction, taille du t-shirt et régime alimentaire.
- Une fois la vente des billets terminée, l'organisateur de l'événement doit exporter une liste de tous les participants qui pourra être importée dans son système de gestion de la relation client (CRM).
- Les participants doivent s'enregistrer à leur arrivée à l'événement.
- La société organisatrice de l'événement doit imprimer les badges qui seront remis aux participants lors de l'inscription.
Voici un exemple d'un tel événement : Conférence
Dans ce document d'aide, nous décrivons la configuration exacte nécessaire pour répondre à toutes les exigences susmentionnées.
Ce document d'aide suppose que vous avez déjà FooEvents et WooCommerce installé sur un WordPress et avoir une compréhension de base du fonctionnement de FooEvents. Si vous ne connaissez pas encore FooEvents, nous vous conseillons de lire notre Pour commencer pour vous aider à démarrer.
Produits utilisés
- FooEvents pour WooCommerce
- FooEvents Champs personnalisés pour les participants
- FooEvents Applications d'enregistrement
Offre groupée recommandée #
Tous les plugins nécessaires à l'organisation d'une conférence peuvent être achetés individuellement. FooEvents Premium Bundle. Cette offre groupée comprend également le FooEvents PDF Tickets et FooEvents Plusieurs jours qui sont souvent utilisés lors de l'organisation d'un événement de type conférence.
Mise en place
Créer un événement #
Aller à Produits > Ajouter un produit dans le menu principal et remplissez les champs standard du produit tels que le titre, le corps, la description, les balises, les catégories, l'image vedette et la galerie, le cas échéant.
Passez à l'étape Données sur le produit et sélectionnez Produit variable de la Type de produit dans la liste déroulante.
Attributs et variations #
Ensuite, nous devons créer des variantes de produits qui permettront aux acheteurs de choisir entre différents types de billets. Les acheteurs devront payer des montants différents en fonction de leur sélection :
| Variation | Prix | Disponibilité du stock |
| Délégué | $499 | 50 |
| Standard | $299 | 250 |
| Étudiant | $0 (gratuit) | 100 |
| VIP | $599 | 50 |
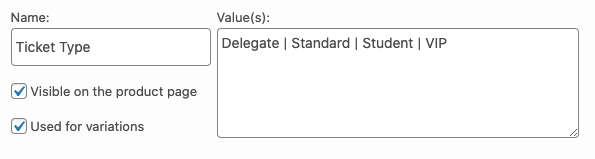
Aller à Données produit > Attributs et créer un attribut appelé Type de billet. Dans le Valeurs spécifiez les différentes options. Veillez à cocher la case Utilisé pour les variations et l'option Sauvegarder les attributs.
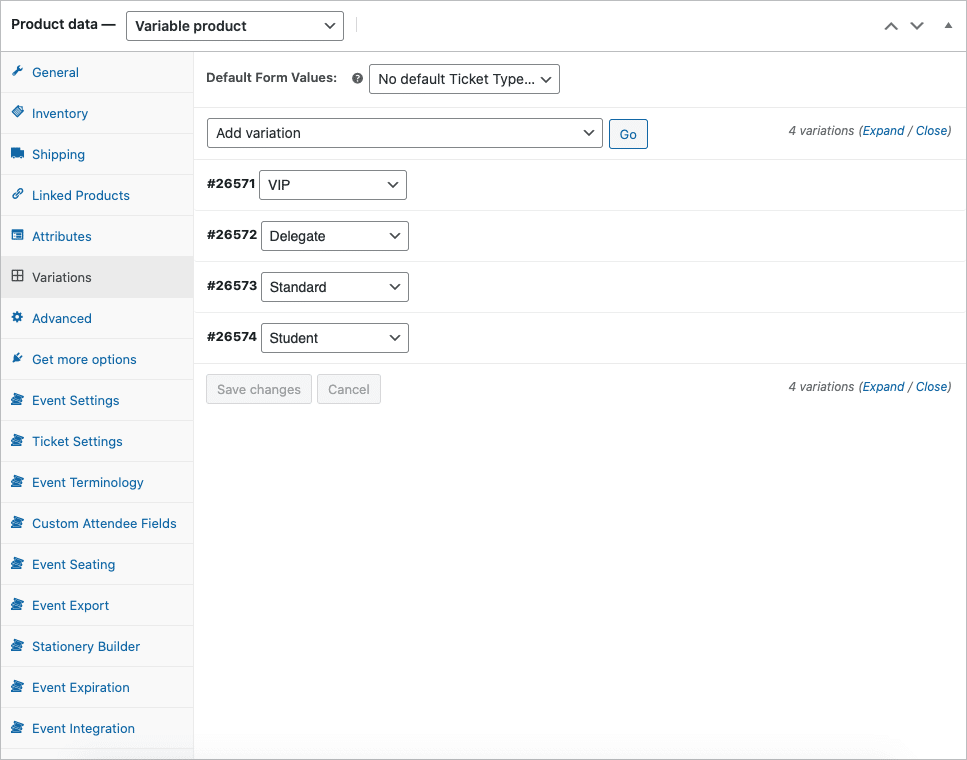
Aller à Données produit > Variations. Utiliser le Créer des variantes à partir de tous les attributs pour générer les variations.
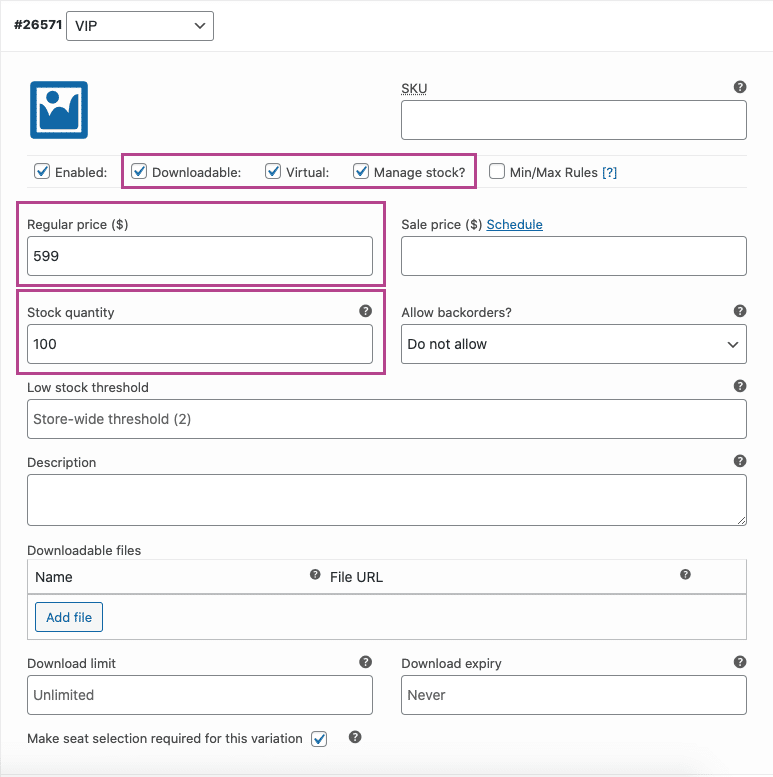
Régler chaque variation sur Virtuel et Téléchargeable et fixer le prix correspondant. Activer le Gérer les stocks et définir le nombre de billets disponibles pour chaque type de billet à l'aide de l'option Quantité en stock domaine.
Paramètres de l'événement #
Aller à Données sur le produit > Paramètres de l'événement
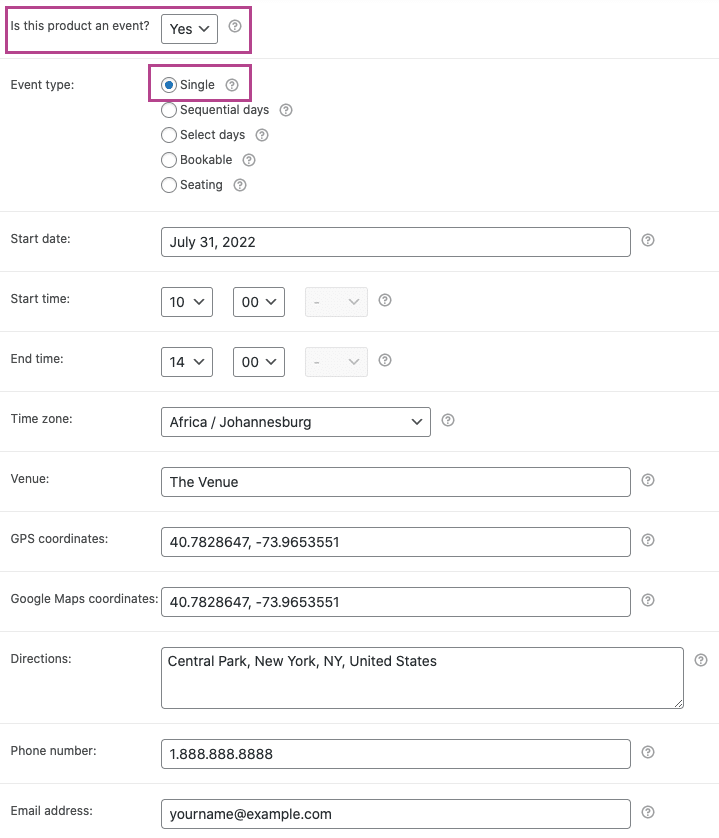
Pour activer la fonctionnalité d'événement, définissez le paramètre 'Ce produit est-il un événement ?' en 'Oui'.
Réglez l'option Type d'événement sur 'Uniqueet complétez les champs standard de l'événement si nécessaire.
Activez les options suivantes pour vous assurer que les informations individuelles sur les participants sont capturées.
- Activé - Saisir le nom complet et l'adresse électronique des participants ?
- Activé - Saisir le numéro de téléphone des participants (facultatif)
- Activé - Nom de l'entreprise du participant à la capture (facultatif)
- Activé - Saisir la désignation des participants ? (facultatif)
Les options relatives aux réservations peuvent être ignorées et les autres options peuvent être définies en fonction de vos préférences.
Paramètres des billets #
Aller à Données sur le produit > Paramètres des billets
Définir les thème du billet, logo et image d'en-tête. Vous pouvez également modifier l'objet de l'e-mail du ticket en utilisant le bouton Objet de l'e-mail du billet domaine.
Si vous souhaitez transmettre des informations supplémentaires que seuls les participants pourront voir, vous pouvez utiliser la fonction Corps de l'e-mail du billet pour y parvenir.
Activez les paramètres de ticket suivants si nécessaire :
- Activé - Afficher les coordonnées de l'acheteur ou du participant sur le billet ?
- Activé - Afficher les détails des participants sur le billet (optionnel)
- Activé - Afficher l'option "Ajouter au calendrier" sur le billet (optionnel)
- Activé - Joindre le fichier ICS du calendrier à l'email du ticket (optionnel)
- Activé - Affichage de la date et de l'heure sur le ticket (optionnel)
- Activé - Afficher le code-barres sur le billet (optionnel)
- Activé - Afficher le prix du billet (facultatif)
- Activé - Envoyer un billet par courriel à un participant plutôt qu'à un acheteur ?
- Activé - Billets par courriel ?
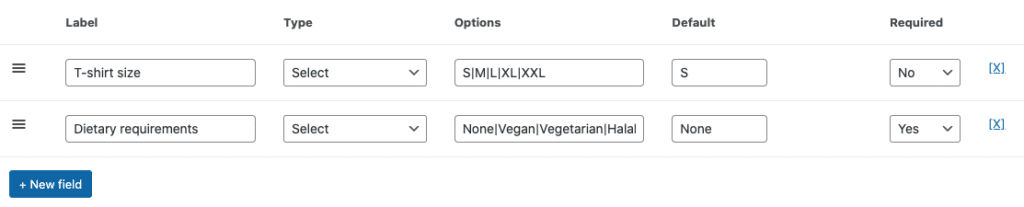
Champs personnalisés pour les participants #
Exige que le FooEvents Champs personnalisés pour les participants plugin.
Aller à Données sur le produit > Champs personnalisés pour les participants
Créez des champs personnalisés pour les participants si nécessaire. Ces champs s'affichent sur la page de paiement et peuvent être complétés pour chaque participant. Les champs personnalisés des participants seront également affichés dans les informations relatives au billet des participants, qui peuvent être consultées dans la zone d'administration de WordPress et dans la page d'accueil de WordPress. FooEvents Applications d'enregistrement.
Une fois que vous avez passé en revue tous les paramètres, vous pouvez Économiser et Publier votre événement. Il devrait ensuite être visible sur la page d'accueil de votre site web.
Disposition du tableau des variations #
Par défaut, WooCommerce affiche les variations dans un champ déroulant sur la page du produit :

L'utilisation cet extraitVous pouvez modifier le comportement par défaut de la page produit et afficher les variations dans un tableau.
Important : Ces extraits sont fournis à titre gracieux et ne font pas partie de l'offre de produits de FooEvents. Ils sont considérés comme des personnalisations et ne sont pas officiellement pris en charge par FooEvents. En tant que tel, nous ne fournissons pas de support pour les snippets et les personnalisations, conformément à notre politique de support. Conditions d'utilisation. Vous les utilisez à vos risques et périls.
Utilisation
Similaire à cet exemple de démonstrationUne fois que vous avez terminé, vos clients devraient pouvoir sélectionner un ou plusieurs types de billets et les ajouter à leur panier. Ils peuvent ensuite passer à la caisse, où il leur sera demandé de remplir les champs relatifs aux informations de facturation et aux participants.
Billets #
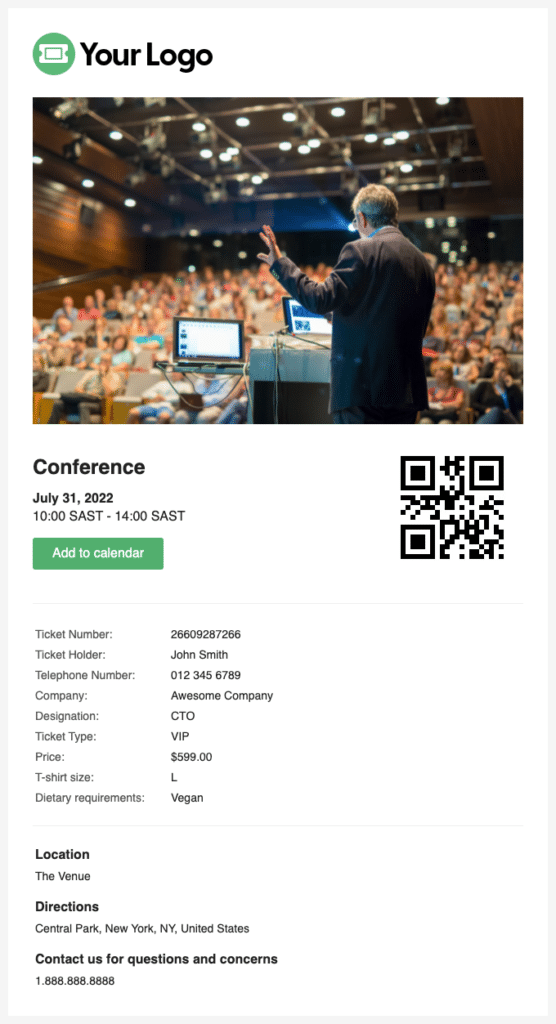
Une fois le paiement effectué et le statut de la commande modifié en TerminéUn ticket sera généré et envoyé à chaque participant. En fonction des paramètres activés, le ticket contiendra toutes les informations capturées sur les participants :
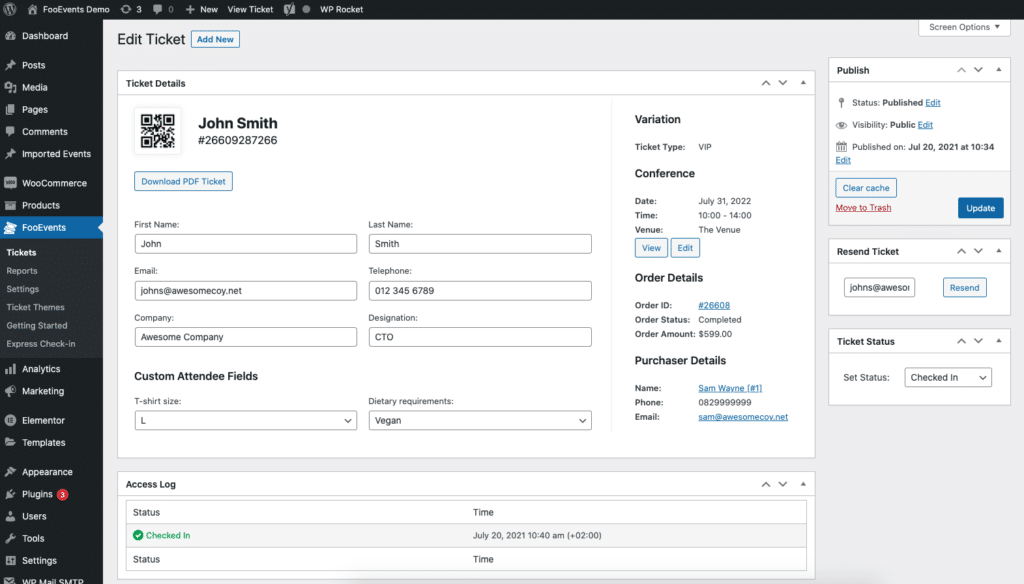
Le ticket peut également être consulté dans la zone d'administration de WordPress. Allez dans votre Zone d'administration de WordPress > FooEvents > Billets et sélectionnez le billet correspondant :
Exportation des participants #
Vous pouvez exporter un fichier CSV pour chaque événement qui comprend tous les numéros de tickets, champs personnalisés pour les participants, données d'enregistrement, acheteur et détails sur les participants. Le fichier CSV peut ensuite être importé dans votre système de gestion de la relation client.
Vous pouvez également utiliser une solution telle que WP Fusionqui offre une intégration avec FooEvents qui vous permet d'ajouter dynamiquement des participants à des événements en tant que contacts dans le CRM de votre choix. Vous pouvez également appliquer des étiquettes basées sur le billet d'événement acheté.
Vérification des participants #
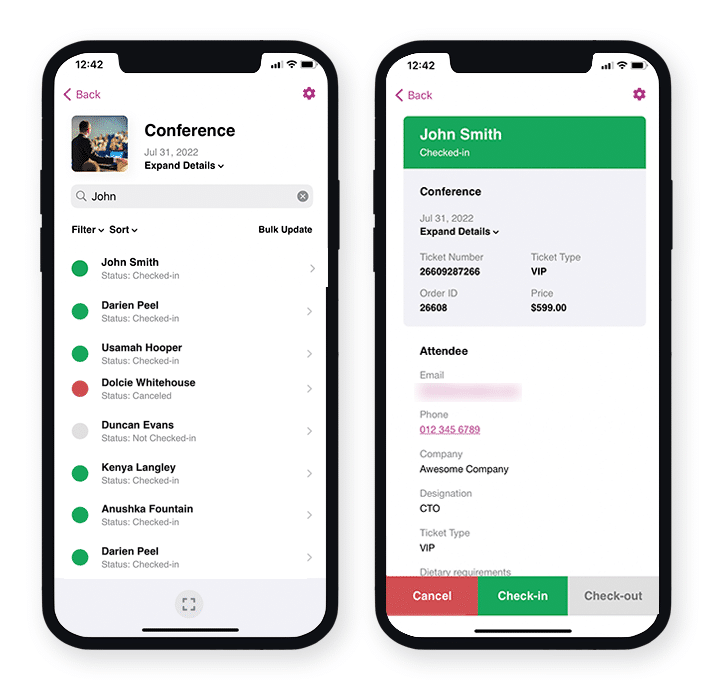
Le statut d'un ticket peut être modifié de Non enregistré à Enregistrement, Annulé ou Non payé. Pour ce faire, il suffit d'éditer le ticket dans la section Zone d'administration de WordPressà l'aide de l'outil FooEvents Express Check-ins plugin ou en utilisant le logiciel gratuit FooEvents Application Check-ins (populaire).
Impression de badges #
Le système intégré FooEvents Constructeur d'articles de papeterie et permet de concevoir et d'imprimer sans effort des badges nominatifs, des bracelets, des billets, des badges et des étiquettes personnalisées grâce à une interface intuitive de type " glisser-déposer ".
Questions et commentaires
Vous avez une question avant d'acheter ? S'il vous plaît prendre contact. Si vous êtes prêt à commencer, vous pouvez acheter une licence ici.
Vous avez déjà acheté et vous avez besoin d'aide ? Contactez notre équipe d'assistance