

Cenário
Uma empresa de eventos está a planear uma conferência de um dia que tem os seguintes requisitos:
- 450 bilhetes serão vendidos através do sítio Web WordPress existente da empresa do evento, utilizando o WooCommerce
- O comprador deve selecionar um tipo de bilhete (Delegado, Normal, Estudante ou VIP) que determinará o custo do bilhete
- Cada tipo de bilhete tem um número definido de bilhetes disponíveis, que deverá totalizar 450 bilhetes
- Os bilhetes podem ser adquiridos por um indivíduo em nome de vários participantes
- Os e-mails dos bilhetes devem ser enviados diretamente aos participantes individuais
- As variações devem ser apresentadas num esquema de grelha de tabela
- Devem ser registados os seguintes campos para cada participante: Nome, Apelido, E-mail, Telefone, Empresa, Designação, Tamanho da T-shirt e Requisitos dietéticos
- Uma vez encerrada a venda de bilhetes, a empresa do evento precisa de exportar uma lista de todos os participantes que possa ser importada para o seu sistema CRM
- Os participantes devem fazer o check-in no registo quando chegarem ao evento
- A empresa do evento precisa de imprimir etiquetas com nomes que serão entregues aos participantes no momento do registo
Eis um exemplo de um evento deste género: Conferência
Neste documento de ajuda, iremos delinear a configuração exacta necessária para atingir todos os requisitos acima referidos.
Este documento de ajuda pressupõe que o utilizador já tem FooEvents e WooCommerce instalado num WordPress e ter uma compreensão básica de como funciona o FooEvents. Se é novo no FooEvents, deve ler o nosso Começar a trabalhar guia para o ajudar a começar.
Produtos utilizados
- FooEvents para WooCommerce
- FooEvents Campos personalizados de participantes
- FooEvents Aplicações de check-ins
Pacote recomendado #
Todos os plug-ins necessários para configurar uma conferência podem ser adquiridos individualmente, mas também estão incluídos no pacote Pacote Premium FooEvents. Este pacote também inclui o FooEvents Bilhetes PDF plugin e FooEvents Vários dias que são frequentemente utilizados na organização de um evento do tipo conferência.
Configuração
Criar um evento #
Ir para Produtos > Adicionar produto no menu principal e preencha os campos padrão do produto, como o título, o corpo, a descrição, as etiquetas, as categorias, a imagem em destaque e a galeria, conforme necessário.
Avançar para o Dados do produto e selecionar Produto variável do Tipo de produto lista pendente.
Atributos e variações #
Em seguida, precisamos de criar variações de produtos que permitam aos compradores escolher entre diferentes tipos de bilhetes. Serão cobrados aos compradores montantes diferentes consoante a sua seleção:
| Variação | Preço | Disponibilidade de stock |
| Delegado | $499 | 50 |
| Padrão | $299 | 250 |
| Estudante | $0 (gratuito) | 100 |
| VIP | $599 | 50 |
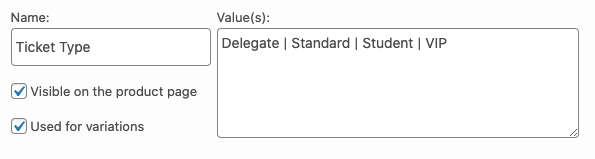
Ir para Dados do produto > Atributos e criar um atributo chamado Tipo de bilhete. No Valores especifique as diferentes opções. Não se esqueça de verificar o campo Utilizado para variações opção e Guardar atributos.
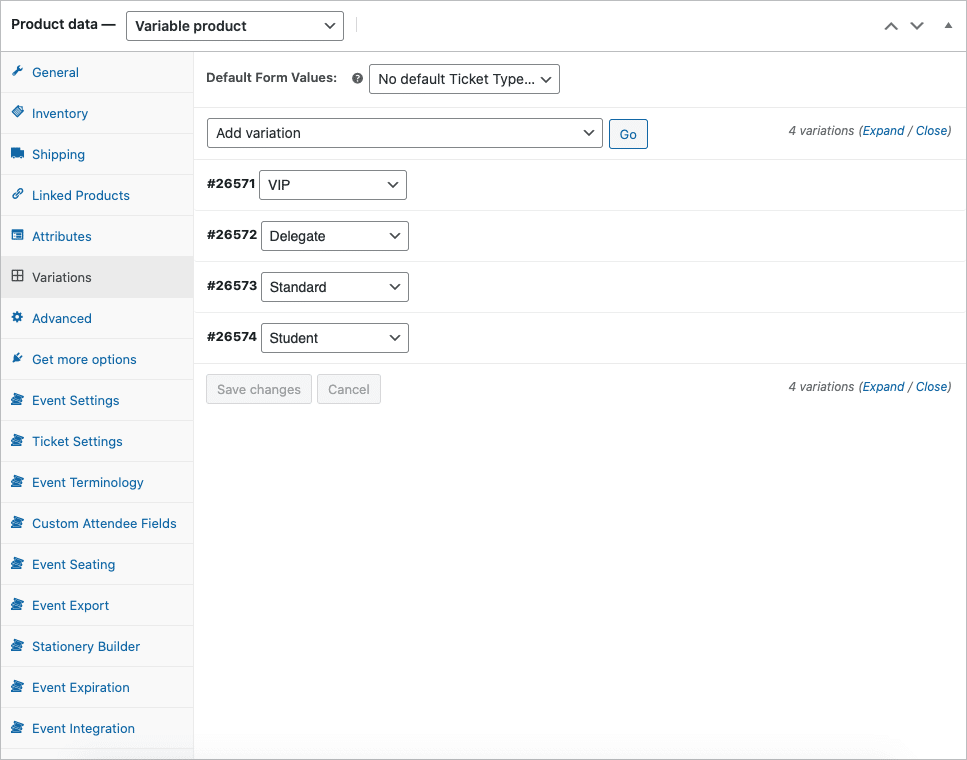
Ir para Dados do produto > Variações. Utilizar o Criar variações de todos os atributos para gerar as variações.
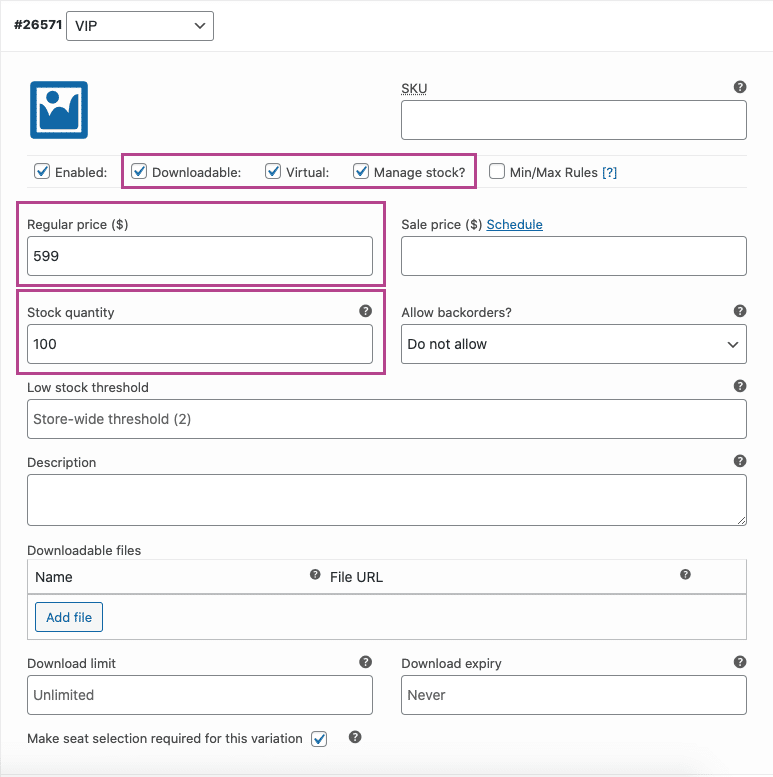
Definir cada variação para Virtual e Descarregável e definir o preço relevante. Ativar o Gerir as existências e definir a quantidade de bilhetes disponíveis para cada tipo de bilhete utilizando a opção Quantidade em stock domínio.
Definições de eventos #
Ir para Dados do produto > Definições de eventos
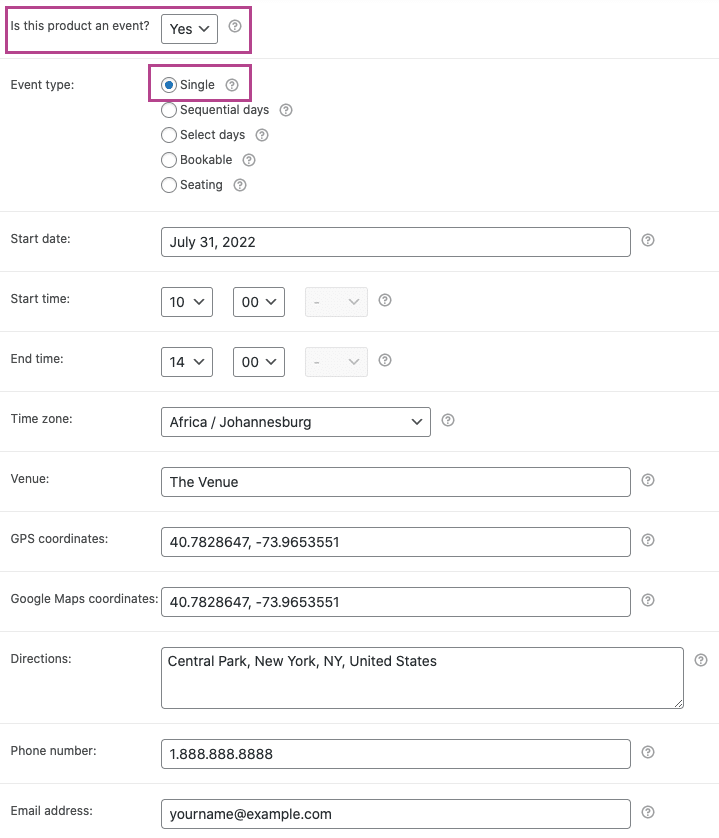
Para ativar a funcionalidade do evento, defina o parâmetro 'Este produto é um evento?' no menu pendente para 'Sim'.
Definir a opção Tipo de evento para 'Individual' e preencha os campos de eventos padrão conforme necessário.
Ativar as seguintes opções para garantir que as informações individuais dos participantes são captadas.
- Ativado - Capturar o nome completo e o endereço de correio eletrónico do participante?
- Ativado - Capturar o número de telefone do participante? (opcional)
- Ativado - Capturar o nome da empresa do participante (opcional)
- Ativado - Capturar a designação dos participantes? (opcional)
As opções relacionadas com as reservas podem ser ignoradas e as restantes opções podem ser definidas com base nas suas preferências.
Definições dos bilhetes #
Ir para Dados do produto > Definições dos bilhetes
Definir os tema do bilhete, logótipo e imagem de cabeçalho. Também é possível alterar o assunto do e-mail do bilhete utilizando o botão Assunto do e-mail do bilhete domínio.
domínio. Se pretender transmitir informações adicionais que apenas os participantes poderão ver, pode utilizar o campo Corpo do e-mail do bilhete para o conseguir.
Active as seguintes definições de bilhetes, conforme necessário:
- Ativado - Mostrar os dados do comprador ou do participante no bilhete?
- Ativado - Exibir detalhes personalizados do participante no bilhete? (opcional)
- Ativado - Mostrar a opção "Adicionar ao calendário" no bilhete? (opcional)
- Ativado - Anexar o ficheiro ICS do calendário ao e-mail do bilhete? (opcional)
- Ativado - Mostrar a data e a hora no bilhete? (opcional)
- Ativado - Mostrar código de barras no bilhete? (opcional)
- Ativado - Mostrar o preço no bilhete? (opcional)
- Ativado - Enviar o bilhete por correio eletrónico ao participante em vez de ao comprador?
- Ativado - Bilhetes por correio eletrónico?
Campos personalizados de participantes #
Requer o FooEvents Campos personalizados de participantes plugin.
Ir para Dados do produto > Campos personalizados de participantes
Crie campos de participante personalizados conforme necessário. Os campos de participante serão exibidos na página de checkout e podem ser preenchidos para cada participante individual. Os campos personalizados do participante também serão exibidos nas informações do bilhete do participante, que podem ser visualizadas na área de administração do WordPress e na página FooEvents Aplicações de check-ins.
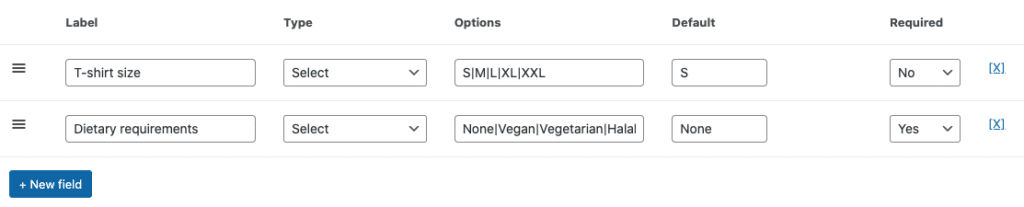
Depois de rever todas as definições, pode Guardar e Publicar o seu evento. Este deverá então ser visível no front-end do seu sítio Web.
Layout do quadro de variação #
Por defeito, o WooCommerce apresenta as variações num campo pendente na página do produto:

Utilizar este excertoSe o produto for apresentado numa página de produto, pode alterar o comportamento predefinido da página de produto e apresentar as variações numa disposição de tabela.
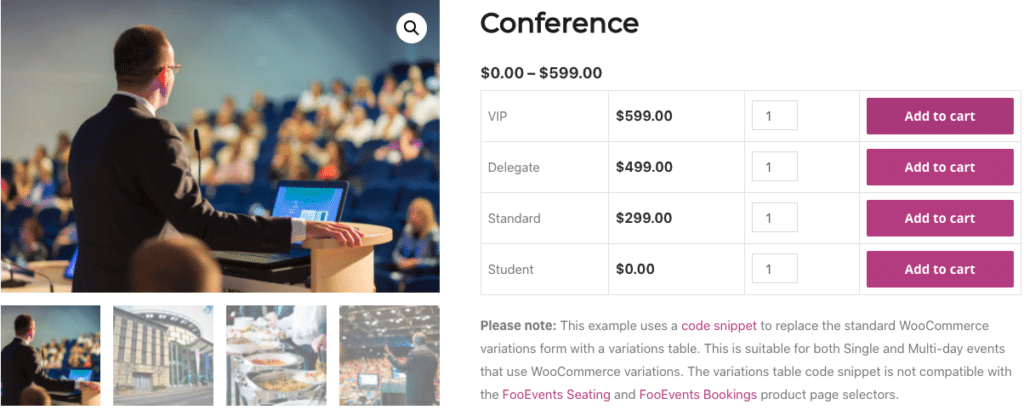
Importante: Estes snippets são fornecidos como cortesia e não fazem parte da oferta de produtos do FooEvents. Eles são considerados customizações e não são oficialmente suportados pelo FooEvents. Como tal, não fornecemos suporte para snippets e personalizações de acordo com nosso Termos do serviço. Utilize-os por sua conta e risco.
Utilização
Semelhante a este exemplo de demonstraçãoA partir de agora, os seus clientes devem poder selecionar um ou mais tipos de bilhetes e adicioná-los ao carrinho. Podem então prosseguir para o checkout, onde lhes será pedido que preencham as informações de faturação e os campos de participantes relevantes.
Bilhetes #
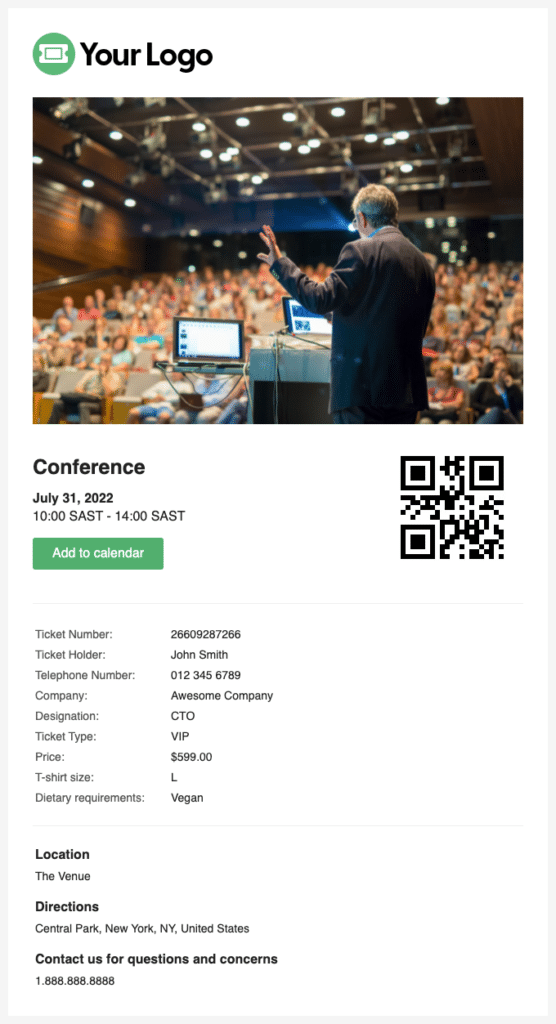
Assim que o pagamento tiver sido concluído e o estado da encomenda tiver mudado para ConcluídoSe o participante estiver presente no evento, será gerado um bilhete que será enviado a cada um dos participantes. Com base nas definições que foram activadas, o bilhete incluirá todas as informações do participante capturadas:
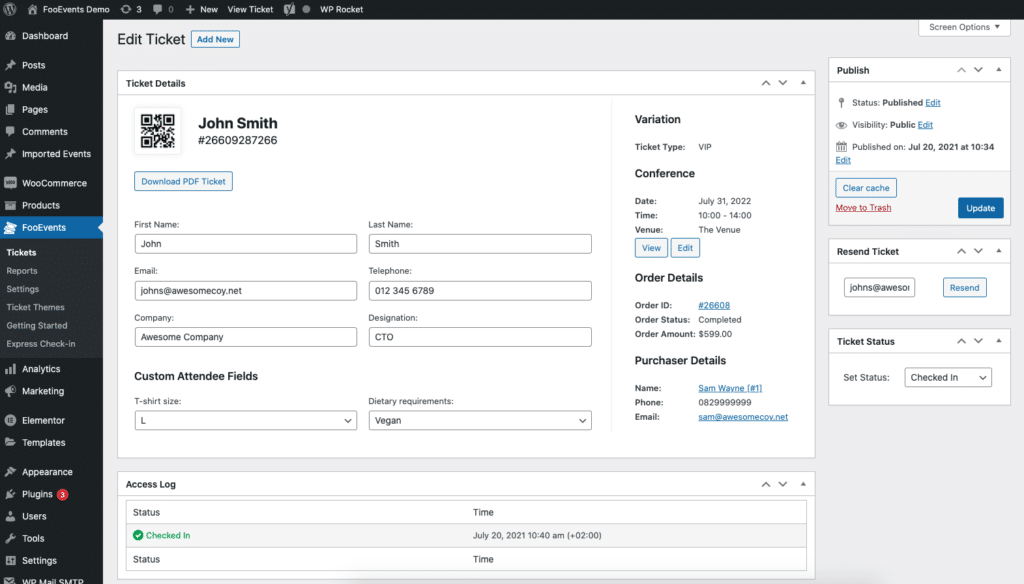
O bilhete também pode ser visualizado na área de administração do WordPress. Aceda ao seu Área de administração do WordPress > FooEvents > Bilhetes e selecionar o bilhete relevante:
Exportação de participantes #
Pode exportar um ficheiro CSV para cada evento, que inclui todos os números de bilhetes, campos personalizados de participantes, dados de check-in, comprador e detalhes do participante. O CSV pode então ser importado para o seu sistema CRM.
Em alternativa, pode utilizar uma solução como WP Fusãoque oferece uma integração com o FooEvents que lhe permite adicionar dinamicamente os participantes do evento como contactos ao seu CRM de eleição. Pode também, opcionalmente, aplicar etiquetas com base no bilhete comprado para o evento.
Check-ins dos participantes #
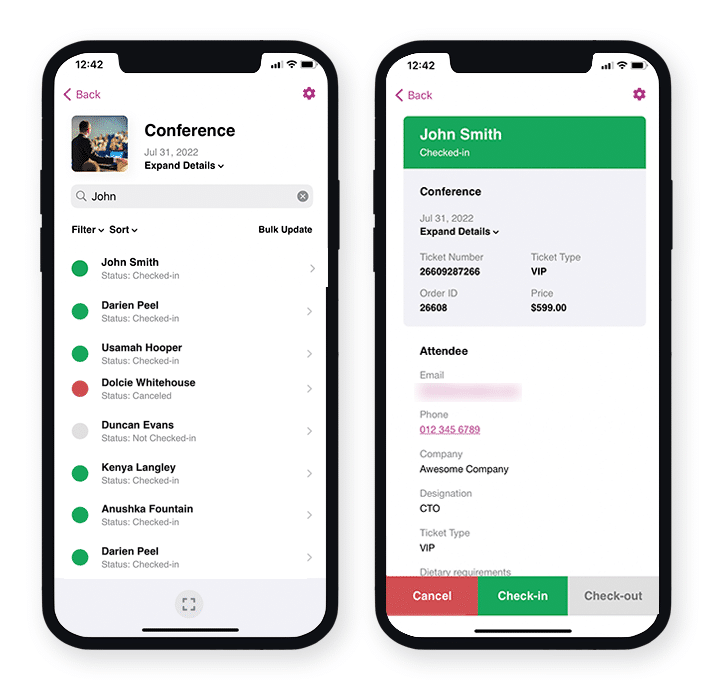
O Estado de um bilhete pode ser alterado de Não registado para Registo de entrada, Cancelado ou Não pago. Isto pode ser feito editando o bilhete no Área de administração do WordPress, utilizando o Plugin FooEvents Express Check-ins ou utilizando a aplicação gratuita FooEvents Aplicação de check-ins (popular).
Impressão de crachás #
O sistema integrado FooEvents Construtor de artigos de papelaria permite conceber e imprimir sem esforço etiquetas de identificação, pulseiras, bilhetes, crachás e etiquetas personalizadas através de uma interface intuitiva de arrastar e largar.
Perguntas e comentários
Tem uma pergunta antes de comprar? Por favor entrar em contacto. Se estiver pronto para começar, pode adquirir uma licença aqui.
Já comprou e precisa de assistência? Contactar a nossa equipa de apoio