

Escenario
Una empresa de eventos está planificando una conferencia que tendrá lugar durante varios días (del 24 de noviembre al 1 de diciembre de 2020). Tiene los siguientes requisitos:
- 350 entradas se venderán a través del sitio web WordPress existente de la empresa del evento utilizando WooCommerce
- El comprador debe seleccionar un tipo de entrada (Delegado, Estándar, Estudiante o VIP) que determinará el coste de la entrada
- Cada tipo de entrada tiene un número determinado de entradas disponibles, que debería ascender a un total de 450 entradas.
- Las entradas pueden ser adquiridas por un particular en nombre de varios asistentes
- Los correos electrónicos con las entradas deben enviarse directamente a los asistentes individuales
- Las variaciones deben mostrarse en una tabla cuadriculada
- Deben capturarse los siguientes campos para cada asistente: Nombre, Apellidos, Correo electrónico, Teléfono, Empresa, Cargo, Talla de camiseta y Régimen alimenticio.
- Una vez cerradas las ventas de entradas, la empresa del evento necesita exportar una lista de todos los asistentes que pueda importarse a su sistema CRM.
- Los asistentes deben registrarse en el registro al comienzo de cada día y ser registrados a la salida cuando abandonen el evento (requisito del reglamento COVID-19).
- La empresa del evento necesita imprimir las etiquetas de identificación que se entregarán a los asistentes en el registro
He aquí un ejemplo: Conferencia de varios días
En este documento de ayuda, describiremos la configuración exacta necesaria para cumplir todos los requisitos anteriores.
Este documento de ayuda asume que usted ya tiene FooEvents y WooCommerce instalado en un WordPress y tener conocimientos básicos sobre el funcionamiento de FooEvents. Si no conoce FooEvents, le recomendamos que lea nuestra sección Primeros pasos para ayudarle a empezar.
Productos utilizados
- FooEvents para WooCommerce
- FooEvents Campos de asistente personalizados
- FooEvents Varios días
- FooEvents Check-ins apps
Paquete recomendado #
Todos los plugins necesarios para organizar una conferencia pueden adquirirse por separado, aunque también se incluyen en el paquete FooEvents Paquete Premium. Este paquete también incluye el FooEvents Entradas PDF que se utiliza a menudo cuando se organiza una conferencia.
Configurar
Crear un evento #
Ir a Productos > Añadir producto en el menú principal y complete los campos estándar del producto, como el título, el cuerpo, la descripción, las etiquetas, las categorías, la imagen destacada y la galería, según sea necesario.
Proceda a la Datos del producto y seleccione Producto variable del Tipo de producto desplegable.
Atributos y variaciones #
A continuación, tenemos que crear variaciones del producto que permitan a los compradores elegir entre distintos tipos de entradas. Los compradores deberán abonar distintos importes en función de su elección:
| Variación | Precio | Disponibilidad de existencias |
| Delegado | $499 | 100 |
| Estándar | $299 | 200 |
| Estudiante | $0 (libre) | 50 |
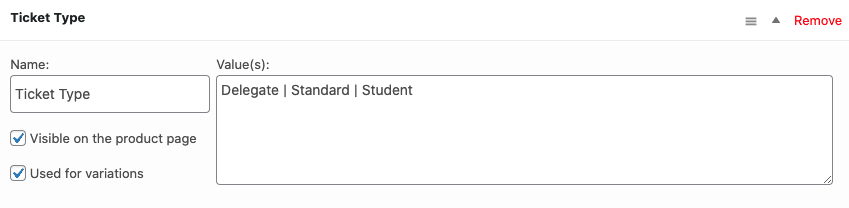
Ir a Datos del producto > Atributos y crear un atributo llamado Tipo de billete. En el Valores especifique las distintas opciones. Asegúrese de marcar la casilla Utilizado para variaciones y Guardar atributos.
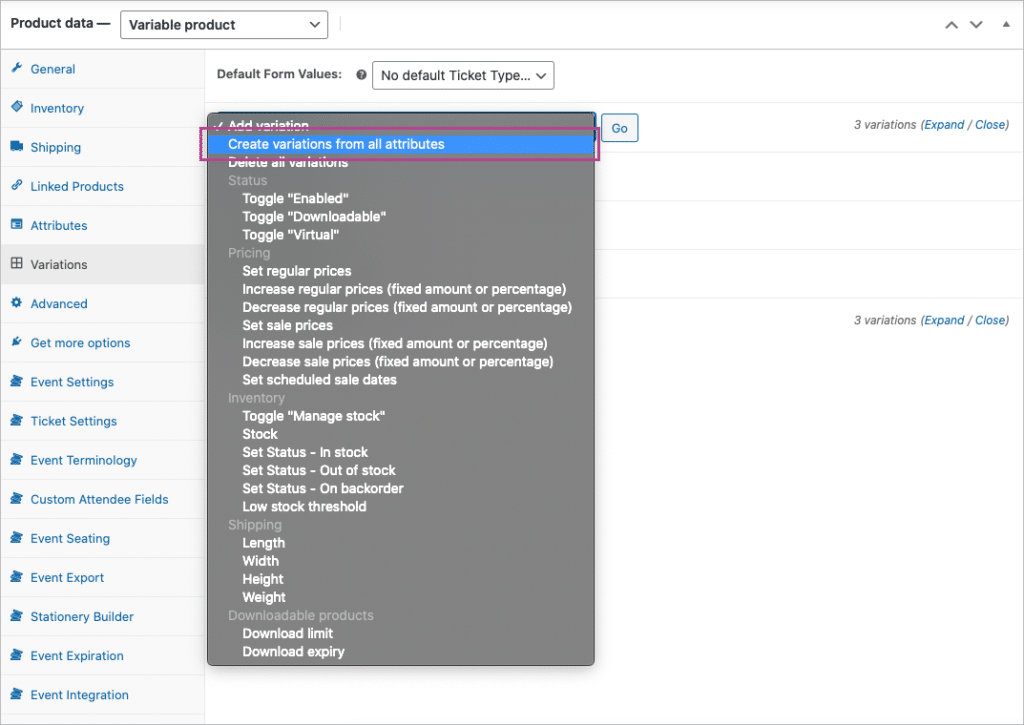
Ir a Datos del producto > Variaciones. Utilice el Crear variaciones a partir de todos los atributos para generar las variaciones.
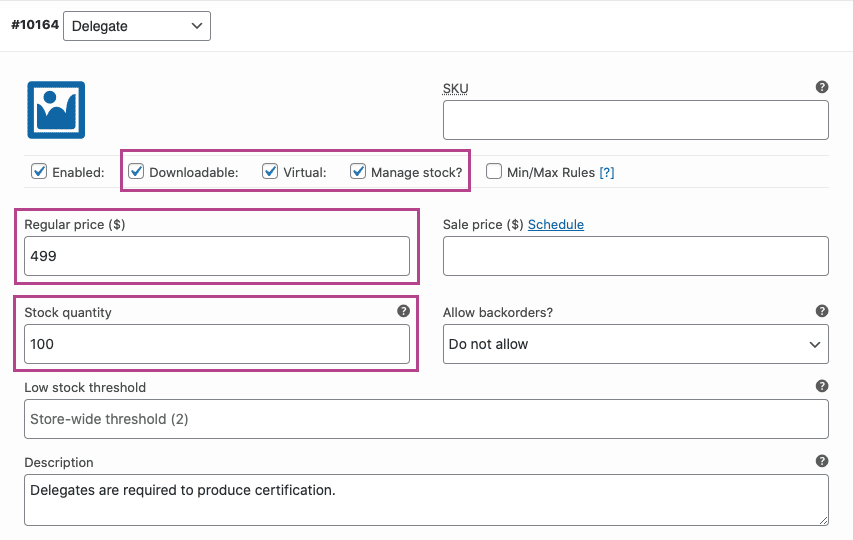
Ajuste cada variación a Virtual y Descargable y fije el precio correspondiente. Active el Gestionar las existencias y establezca la cantidad de billetes disponibles para cada tipo de billete mediante la opción Cantidad de existencias campo.
Configuración de eventos #
Ir a Datos del producto > Configuración de eventos
Para activar la funcionalidad de eventos, establezca el parámetro '¿Es este producto un acontecimiento?' a 'Sí'.
Las siguientes opciones de varios días son ofrecidas por el FooEvents Varios días plugin.
Para eventos de varios días, puede establecer el tipo de evento en Días consecutivos o Días concretos:
- Días consecutivos - Acontecimientos que se producen a lo largo de varios días y se repiten durante un número determinado de días consecutivos.
- Días específicos - Eventos que se repiten a lo largo de varios días naturales.
Para este ejemplo, utilizaremos el Específico días opción. Una vez seleccionada, elija el número de días en los que tendrá lugar el acto y fije la fecha de cada día.
Active todas las opciones siguientes para garantizar que se captura la información individual de los asistentes:
- Activado - ¿Capturar el nombre completo y la dirección de correo electrónico de los asistentes?
- Activado - Capturar el número de teléfono del asistente (opcional)
- Activado - Capturar el nombre de la empresa del asistente (opcional)
- Activado - ¿Capturar la designación de asistentes? (opcional)
Las opciones relacionadas con las reservas pueden ignorarse y las restantes pueden configurarse en función de sus preferencias.
Configuración de entradas #
Ir a Datos del producto > Configuración de entradas
Establezca el Tema del billete, logotipo y imagen de cabecera. También puede cambiar el asunto del correo electrónico del ticket utilizando el botón Asunto del billete campo.
campo. Si desea transmitir información adicional que sólo podrán ver los asistentes, puede utilizar el campo Cuerpo del billete de correo electrónico campo para conseguirlo.
Habilite los siguientes ajustes de ticket según sea necesario:
- Activado - ¿Mostrar los datos del comprador o del asistente en el billete?
- Activado - Mostrar datos personalizados de los asistentes en la entrada (opcional)
- Activado - Mostrar la opción "Añadir al calendario" en el ticket (opcional)
- Activado - Adjuntar un archivo ICS de calendario al correo electrónico del ticket (opcional)
- Activado - Mostrar fecha y hora en el ticket (opcional)
- Activado - Mostrar código de barras en el billete (opcional)
- Activado - ¿Mostrar el precio en el billete? (opcional)
- Activado - ¿Enviar la entrada por correo electrónico al asistente en lugar de al comprador?
- Activado - ¿Billetes por correo electrónico?
Campos personalizados para los asistentes #
Requiere el FooEvents Campos de asistente personalizados plugin.
Ir a Datos del producto > Campos personalizados para los asistentes
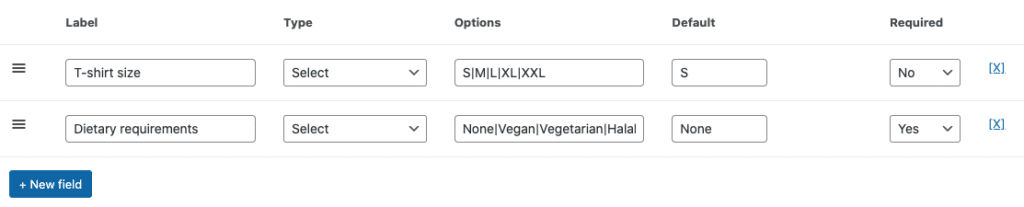
Cree campos personalizados para los asistentes según sea necesario. Los campos del asistente se mostrarán en la página de pago y se pueden completar para cada asistente individual. Los campos personalizados de los asistentes también se mostrarán en la información de la entrada del asistente, que se puede ver en el área de administración de WordPress y en la sección FooEvents Check-ins apps.
Una vez que haya revisado todos los ajustes, puede Guardar y Publique su evento. A continuación, debería ser visible en el front-end de su sitio web.
Disposición de la tabla de variaciones #
Por defecto, WooCommerce mostrará las variaciones en un campo desplegable en la página del producto:

Utilizando este fragmentopuede cambiar el comportamiento predeterminado de la página del producto y mostrar las variaciones en un diseño de tabla.
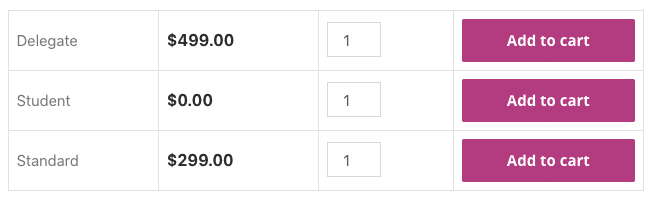
Importante: Estos fragmentos se proporcionan como cortesía y no forman parte de la oferta de productos de FooEvents. Se consideran personalizaciones y no cuentan con el soporte oficial de FooEvents. Por lo tanto, no proporcionamos soporte para fragmentos y personalizaciones de acuerdo con nuestra política de personalización. Condiciones de uso. Utilícelos bajo su propia responsabilidad.
Utilización
Similar a este ejemplo de demostraciónAhora sus clientes podrán seleccionar uno o varios tipos de entradas y añadirlas a su cesta. A continuación, podrán pasar por caja, donde se les pedirá que rellenen los campos correspondientes a la información de facturación y a los asistentes.
Entradas #
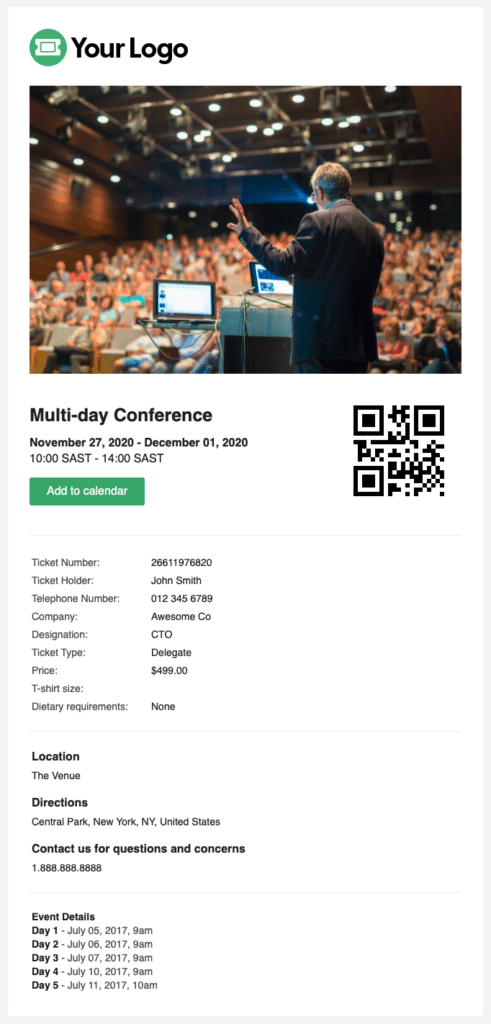
Una vez que se haya completado el pago y el estado del pedido haya cambiado a Completadose generarán tickets y se enviarán a cada uno de los asistentes. En función de los ajustes que se hayan habilitado, el ticket incluirá toda la información capturada de los asistentes, así como la fecha de cada día de la conferencia:
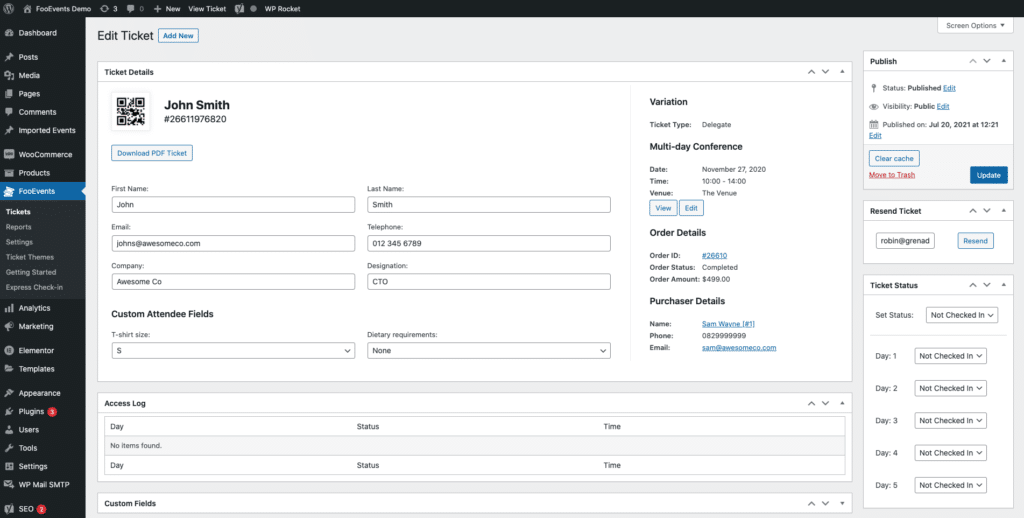
El ticket también se puede ver en el área de administración de WordPress. Vaya a su Área de administración de WordPress > FooEvents > Entradas y seleccione el billete correspondiente:
Exportación de asistentes #
Puede exportar un archivo CSV para cada evento, que incluye todos números de billete, campos personalizados de asistentes, datos de entrada/salidacomprador y datos de los asistentes. A continuación, el CSV puede importarse a su sistema CRM.
También puede utilizar una solución como Fusión WPque ofrece una integración con FooEvents que le permite añadir dinámicamente asistentes a eventos como contactos a su CRM de elección. También puede aplicar opcionalmente etiquetas basadas en la entrada del evento adquirida.
Registro de asistentes #
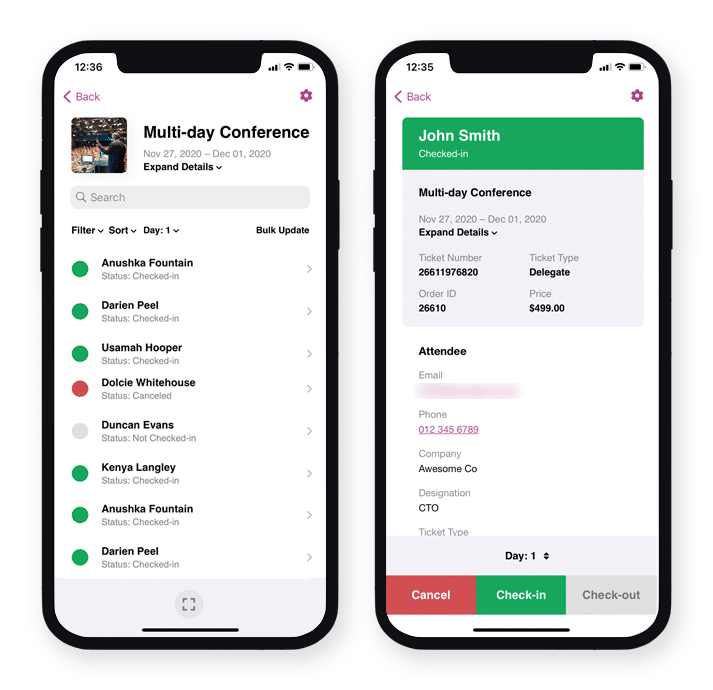
El estado de un ticket puede cambiarse de No registrado a Registrado, Cancelado o Sin pagar. Los check-ins se aplican por separado para cada día del evento. El estado de las entradas puede modificarse editando la entrada en la sección Área de administración de WordPressutilizando el Plugin FooEvents Express Check-ins o utilizando la aplicación gratuita Aplicación FooEvents Check-ins (popular).
Impresión de etiquetas identificativas #
El sistema FooEvents Constructor de artículos de papelería permite diseñar e imprimir sin esfuerzo identificadores, pulseras, entradas, chapas y etiquetas personalizadas mediante una intuitiva interfaz de arrastrar y soltar.
Preguntas y comentarios
¿Tiene alguna pregunta antes de comprar? Por favor ponerse en contacto. Si está listo para empezar, puede adquirir una licencia aquí.
¿Ya ha comprado y necesita ayuda? Póngase en contacto con nuestro equipo de asistencia