

Szenario
Ein Veranstaltungsunternehmen plant eine mehrtägige Konferenz (24. November 2020 - 01. Dezember 2020). Es hat die folgenden Anforderungen:
- 350 Eintrittskarten werden über die bestehende WordPress-Website des Veranstaltungsunternehmens unter Verwendung von WooCommerce verkauft
- Der Käufer muss eine Ticketart (Delegierter, Standard, Student oder VIP) auswählen, die den Preis des Tickets bestimmt
- Für jede Ticketart steht eine bestimmte Anzahl von Tickets zur Verfügung, insgesamt 450 Tickets
- Die Karten können von einer Einzelperson im Namen mehrerer Teilnehmer erworben werden
- Ticket-E-Mails müssen direkt an einzelne Teilnehmer gesendet werden
- Variationen müssen in einem Tabellengitterlayout angezeigt werden
- Die folgenden Felder sollten für jeden Teilnehmer erfasst werden: Vorname, Nachname, E-Mail, Telefon, Firma, Bezeichnung, T-Shirt-Größe und Ernährungsgewohnheiten
- Sobald der Kartenverkauf abgeschlossen ist, muss das Veranstaltungsunternehmen eine Liste aller Teilnehmer exportieren, die in sein CRM-System importiert werden kann.
- Die Teilnehmer müssen zu Beginn eines jeden Tages bei der Registrierung einchecken und beim Verlassen der Veranstaltung am Ausgang ausgecheckt werden (COVID-19-Vorschrift).
- Das Veranstaltungsunternehmen muss Namensschilder drucken, die den Teilnehmern bei der Registrierung ausgehändigt werden.
Hier ist ein Beispiel für ein solches Ereignis: Mehrtägige Konferenz
In diesem Hilfedokument wird die genaue Konfiguration beschrieben, die erforderlich ist, um alle oben genannten Anforderungen zu erfüllen.
Dieses Hilfedokument geht davon aus, dass Sie bereits über FooEvents und WooCommerce installiert auf einem WordPress Website und haben ein grundlegendes Verständnis davon, wie FooEvents funktioniert. Wenn Sie neu bei FooEvents sind, sollten Sie unsere Erste Schritte Leitfaden, der Ihnen den Einstieg erleichtert.
Verwendete Produkte
- FooEvents für WooCommerce
- FooEvents Benutzerdefinierte Teilnehmerfelder
- FooEvents Mehrtägig
- FooEvents Check-ins Anwendungen
Empfohlenes Bündel #
Alle Plugins, die zur Einrichtung einer Konferenz benötigt werden, können einzeln erworben werden, sind aber auch in der FooEvents Premium-Paket. Dieses Paket enthält auch die FooEvents PDF-Tickets Plugin, das häufig bei der Organisation von Konferenzen verwendet wird.
Einrichtung
Ein Ereignis erstellen #
Gehe zu Produkte > Produkt hinzufügen im Hauptmenü und füllen Sie die Standardproduktfelder wie Titel, Text, Beschreibung, Tags, Kategorien, Bild und Galerie nach Bedarf aus.
Fahren Sie fort mit dem Produktdaten Registerkarten und wählen Sie Variables Produkt von der Produkttyp Dropdown.
Attribute und Variationen #
Als Nächstes müssen wir Produktvariationen erstellen, die es den Käufern ermöglichen, zwischen verschiedenen Ticketarten zu wählen. Je nach Auswahl werden den Käufern unterschiedliche Beträge in Rechnung gestellt:
| Variation | Preis | Verfügbarkeit auf Lager |
| Delegierte | $499 | 100 |
| Standard | $299 | 200 |
| Studenten | $0 (frei) | 50 |
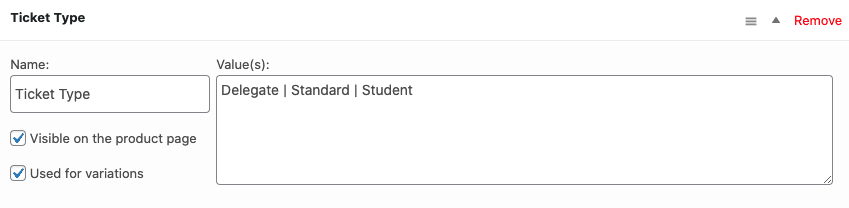
Gehe zu Produktdaten > Attribute und erstellen Sie ein Attribut namens Ticket-Typ. In der Werte geben Sie die verschiedenen Optionen an. Achten Sie darauf, das Feld Verwendet für Variationen Option und Attribute speichern.
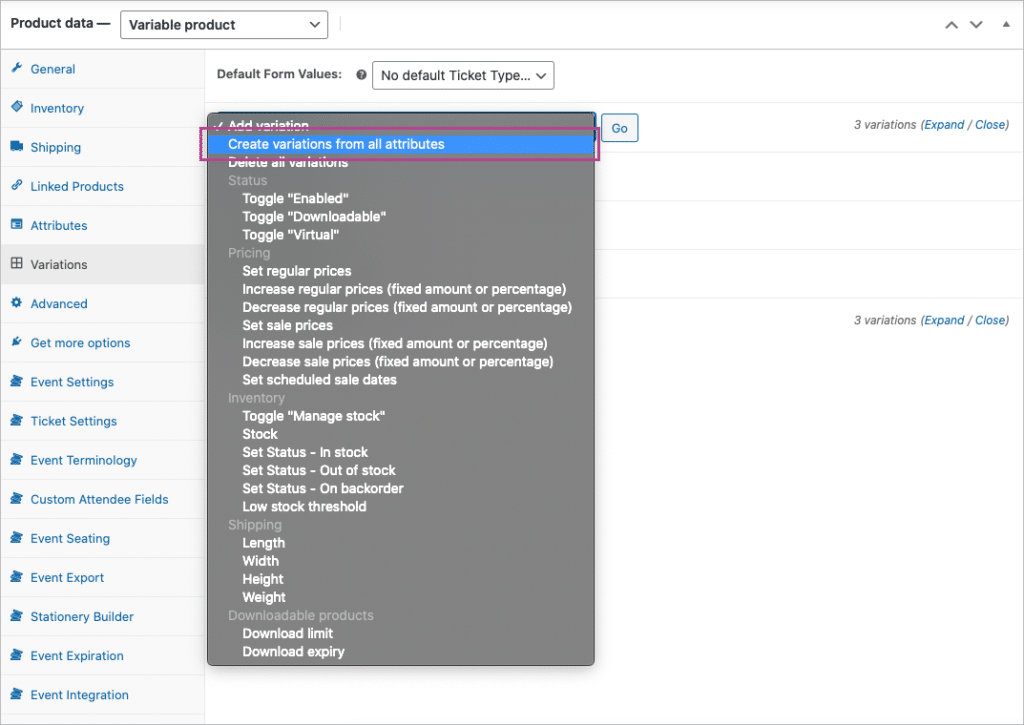
Gehe zu Produktdaten > Variationen. Verwenden Sie die Variationen aus allen Attributen erstellen um die Variationen zu erzeugen.
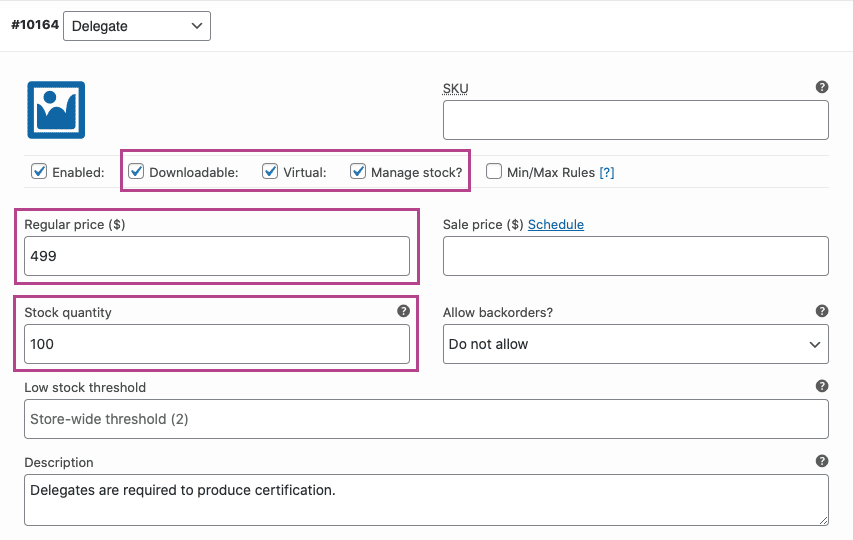
Setzen Sie jede Variation auf Virtuell und Herunterladbar und legen Sie den entsprechenden Preis fest. Aktivieren Sie die Lagerbestände verwalten und legen Sie die Anzahl der verfügbaren Tickets für jeden Ticket-Typ mit der Option Vorratsmenge Feld.
Ereignis-Einstellungen #
Gehe zu Produktdaten > Ereignis-Einstellungen
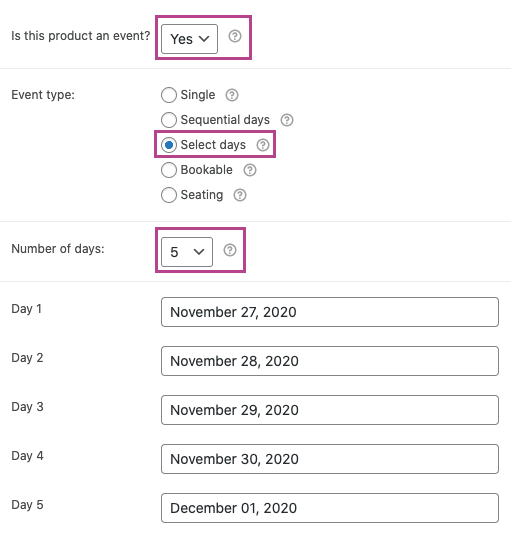
Um die Ereignisfunktionalität zu aktivieren, setzen Sie den 'Ist dieses Produkt ein Ereignis?Dropdown zu 'Ja'.
Die folgenden mehrtägigen Optionen werden von der FooEvents Mehrtägig Plugin.
Für mehrtägige Veranstaltungen können Sie den Veranstaltungstyp entweder auf Sequentielle Tage oder Tage auswählen:
- Sequentielle Tage - Ereignisse, die sich über mehrere Tage erstrecken und sich an einer bestimmten Anzahl aufeinander folgender Tage wiederholen.
- Tage auswählen - Ereignisse, die sich über mehrere Kalendertage wiederholen.
Für dieses Beispiel werden wir die Tage auswählen Option. Wählen Sie dann die Anzahl der Tage, an denen das Ereignis stattfinden soll, und legen Sie das Datum für jeden Tag fest.
Aktivieren Sie alle der folgenden Optionen, um sicherzustellen, dass individuelle Teilnehmerinformationen erfasst werden:
- Aktiviert - Erfassen Sie den vollständigen Namen und die E-Mail-Adresse des Teilnehmers?
- Aktiviert - Erfassen Sie die Telefonnummer des Teilnehmers (optional).
- Aktiviert - Erfassen Sie den Firmennamen des Teilnehmers (optional).
- Aktiviert - Erfassen Sie die Teilnehmerbezeichnung? (fakultativ)
Optionen, die sich auf Buchungen beziehen, können ignoriert werden, und die übrigen Optionen können nach Ihren Wünschen eingestellt werden.
Ticket-Einstellungen #
Gehe zu Produktdaten > Ticket-Einstellungen
Stellen Sie die entsprechenden Ticket-Thema, Logo und Kopfzeilenbild. Sie können auch den Betreff der Ticket-E-Mail ändern, indem Sie die Betreff der Ticket-E-Mail Feld.
Feld. Wenn Sie zusätzliche Informationen übermitteln möchten, die nur für die Teilnehmer sichtbar sind, können Sie das Feld Text der Ticket-E-Mail Feld, um dies zu erreichen.
Aktivieren Sie bei Bedarf die folgenden Ticketeinstellungen:
- Aktiviert - Angaben zum Käufer oder Teilnehmer auf dem Ticket anzeigen?
- Aktiviert - Benutzerdefinierte Teilnehmerdetails auf dem Ticket anzeigen? (optional)
- Aktiviert - Anzeige der Option "Zum Kalender hinzufügen" auf dem Ticket? (optional)
- Aktiviert - Kalender-ICS-Datei an die Ticket-E-Mail anhängen? (optional)
- Aktiviert - Datum und Uhrzeit auf dem Ticket anzeigen? (optional)
- Aktiviert - Barcode auf dem Ticket anzeigen? (optional)
- Aktiviert - Preis auf dem Ticket anzeigen? (optional)
- Aktiviert - E-Mail-Ticket an Teilnehmer statt an Käufer?
- Aktiviert - E-Mail-Tickets?
Benutzerdefinierte Teilnehmerfelder #
Erfordert die FooEvents Benutzerdefinierte Teilnehmerfelder Plugin.
Gehe zu Produktdaten > Benutzerdefinierte Teilnehmerfelder
Erstellen Sie bei Bedarf benutzerdefinierte Teilnehmerfelder. Die Teilnehmerfelder werden auf der Kassenseite angezeigt und können für jeden einzelnen Teilnehmer ausgefüllt werden. Benutzerdefinierte Teilnehmerfelder werden auch in den Ticketinformationen des Teilnehmers angezeigt, die im WordPress-Verwaltungsbereich und in der FooEvents Check-ins Anwendungen.
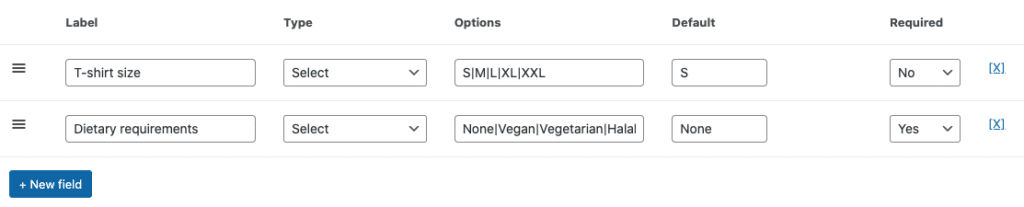
Wenn Sie alle Einstellungen überprüft haben, können Sie Speichern Sie und veröffentlichen. Ihre Veranstaltung. Sie sollte dann auf dem Front-End Ihrer Website sichtbar sein.
Layout der Variationstabelle #
Standardmäßig zeigt WooCommerce Variationen in einem Dropdown-Feld auf der Produktseite an:

Verwendung von dieser Ausschnittkönnen Sie das Standardverhalten der Produktseite ändern und Varianten in einem Tabellenlayout anzeigen.
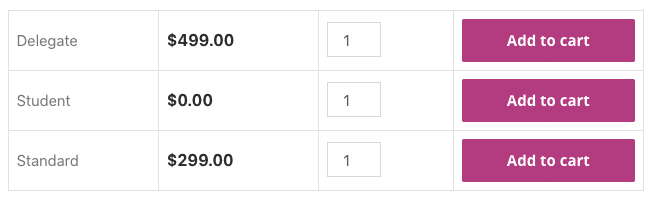
Das ist wichtig: Diese Snippets werden aus Höflichkeit zur Verfügung gestellt und sind nicht Teil des FooEvents-Produktangebots. Sie gelten als Anpassungen und werden nicht offiziell von FooEvents unterstützt. Daher bieten wir keinen Support für Snippets und Anpassungen im Sinne unserer Bedingungen der Dienstleistung. Die Verwendung erfolgt auf eigene Gefahr.
Verwendung
Ähnlich wie dieses Demo-Beispielkönnen Ihre Kunden nun eine oder mehrere Ticketarten auswählen und in den Warenkorb legen. Sie können dann zur Kasse gehen, wo sie die entsprechenden Rechnungsinformationen und Teilnehmerfelder ausfüllen müssen.
Eintrittskarten #
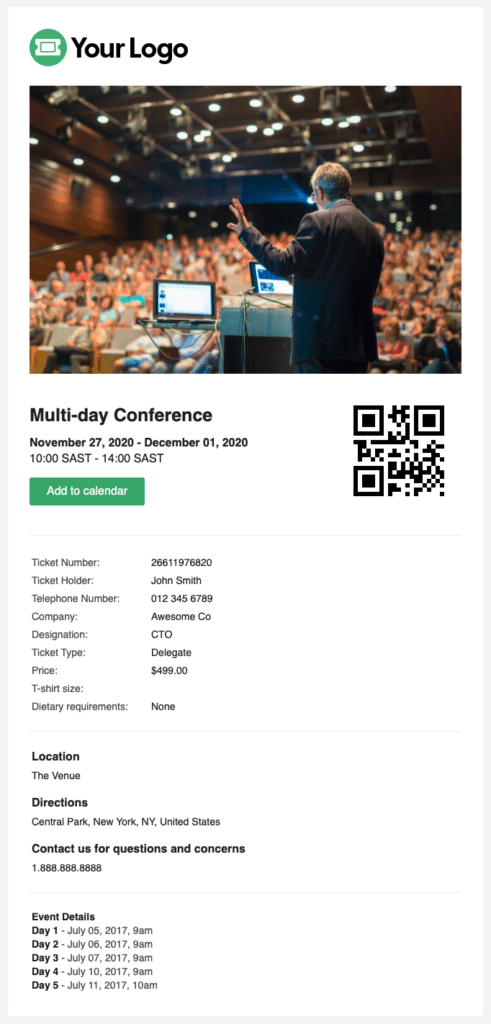
Sobald die Zahlung abgeschlossen ist und der Status der Bestellung auf Abgeschlossenwerden Tickets erstellt und an jeden einzelnen Teilnehmer gesendet. Basierend auf den Einstellungen, die aktiviert wurden, enthält das Ticket alle erfassten Teilnehmerinformationen sowie das Datum jedes Konferenztages:
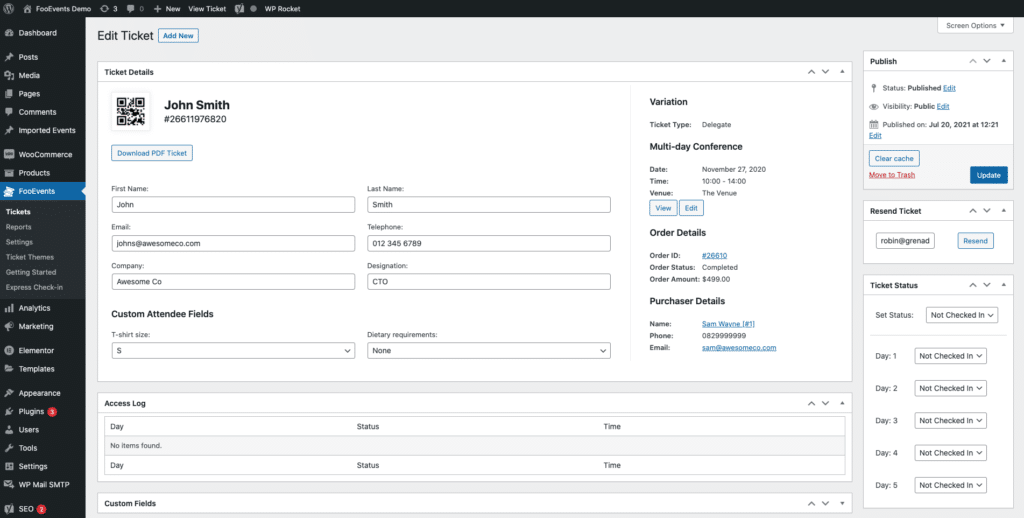
Das Ticket kann auch im Verwaltungsbereich von WordPress eingesehen werden. Gehen Sie zu Ihrem WordPress Verwaltungsbereich > FooEvents > Eintrittskarten und wählen Sie das entsprechende Ticket aus:
Teilnehmer exportieren #
Sie können eine CSV-Datei exportieren für jedes Ereignis, das alle Ticketnummern, benutzerdefinierte Teilnehmerfelder, Check-in/Check-out-DatenKäufer und Teilnehmerdetails. Die CSV-Datei kann dann in Ihr CRM-System importiert werden.
Alternativ können Sie eine Lösung wie die folgende verwenden WP Fusiondie eine Integration mit FooEvents bietet, die es Ihnen ermöglicht, Veranstaltungsteilnehmer dynamisch als Kontakte zu Ihrem CRM der Wahl hinzuzufügen. Sie können auch optional Tags auf der Grundlage des gekauften Veranstaltungstickets anwenden.
Teilnehmer-Check-ins #
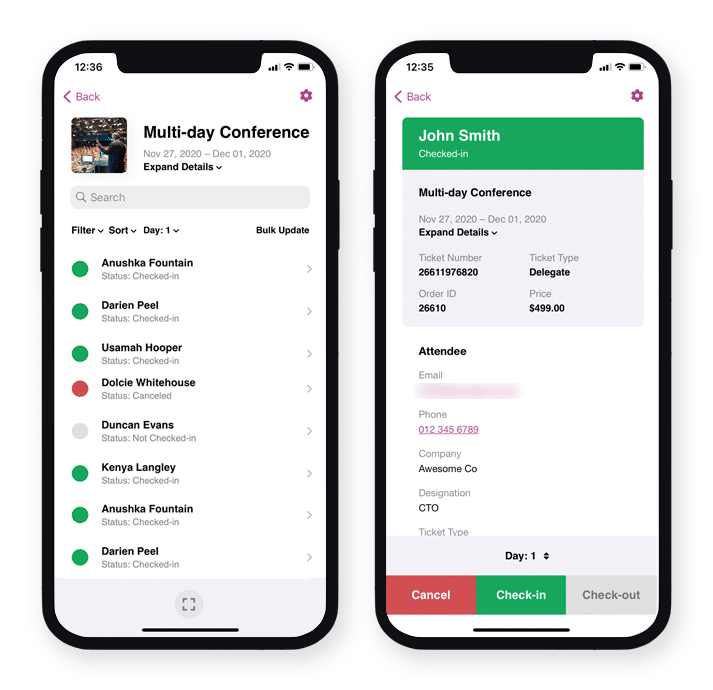
Der Status eines Tickets kann geändert werden von Nicht eingecheckt zu Eingecheckt, Abgesagt oder Unbezahlt. Check-ins werden für jeden Tag der Veranstaltung separat angewendet. Der Status des Check-ins kann durch Bearbeiten des Tickets in der WordPress Verwaltungsbereichunter Verwendung der FooEvents Express Check-ins Plugin oder durch die Verwendung des kostenlosen FooEvents Check-ins App (populär).
Namensschilder drucken #
Die eingebaute FooEvents Schreibwarenhersteller ermöglicht das mühelose Entwerfen und Drucken von individuellen Namensschildern, Armbändern, Tickets, Ansteckern und personalisierten Etiketten über eine intuitive Drag & Drop-Oberfläche.
Fragen und Feedback
Haben Sie eine Frage, bevor Sie kaufen? Bitte sich melden. Wenn Sie bereit sind, loszulegen, können Sie eine Lizenz erwerben hier.
Sie haben bereits gekauft und benötigen Unterstützung? Kontakt zu unserem Support-Team