
If your site contains a large number of events or has accumulated many tickets over time, you can control which events and tickets are made available to the FooEvents Check-ins app.
These settings can help keep the app focused on relevant events, reduce the amount of data that needs to be loaded, and improve loading times and overall performance.
In your WordPress admin area, go to:
FooEvents > Settings > Check-ins App
There are two settings that can be used to control what is available in the app:
- Event listing options controls which events users can see in the Check-ins app.
- Tickets loaded controls which tickets are returned to the app based on when the tickets were generated.
Event listing options
The Event listing options setting lets you control which events are displayed to users in the Check-ins app.
You can choose from the following options:
Show all events
All FooEvents events will be available to the signed-in user. Default option provides the Check-in app with access to all events on your website.
Only show events created by the signed-in user
Users will only see events that were created by their WordPress user account.
This is useful when different users or event organizers manage their own events on the same website and should only have access to the events they are responsible for.
For example, if several organizers use the same WordPress installation, each organizer can sign in to the Check-ins app using their own WordPress account and only see the events they created.
Only show the following events
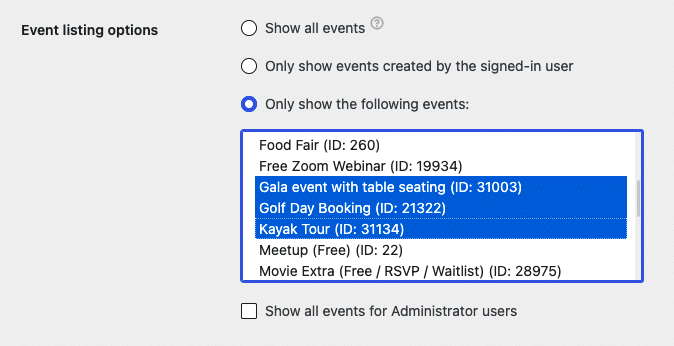
This option lets you explicitly choose which events should be available in the Check-ins app.
A multi-select event list will be displayed where you can select one or more events.
This is useful when Check-ins app users should only have access to a specific group of events, regardless of who created them.
For example, you could give check-in staff access only to the events they are working on while keeping other events on the website hidden from them.
Show all events for Administrator users
Enable Show all events for Administrator users if users with the WordPress Administrator role should always have access to all events in the Check-ins app.
When enabled, the selected event listing restrictions will continue to apply to other users, while Administrators will be able to see all events.
This is useful when event staff should have restricted access but site administrators still need full access for management, testing, or troubleshooting.
Tickets loaded
The Tickets loaded setting controls how many historical tickets are returned to the FooEvents Check-ins app.
Over time, a site can accumulate thousands of tickets from previous events. Loading all of these tickets into the app may be unnecessary and can increase the amount of data that needs to be transferred and processed.
By limiting tickets according to when they were generated, you can prevent older tickets from being returned to the app while continuing to load tickets for current events. This can reduce loading times and improve overall Check-ins app performance, particularly on sites with a long event history.
Important: This setting uses the ticket creation date, not the event date. This allows FooEvents to use built-in WordPress queries and database indexes, ensuring tickets are filtered efficiently with minimal impact on your server’s resources.
Selecting how far back tickets should be loaded
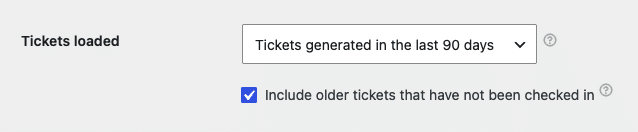
You can choose from the following options:
- All tickets
- Tickets generated in the last 30 days
- Tickets generated in the last 90 days
- Tickets generated in the last 180 days
- Tickets generated in the last 12 months
- Tickets generated in the last 18 months
- Tickets generated in the last 24 months
The selected option limits the tickets returned to the Check-ins app based on the date each ticket was generated.
For example, if you select Tickets generated in the last 90 days, tickets generated more than 90 days ago will normally not be returned to the Check-ins app.
Choosing the correct time period
It is important to select a period that covers any tickets that could still be valid for your current or upcoming events.
Because this setting uses the ticket creation date rather than the event date, you should take into account how far in advance customers are able to purchase tickets.
For example, if customers can purchase tickets six months before an event takes place, selecting Tickets generated in the last 90 days could exclude valid tickets that were purchased earlier.
When in doubt, choose a longer period.
Include older tickets that have not been checked in
As an additional safeguard, you can enable Include older tickets that have not been checked in.
When enabled, tickets that fall outside the selected time period will still be returned to the app if they have not yet been checked in.
For example, if the app is configured to load tickets generated in the last 90 days but a valid ticket for an upcoming event was generated four months ago, the ticket will still be loaded provided it has not already been checked in.
This fallback helps ensure that valid tickets generated before the selected cutoff are not accidentally excluded.
Keep in mind that unchecked tickets from older events will also be included. If your site contains a large number of historical tickets that were never checked in, these tickets may still be returned to the app.
Recommended approach for repeat events
The best way to ensure that only relevant tickets need to be loaded is to create a new WooCommerce event product for each event, rather than continually changing the date and reusing an existing event product.
For example, if you run the same event every month, create a separate event product for each occurrence instead of updating the date on the previous event.
This helps:
- Keep tickets associated with the correct event.
- Prevent large numbers of historical tickets from accumulating against a single event.
- Make it easier to restrict Check-ins app users to relevant events.
- Keep event management and reporting properly separated.
If your events are very similar, you do not need to configure each new event from scratch.
When creating the new event, use the Copy settings from another event option in the Event Details tab, to copy the FooEvents configuration from your previous event. You can then simply update the relevant event date and time settings.
Using separate event products together with the Event listing options and Tickets loaded settings provides the cleanest way to keep the Check-ins app focused on the events and tickets your team actually needs.
 English
  German
  Dutch
Dutch  Spanish
  Italian
  Portuguese
  French
  Polish
  Czech
Czech  Greek
Greek