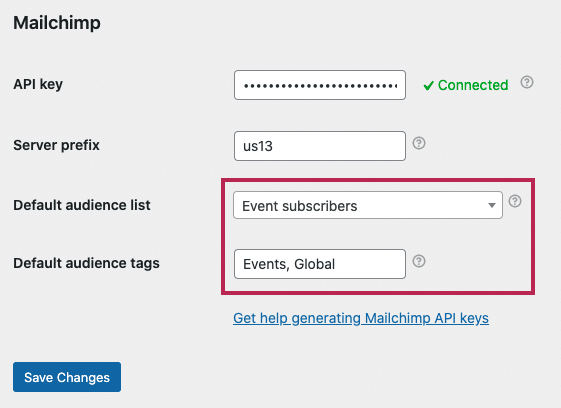
FooEvents includes the ability to automatically add attendees to a Mailchimp audience list when tickets are generated. You can also specify default tags or event-specific tags that can be used to segment your Mailchimp list.
Sections #
- Before you start
- Connecting FooEvents to Mailchimp
- Setting the Mailchimp API key
- Setting the Mailchimp server prefix
- Save the Mailchimp settings and check the connection
- Setting the default Mailchimp audience list and tags
- Setting a different Mailchimp audience list and tags for each event
Before you start
It’s important that your FooEvents for WooCommerce plugin is up-to-date on your site and that the Capture attendee full name and Capture attendee email address options are enabled in your product event settings tab, otherwise attendees will not be added as contacts in Mailchimp, even if everything described in the next steps is entered correctly.
Connecting FooEvents to Mailchimp
In order to connect FooEvents to Mailchimp, you will need to generate a Mailchimp API key (20+ character string) and set the Mailchimp server prefix.
This is a once-off process and should take you less than 5 minutes.
Setting the Mailchimp API key
- Login to your Mailchimp account
- Go to the Account > Extras > API Keys
- Copy an existing API key or click the Create a Key button
- Copy the relevant API key field
- Login to your site and go to FooEvents > Settings > Integration and scroll down to the Mailchimp section
- Paste the copied API key in the Mailchimp API key field
- Next, enter your Mailchimp server prefix (see next section below)
Read the Mailchimp About API Keys help document for further details.
Setting the Mailchimp server prefix
- Login to your Mailchimp account and check the URL in your web browser
- Copy the parameter that comes immediately after “https://” in the browser address bar e.g. the server prefix is “us13” in https://us13.admin.mailchimp.com/
- Login to your site and go to FooEvents > Settings > Integration and scroll down to the Mailchimp section
- Enter the server prefix in the Mailchimp server prefix field
Save the Mailchimp settings and check the connection
Once you have entered both the Mailchimp API key and Mailchimp server, save the settings by clicking the Save Changes button.
If FooEvents is able to connect to your Mailchimp account, a green ‘Connected‘ message will display alongside the Mailchimp API key field. If the ‘Connected‘ message does not display, please check that you have entered the Mailchimp API key and Mailchimp server prefix correctly.
Setting the default Mailchimp audience list and tags
- Login to your site and go to FooEvents > Settings > Integration and scroll down to the Mailchimp section
- Select a default audience from the Default Mailchimp list dropdown field. This is the list where you would like the attendees of all your events to be automatically added as contacts in Mailchimp. This can be overridden for each product (event) through the Event Integration settings. Note: The audience must first be setup in your Mailchimp account.
- Specify the Default Audience tags as comma-separated values (,). These will be associated with the attendees of all your events when they are automatically added as contacts in Mailchimp. This can be overridden for each product (event) through the Event Integration settings.
- Save the settings by clicking the Save Changes button
Setting a different Mailchimp audience list and tags for each event
The default Mailchimp audience list and tags will be used as outlined in the section above but they can be overridden at an event level.
- Edit the WooCommerce product that you have setup as an event and navigate to the Event Integration tab
- Note: This Mailchimp section will only display if you have connected FooEvents to Mailchimp. If you do not see the Mailchimp settings, please ensure that you have correctly connected FooEvents to Mailchimp.
- In order to add attendee details to a Mailchimp list, you will need to capture attendee details at checkout. If this setting is not enabled, go to Event Settings and enable the Capture attendee full name and email address? option.
- Select an audience from the Audience list dropdown field. This is where you would like the attendees of this event to be automatically added as contacts in Mailchimp. Note: The audience must first be setup in your Mailchimp account.
- Specify tags in the Audience tags field as comma-separated values (,) which you would like to be associated with all the attendees of this event when they are automatically added as contacts in Mailchimp.
- Save the product


