The FooEvents for WooCommerce plugin includes the FooEvents Stationery Builder which makes it possible to effortlessly design and print custom name tags, wristbands, tickets, badges and personalized labels through an intuitive drag & drop interface.
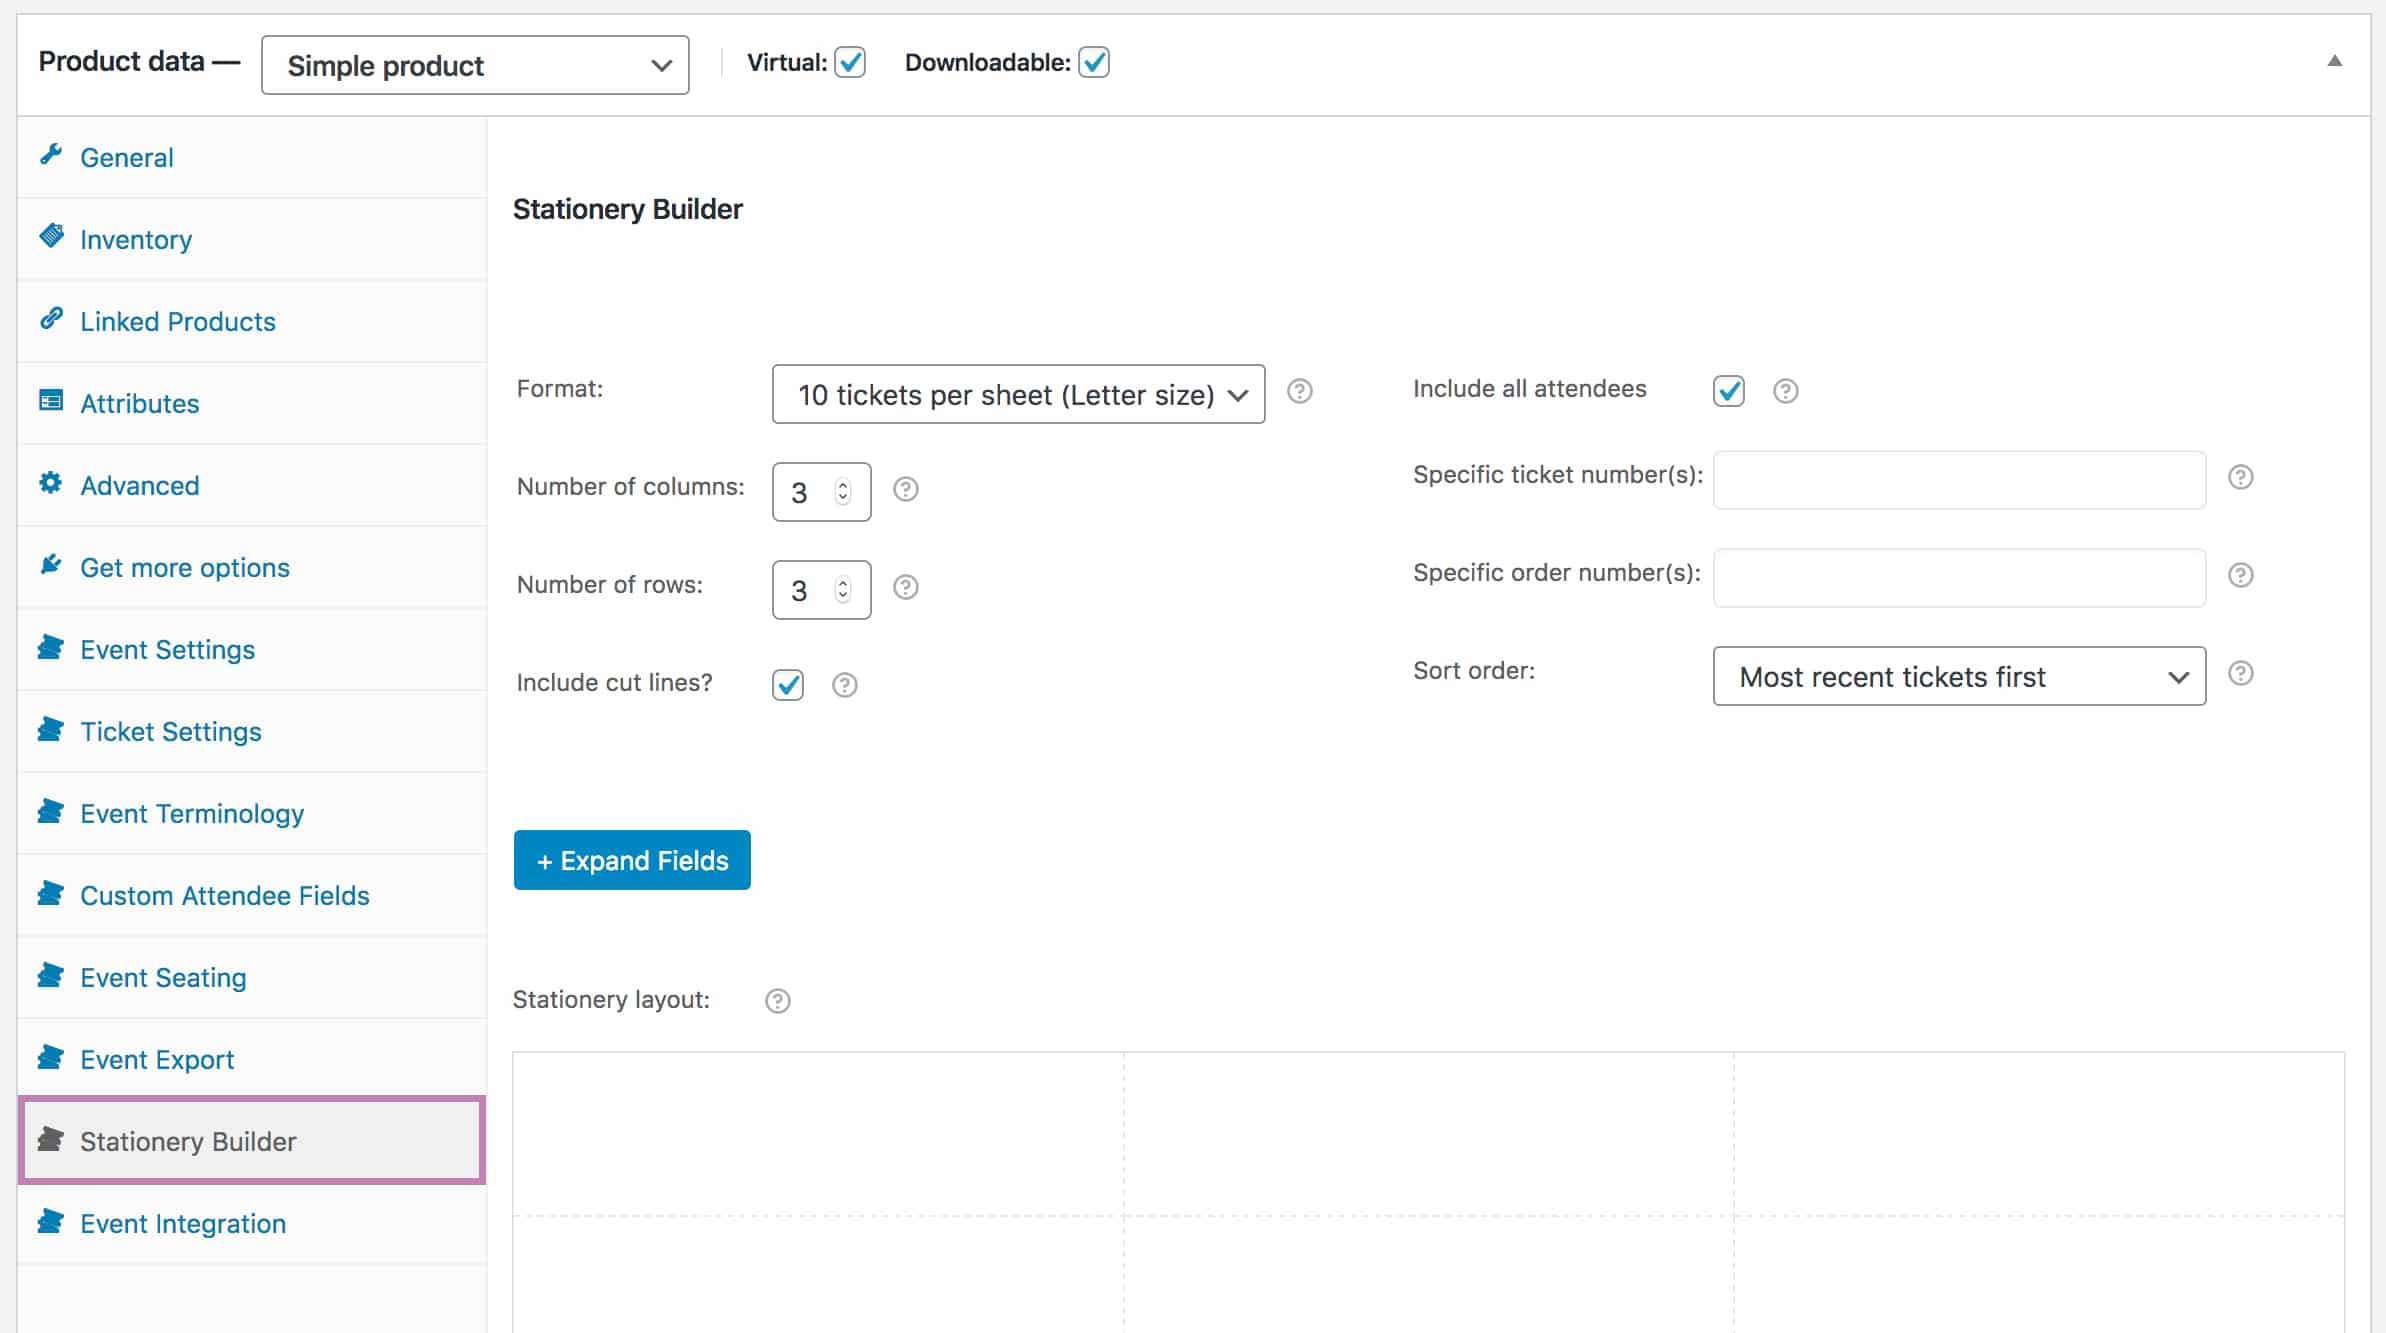
You can customize the layout by choosing a pre-defined format with the number of tickets to be printed on each page. Selecting a format from the list will automatically adjust the “Number of rows” and “Number of columns” fields in the layout block to the recommended configuration for the specific format that you have selected. It’s also possible to adjust the number of rows and columns manually and override the default settings should you wish.
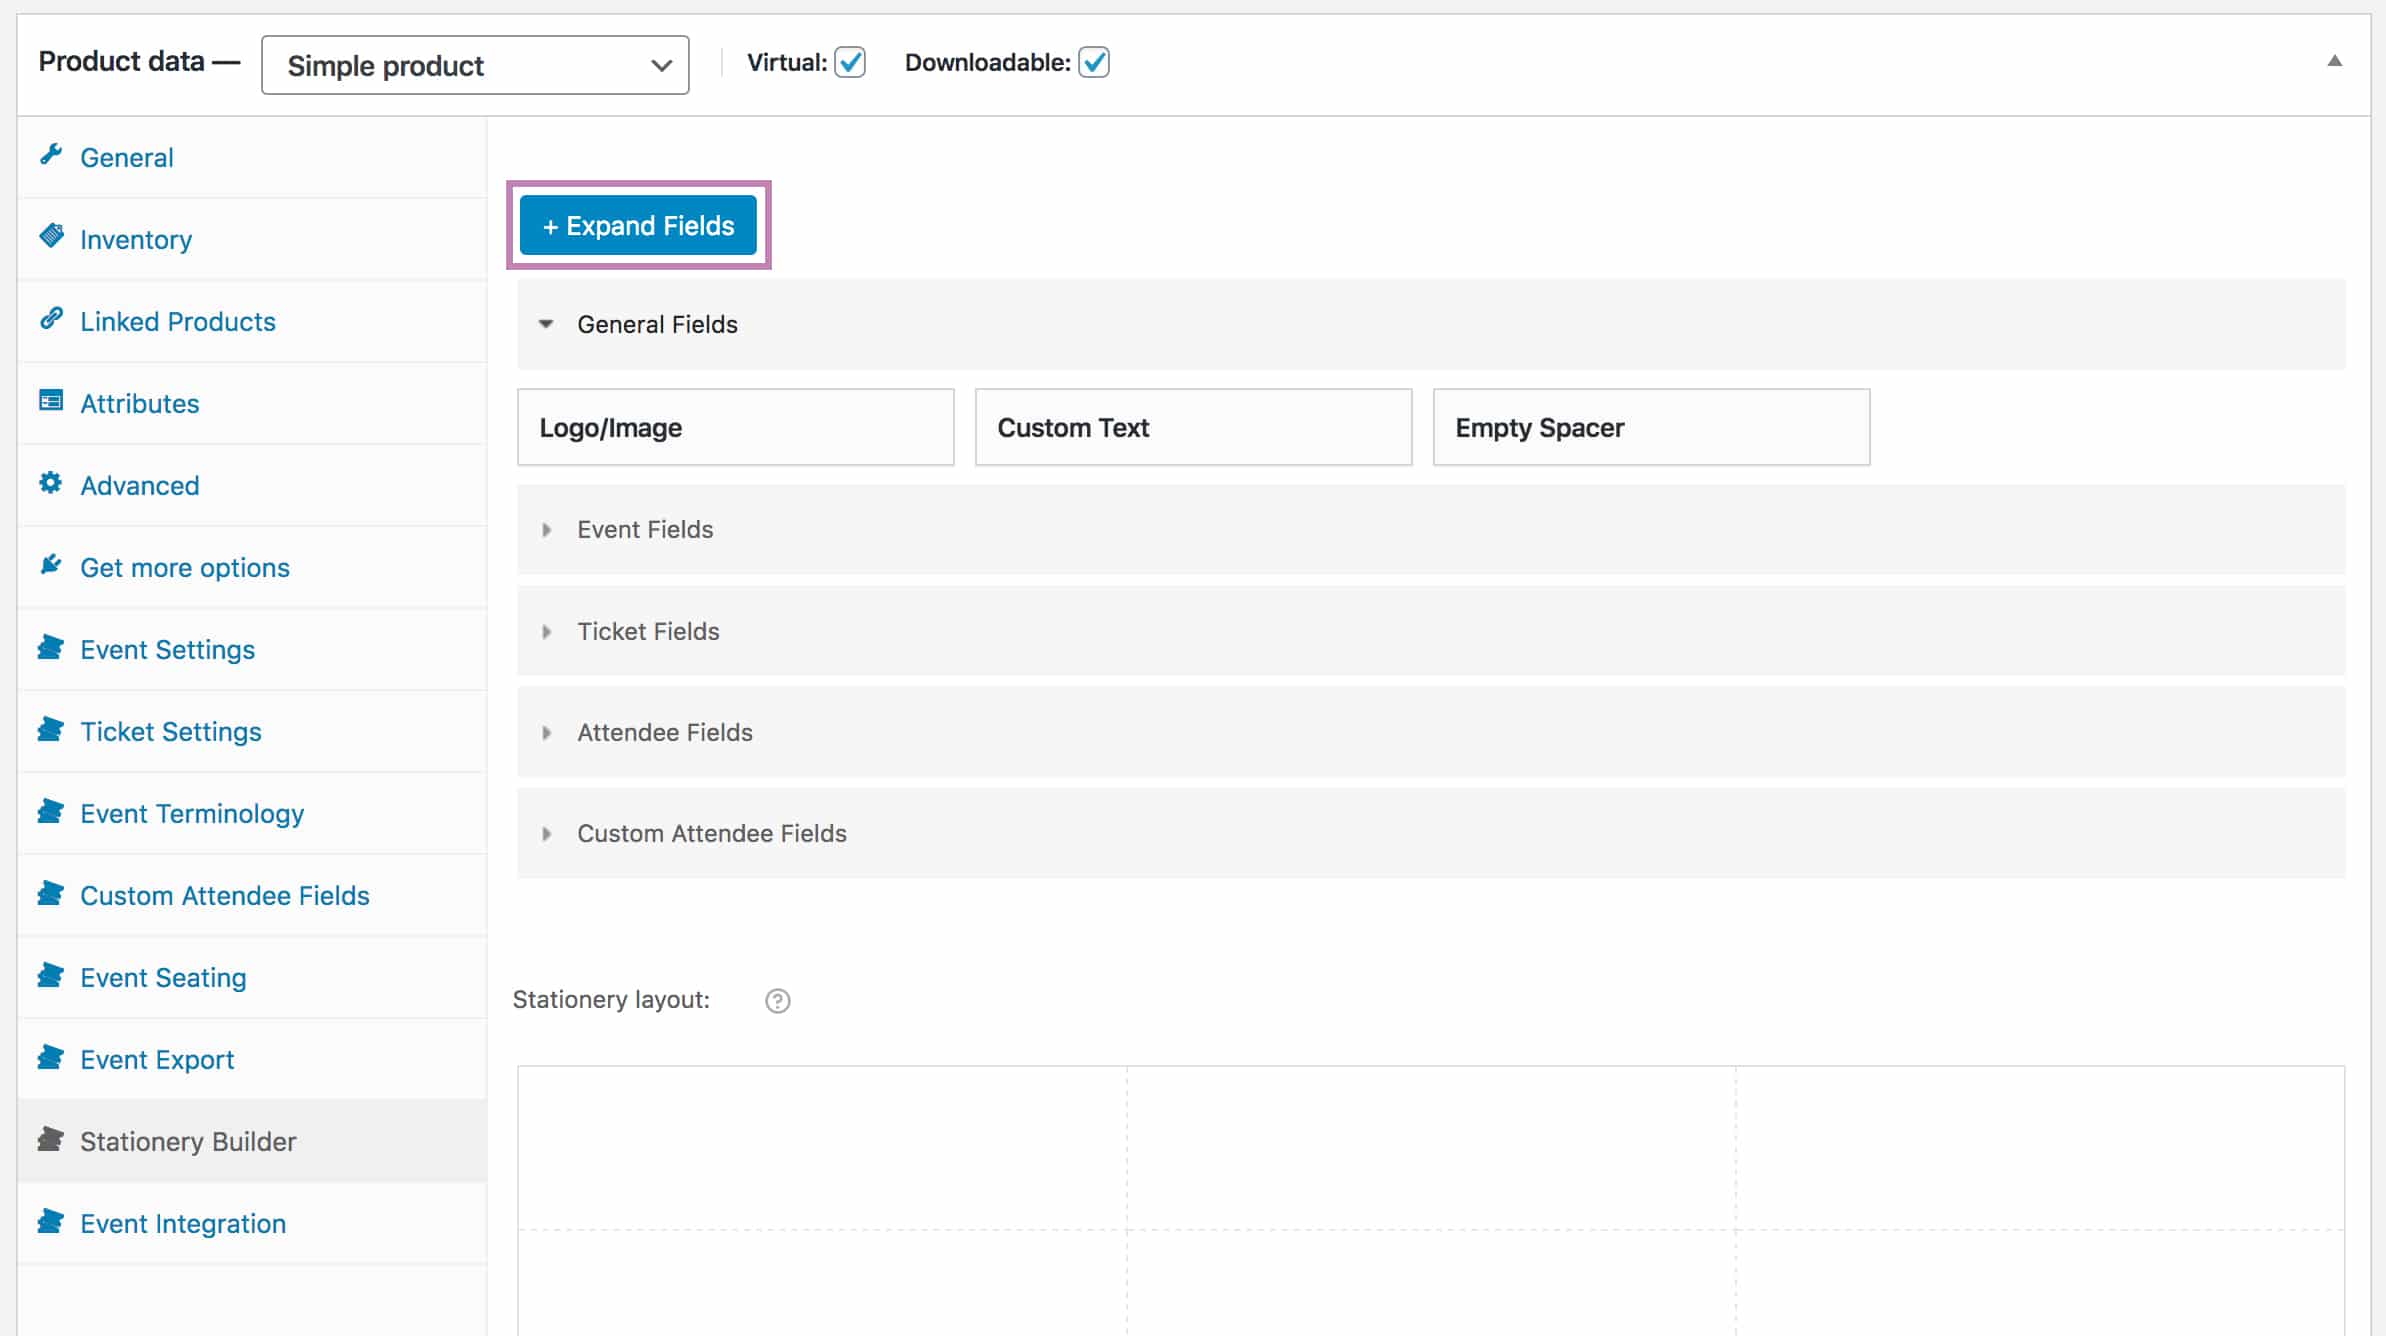
The drag & drop interface lets you insert standard event and attendee details as well as custom attendee fields into your stationery:
- General Fields
- Logo/Image
- Custom Text
- Empty Spacer
- Event Fields
- Event Name Only
- Event Name/Variation
- Variation Only
- Event Location
- Ticket Fields
- Barcode
- Ticket Number
- Attendee Fields
- Attendee Name
- Attendee Email
- Attendee Phone
- Attendee Company
- Attendee Designation
- Attendee Seat
- Custom Attendee Fields
Based on your design, the FooEvents Stationery Builder will generate a print-friendly, PDF file that can be printed on standard paper or cardboard, so that you can cut them out with scissors or a guillotine using the handy print cut line feature, or on popular label and badge stationery from Avery and Microsoft. The exported file will contain stationery for all the event attendees or you can insert specific order or ticket numbers which is useful for walk-ins.
Requirements #
-
- FooEvents for WooCommerce plugin (1.11.35+)
Setup & Usage #
- Login to your WordPress Admin Area
- Click on Products > Edit Product
- Go to the Product Data tab
- Select the Stationery Builder tab
- Choose the required stationery format (click here to see a list of all the sizes and formats currently available)
- When you select a format from the list it will automatically adjust the “Number of rows” and “Number of columns” fields in the layout block to the recommended configuration for the specific format that you have selected or you can adjust the number of rows and columns manually
- Select if you would like print cut lines to be displayed (Note: If you are using label sheets you can deselect this option, but if you are printing the stationery on paper or cardboard, you can select this option to assist with cutting and trimming)
- Select which tickets to print:
- Selecting Include all attendees will generate the chosen stationery for all the attendees of the event
- Deselecting Include all attendees will enable you to print specific tickets or tickets associated with specific orders only
- Insert the ticket numbers that you would like included in the Specific ticket number(s) field. You can separate multiple ticket numbers with commas (,). To find ticket numbers, navigate to FooEvents > Tickets and you will see the ticket number in the first column under “Title”. Do not include the “#” when adding ticket numbers in this field.
- Type the specific order numbers that you would like included in the Specific order number(s) field. You can separate multiple order numbers with commas (,). To find order numbers, navigate to WooCommerce > Orders and you will see the order number in the first column under “Order”. Do not include the “#” when adding order numbers in this field.
- Choose an option in the Sort order list to generate the tickets in a specific order
- Click on the Expand Fields button to see all the fields that are available to be dragged in the layout blocks
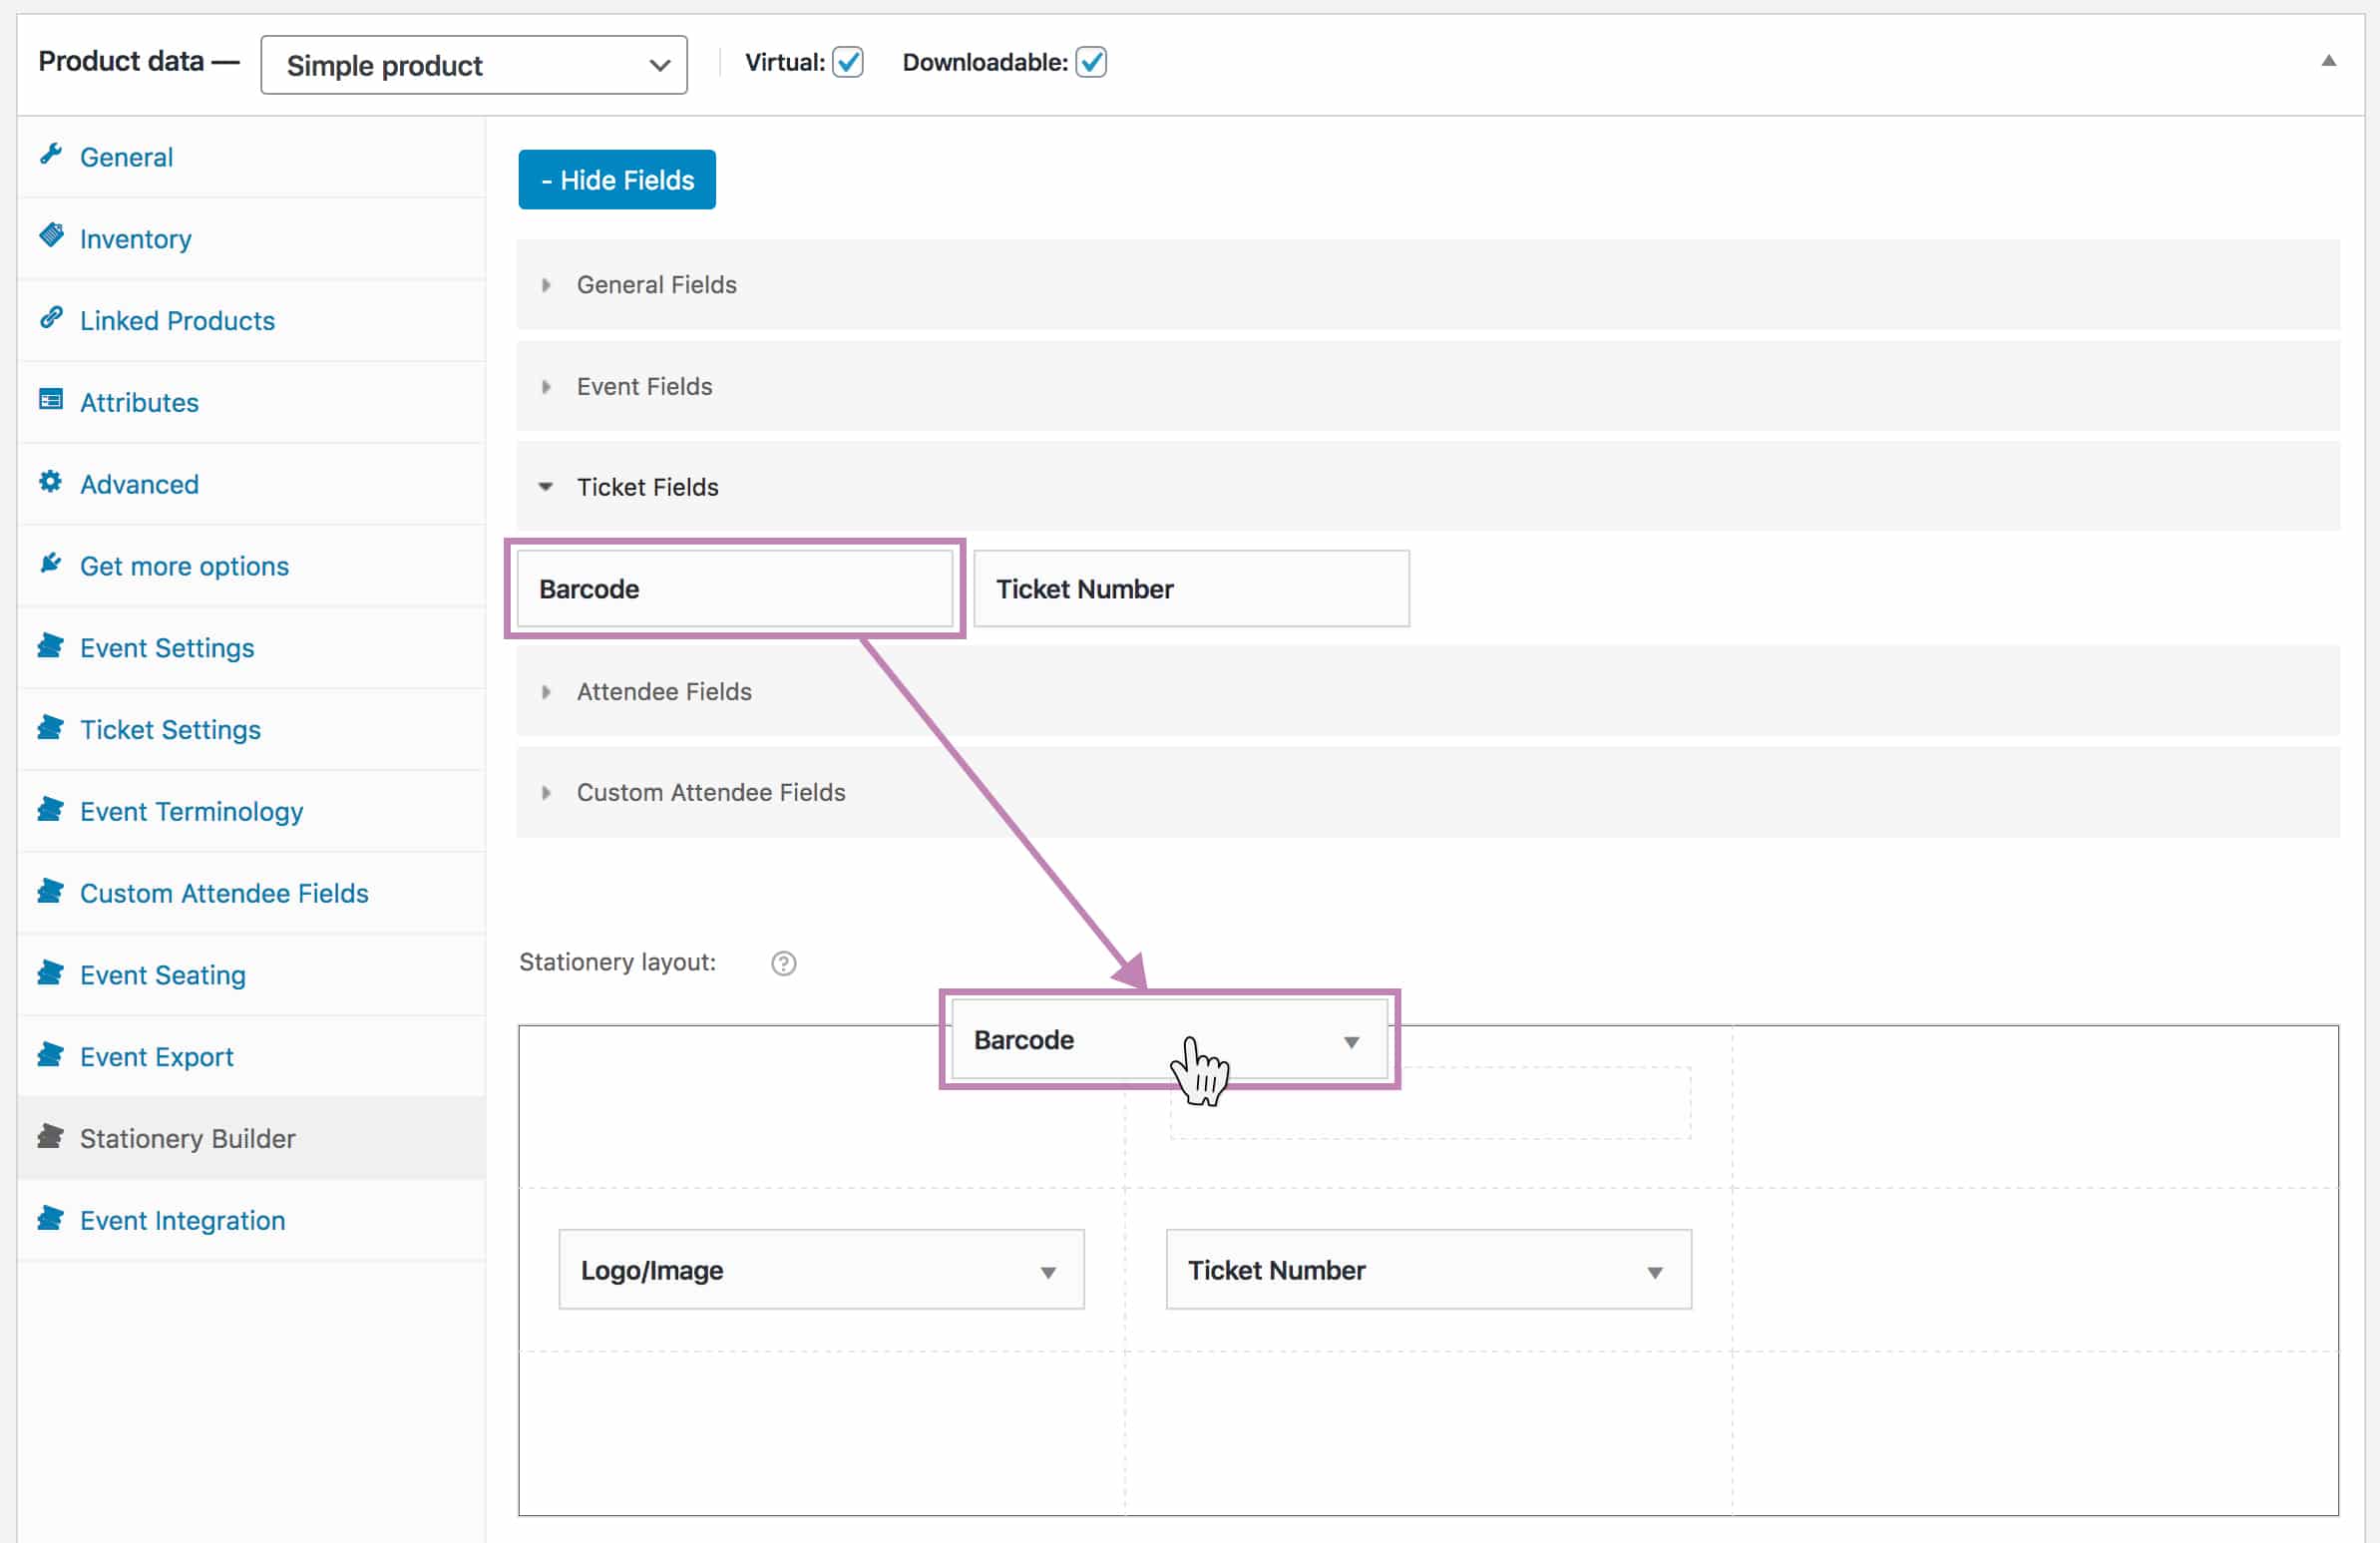
- Drag the fields to the empty layout blocks in the Stationery layout area in order to display those fields in the corresponding position
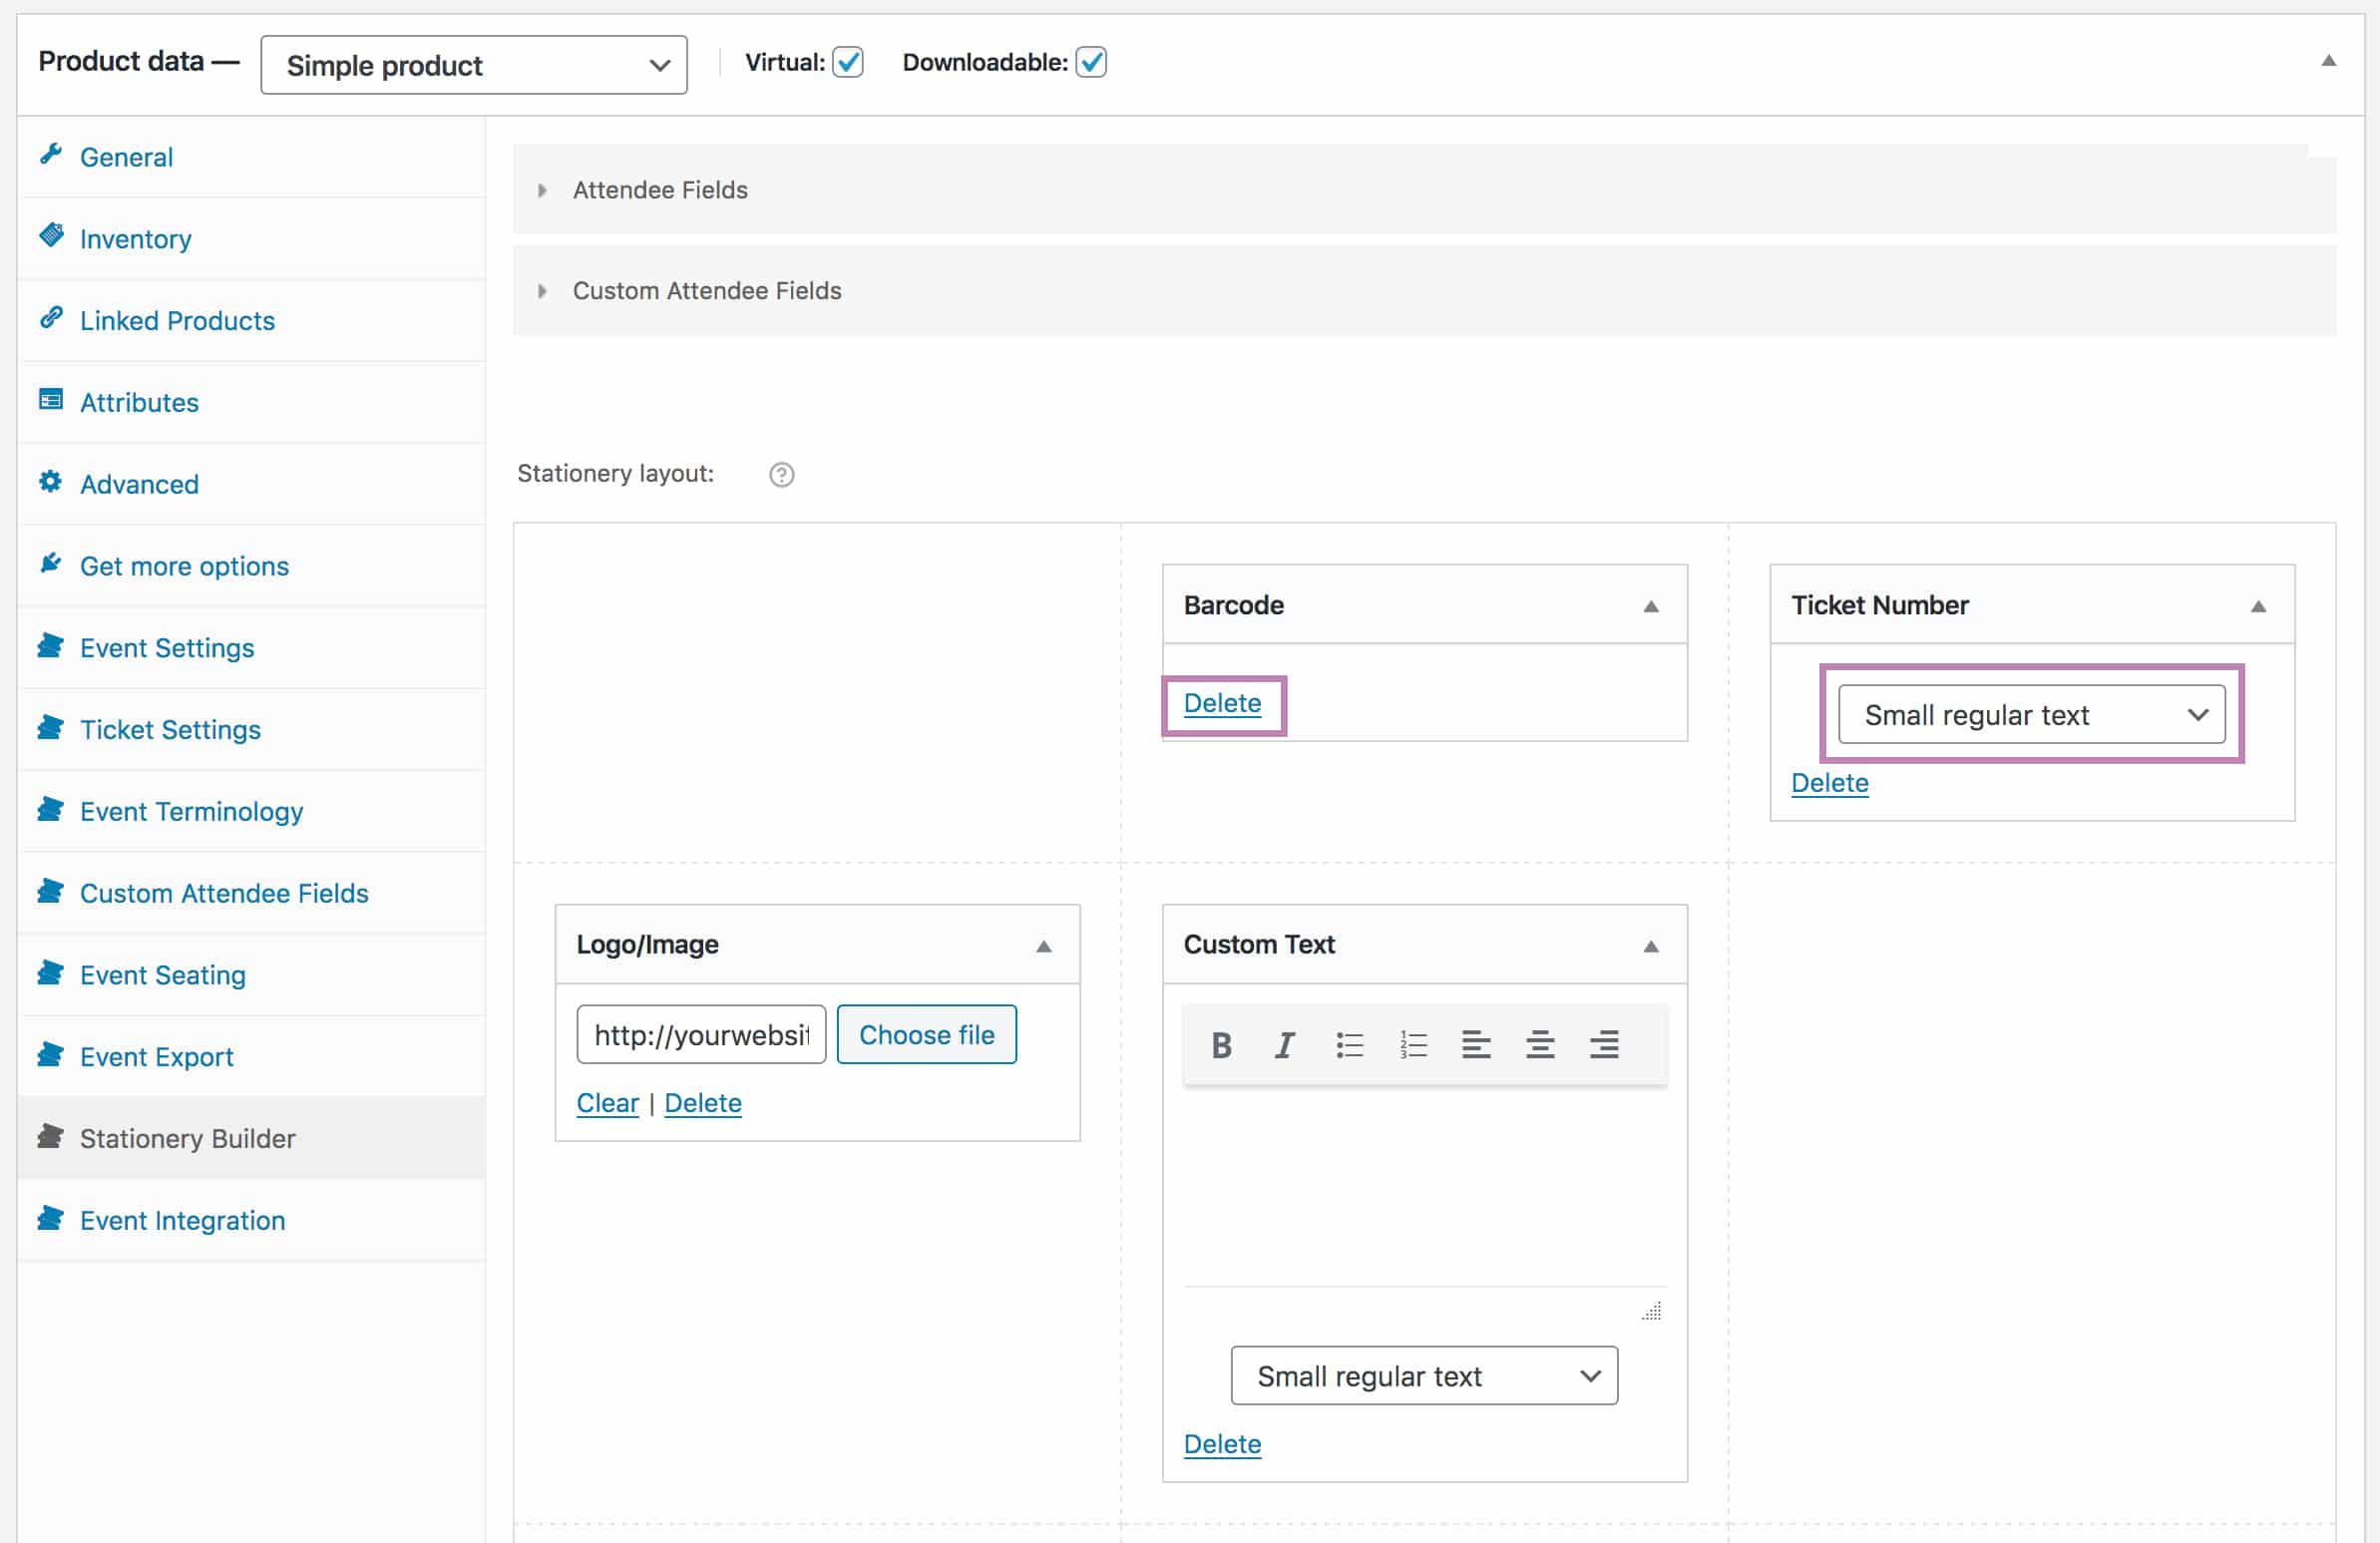
- Click on a field in the Stationery layout area to open the field settings. Here you will be able to select a font size, enter your own text and/or delete the field from the Stationery layout area, depending on the field type.
- Click on the Save Changes button or Update your event after making any changes
- Click on the Print Items button
- The PDF file containing the badges should open in a new browser window/tab, and you should see a print pop-up dialog. NB: Before printing, make sure that you set all print margins to 0 (zero) and remove any extra information that the browser might add such as page headers and footers. Some sizes may need to use the Landscape layout.
Current Formats
Tickets
- 10 tickets per sheet (Letter size)
- 10 tickets per sheet 5.5in x 1.75in (Avery 16154 Tickets Letter size)
- 10 tickets per sheet (A4 size)
- 3 tickets per sheet (A4 size)
- 1 ticket per sheet 5.5in x 2in (BOCA printer)
Badges
- 6 badges per sheet 4in x 3in (Avery 5392/5393 Letter size)
- 10 badges per sheet 4.025in x 2in (Avery 5163/8163 Letter size)
- 12 badges per sheet 63.5mm x 72mm (Microsoft W233 A4 size)
- 16 badges per sheet 99mm x 33.9mm (Microsoft W121 A4 size)
- 24 badges per sheet 35mm x 70mm (Microsoft W110 A4 size)
- 30 badges per sheet 2.625in x 1in (Avery 5160/8160 Letter size)
- 39 badges per sheet 66mm x 20.60mm (Microsoft W239 A4 size)
- 45 badges per sheet 38.5mm x 29.9mm (Microsoft W115 A4 size)
- 1 badge per sheet 4in x 2.5in (DK-2113 BrotherQL Label Printer)
Wraparound Labels/Wristbands
- 1 wristband per sheet 11in x 1in (BOCA printer)
- 5 labels per sheet 9-3/4″ x 1-1/4″ (Avery 22845 Letter size)
- 1 Z-band Fun/Splash wristband per sheet 10″ x 1″ for Zebra ZD510-HC printer
Certificates
- 1 certificate per sheet (Letter size/Portrait)
- 1 certificate per sheet (Letter size/Landscape)
- 1 certificate per sheet (A4 size/Portrait)
- 1 certificate per sheet (A4 size/Landscape)
BOCA Printers
BOCA Systems is a leading manufacturer of ticket printers, offering a wide range of solutions such as desktop, kiosk and receipt printers. The FooEvents Stationery Builder lets you select BOCA printer-specific formats that you can use to print wristbands and tickets using your BOCA printer.
Here are some guidelines to help you get started with using your BOCA printer with FooEvents:
- Acquire the correct BOCA printer for your specific requirements. You can do so by contacting BOCA Systems directly or one of their international distribution partners.
- Acquire ticket paper that works with your BOCA printer.
- Connect your BOCA printer to your computer according to the operator’s manual.
- Install the correct printer drivers depending on the platform that you are using.
- Design your stationery using the FooEvents Stationery Builder. Choose the BOCA format that corresponds to your printer and paper.
General tips:
- Do not use the browser print dialog when printing. Select the “Print using system dialog” option instead.
- Make sure to select the correct paper size and orientation in the print dialog. The BOCA-specific paper sizes will be added automatically when you install the drivers.
- If the printer is printing two tickets at once, it might need to be reset by turning it off and on again.
- You can use the Printer Configuration Program to send commands to the printer.
NB: Please contact Boca Systems directly if you experience any issues with your BOCA printer or need configuration assistance as we are not able to provide support for third-party devices.


