
Do not use these versions of FooEvents, FooEvents Seating, or FooEvents Bookings on a live site or for a live event. Only use the beta versions for testing on a staging or test site.
We’ve completed development on the new FooEvents Seating Version 2 and need your help testing it. Please configure and test FooEvents Seating Version 2 Beta on a staging or test site only.
Please thoroughly test the full seating workflow, including building seating charts, configuring and managing seating for a product, selecting and reserving seats, purchasing tickets, and managing orders. Let us know if you encounter any issues or feel anything is missing.
Download and install the following beta plugins to test the new FooEvents Seating experience:
- FooEvents (Version 2.0.16-seating-beta.4)
- FooEvents Seating (Version 2.0.2-seating-beta.4)
- FooEvents Bookings (Version 2.0.16-seating-beta.4)
- For any other FooEvents extensions, you can use the latest available versions. Ignore plugin update messages.
Thanks again for helping us test and improve the new FooEvents Seating.
Introduction
FooEvents Seating has been rebuilt from the ground up to deliver a more flexible, reliable, and powerful seating experience, shaped by years of customer feedback and real-world event requirements.
The new seating system gives you the freedom to create virtually any seating arrangement without the limitations of traditional row-based layouts. Instead of building a seating setup from scratch for every event, you can create highly customizable, reusable seating chart templates and apply them across multiple events, venues, dates, and time slots.
At the core of the new system is a completely redesigned reservation engine that validates seat availability and reservation ownership throughout the cart and checkout process to help prevent double bookings, incorrect assignments, and unexpected releases. It has also been optimized for mobile, making it easier for customers to select seats on any device.
The new FooEvents Seating Version 2 is fully integrated with FooEvents Bookings, allowing you to set up an event once and use the same seating chart across multiple bookable dates and time slots. Each date and time slot can be managed separately, including its own bookings, seat allocations, and seat selections.
The system also includes change histories for seating chart templates and product-level seating changes, including manual releases and variation mappings. These logs are exportable, making them useful for troubleshooting, support, and reviewing seating-related admin activity.
This is not just an evolution of FooEvents Seating. It is a major step forward in our pursuit of the most flexible, reliable, and sophisticated event seating and booking system available for WordPress.
Getting Started
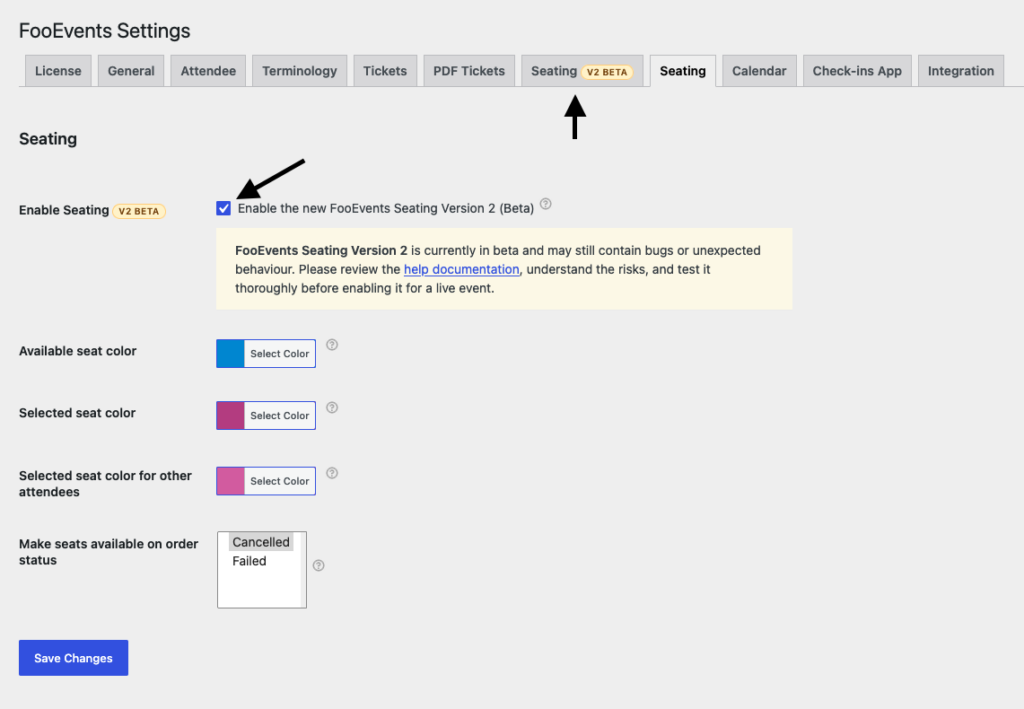
Step 1: Enable the new seating experience
- Go to FooEvents > Settings.
- Open the Seating tab.
- Enable Enable Seating (Enable the new FooEvents Seating Version 2 (Beta)).
- Save your settings.
Once this is enabled, you will see a new Seating settings tab marked V2 Beta. FooEvents also creates a published Sample Seating Chart the first time Version 2 is enabled, provided that sample chart does not already exist.
A few important things to know:
- The new seating system is currently optional while it is in beta, and is disabled by default.
- Turning it on does not automatically change your existing legacy seating products.
Step 2: Configure global seating settings
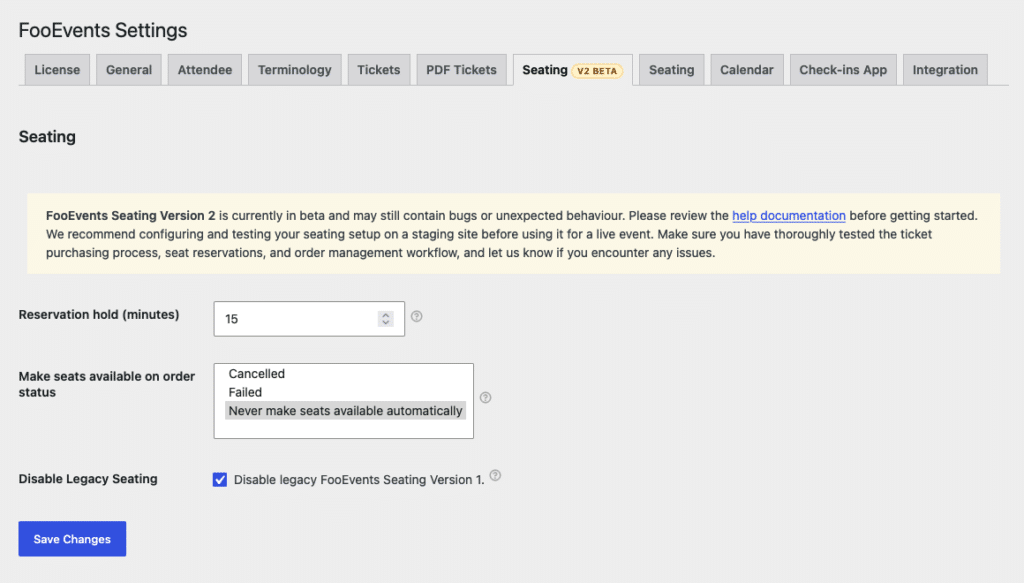
Go to FooEvents > Settings > Seating (V2 Beta) and review the available options.
Reservation hold (minutes)
This controls how long selected seats remain reserved in the cart before they are released. The default is 15 minutes. A shorter hold time can help with faster seat turnover during busy sales periods, while a longer hold time gives customers more time to complete checkout. The cart displays the approximate reservation time remaining for each selection.
Make seats available on order status
This controls when booked seats should be released automatically after an order status changes. The default and recommended option is Never make seats available automatically, which lets you release seats manually. You can opt to release seats when an order becomes Cancelled or Failed, but use these options with care. In particular, do not use Failed if customers can return and pay failed orders later, as the released seats could be booked by somebody else.
Disable Legacy Seating
This disables the older V1 seating system and hides the legacy Seating event type. Only enable this once you are sure you no longer need the old seating setup.
Step 3: Plan your migration
If you still have active events using legacy seating, it is best to leave legacy seating enabled until those events have been fully moved over.
It is not possible to convert an existing event with live seating sales from legacy seating to the new seating system. We recommend using the new seating only for events where ticket sales have not yet started, and gradually phasing out legacy seating usage.
Once you have finished migrating, you can enable Disable Legacy Seating to keep things cleaner and reduce confusion for your team.
Creating Seating Chart Templates
Templates are the foundation of the new seating system.
Instead of rebuilding the same layout for every event, you can create one chart and reuse it wherever needed, including bookable events. This saves time and helps keep your venue layout consistent across performances, dates, and products.
Where to manage templates
Go to FooEvents > Seating Charts. Templates are saved as Seating Charts.
How to create a template
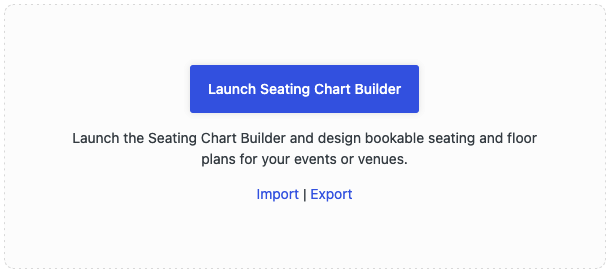
- Go to FooEvents > Seating Charts.
- Click Add New Seating Chart.
- Click Launch Seating Chart Builder.
- Build your layout, then save or publish it.
What you can add in the builder
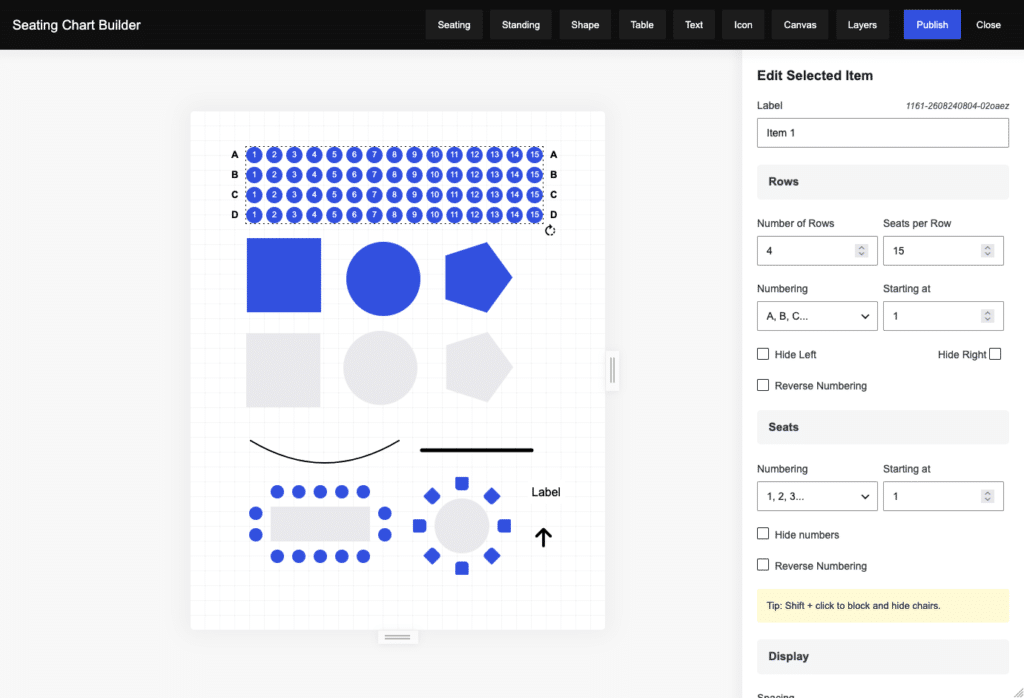
The seating chart builder supports a range of layout elements, including:
- Seating sections with configurable rows, seats, numbering, chair styles, spacing, colors, and curved-row controls.
- Standing sections with a capacity and a rectangle, circle, or polygon shape.
- Table layouts with square or circular tables, configurable chair counts, and different chair styles.
- Shapes such as squares, circles, polygons, and straight or curved lines for structure and visual guidance.
- Text labels to help with directions and naming sections.
- Icons for entrances, exits, accessibility points, restrooms, and more.
- Canvas controls for adjusting selection colors, the background, workspace dimensions, and zoom.
- Layers for finding chart elements and controlling their front-to-back order.
- Import / Export JSON tools for backups or moving charts between environments.
Creating curved seating rows
Seating sections can be curved to follow stages, fields, arenas, and other venue shapes.
- Add a new Seating section, or select an existing seating section.
- Under Display, adjust the Curve slider. Positive and negative values bend the rows in opposite directions, while a value of zero keeps them straight.
- Choose a Curve Anchor: Center creates a symmetrical curve, Left keeps the left end anchored, and Right keeps the right end anchored.
The curve is preserved when the chart is saved and is used in the builder, product seating manager, and customer-facing seating chart.
Creating straight and curved lines
Lines are useful for stages, aisles, barriers, boundaries, and other floor-plan details.
- Choose Shape, then select Line.
- Set the line width, color, and Curve. A value of zero creates a straight line; positive and negative values curve it in opposite directions.
- Select the line and drag either endpoint to change its length and direction. Hold Shift while dragging an endpoint to constrain it horizontally or vertically.
Selecting and moving builder items
- Click an item to select it and open its editing controls.
- Hold Shift and click items to add or remove them from a multi-item selection.
- Hold Shift and drag from an empty part of the canvas to select multiple items with a selection box.
- Drag any selected item to move the entire selected group together.
- Use the arrow keys to move selected items by 1 pixel, or Shift + Arrow key to move them by 10 pixels.
- Use Cmd/Ctrl + D to duplicate the primary selected item, Backspace/Delete to delete it, and Esc to close the editing panel and clear the selection.
When multiple items are selected, the editing sidebar and duplicate/delete actions apply to the primary selected item, while dragging and keyboard movement apply to the full selection.
Layers and canvas controls
Open Layers to see every element in the chart. Select a layer to edit its item, or drag layers to change their front-to-back order. When the layer’s drag handle is focused, use the up and down arrow keys to reorder it. You can also use Bring to Front and Send to Back from an item’s editing controls.
Open Canvas to set the customer selection colors, canvas background color, width, height, and zoom. You can also drag the handles on the right and bottom edges of the canvas to resize it, or focus a resize handle and use the arrow keys to resize in 10-pixel steps. Dragging an empty area inside the canvas moves all chart elements together.
Understanding seat states
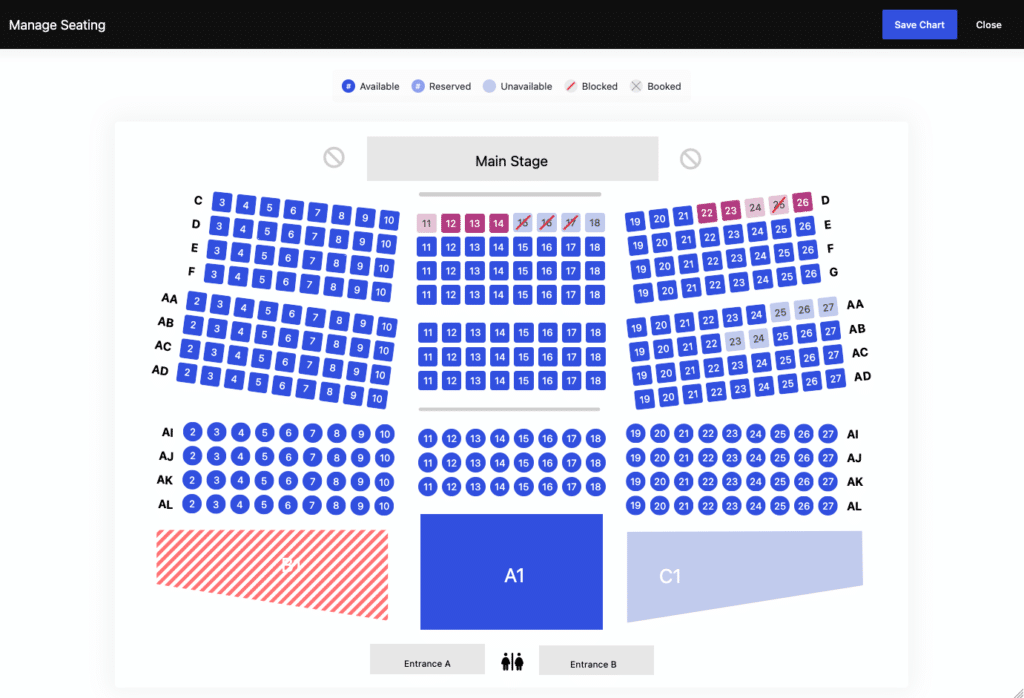
As you work with templates and live event seating, you will see different seat states:
- Available: The seat can be selected and purchased.
- Unavailable: The seat is visible, but customers cannot select it.
- Blocked: The seat has been intentionally blocked by an administrator.
- Reserved: The seat is temporarily being held in a customer’s cart.
- Booked: The seat has been allocated to an order and ticket.
Hidden and pre-blocked chairs
At template level, select a seating or table section and use Shift + click on a chair to cycle it from available to hidden, hidden to blocked, and blocked back to available. You can also hold Shift and drag across multiple chairs in the selected section to cycle their states in bulk.
This is useful for things like:
- obstructed view seats,
- camera or technical areas,
- permanently unavailable seats,
- venue-specific exclusions.
Hidden chairs will not appear as selectable seats, and pre-blocked chairs remain protected when the chart is used on products.
A note on editing live templates
If a template is already being used by active events, structural changes should be made carefully.
The system keeps a Change History and warns you that changing things like section IDs, row names, or seat numbers may affect sold tickets.
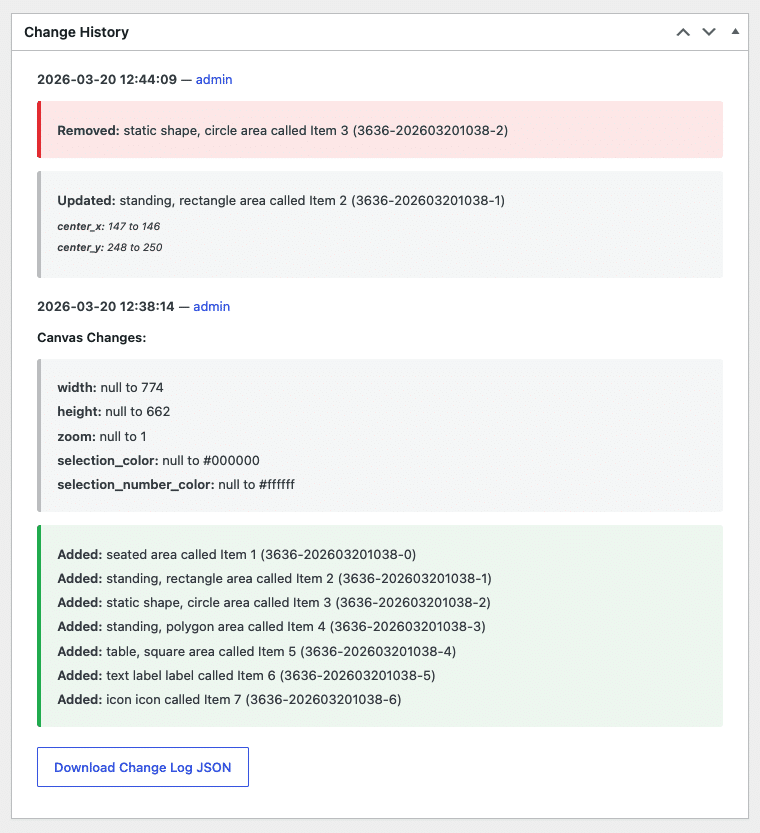
Best practice is to:
- avoid major structural edits on live templates,
- test updated templates before using them on active events.
Importing and Exporting Charts (JSON)
Use the JSON tools to back up a chart or move it between environments, for example from staging to production.
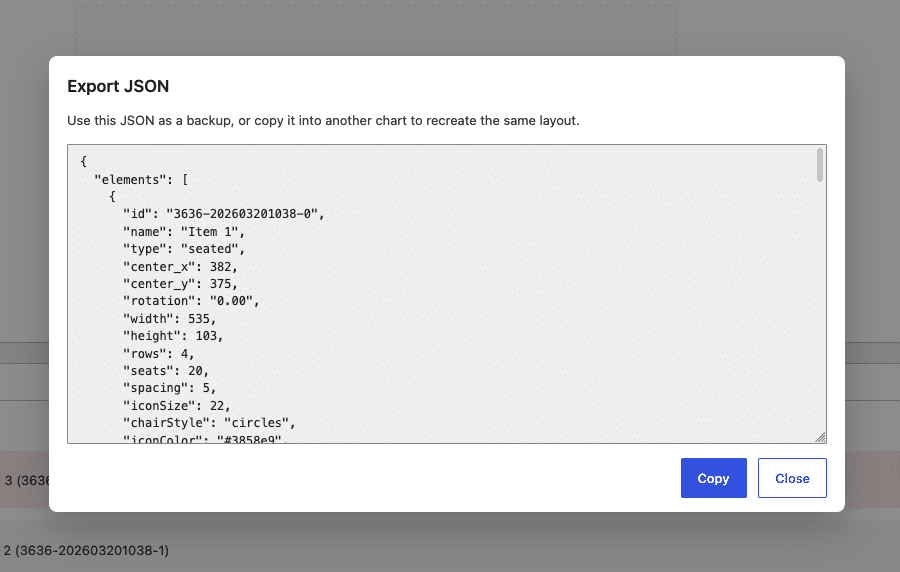
How it works
- Open the source seating chart’s edit screen.
- Click Export below the builder launcher, then copy the full JSON content.
- Create a new seating chart.
- On the new chart’s edit screen, click Import, paste the JSON, and confirm the import. Review the imported layout in the builder, then publish or save the chart.
Important
Importing JSON replaces the chart currently loaded in the builder and recreates its visual layout, including sections, rows, seats, shapes, labels, canvas settings, layers, and structure. Existing valid section IDs are preserved where possible, while missing or duplicate IDs are regenerated when the chart is saved. If you import a layout into a new chart, treat that chart as a separate template and test it before using it on active products.
Configuring Seating Charts in Products
The new FooEvents Seating works with:
- Single
- Sequential days
- Specific days
- Bookable
It does not work with the legacy Seating event type from V1.
If your product is currently using the old Seating event type and you want to use the new seating system, change the event type to Single or another supported option first, then configure the chart settings. Existing seating selections from the old seating will not carry over, so be sure to only do this for events where seats have not yet been booked.
Product setup workflow
- Open the WooCommerce product.
- In Event Details, choose a supported event type.
- In Seating Settings, select your Seating Chart.
- Save the product so the seating options can be applied.
- Reopen the product settings to configure additional chart options.
- Use the Manage Seating buttons to view and adjust live seating availability for that product.
What the Seating Settings do
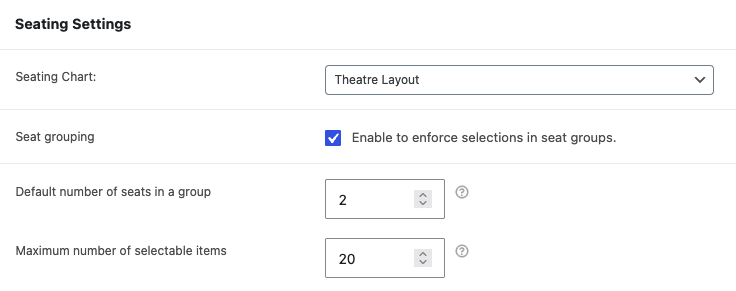
These settings let you control how customers interact with the chart for a specific event.
Seat grouping
Enable this to enforce grouped seat selection. Customers choose how many tickets they need, and FooEvents attempts to select an adjacent group that includes the seat they clicked. For seating rows, the selection logic also avoids leaving unusable gaps at row edges where possible. Square-table selections prioritize nearby chairs.
Default number of seats in a group
Sets the ticket quantity shown when the seat selector opens. Customers can adjust this quantity in the selector when grouping is enabled.
Maximum number of selectable items
Limits how many seats or standing places can be selected in one booking flow.
These options let you fine-tune the customer experience without changing the actual seating template.
Grouped, single, and flexible selection
- Seat grouping disabled: Customers can select any available seats individually, up to the configured maximum.
- Seat grouping enabled with a quantity greater than one: Clicking a seat selects an adjacent group of the requested size where a suitable group is available.
- Seat grouping enabled with a quantity of one: Single Selection Mode lets customers select an isolated seat or build a contiguous group by adding adjacent seats one at a time. After a standard row seat is selected, non-adjacent standard seats are temporarily unavailable, while genuine isolated seats remain selectable.
Single Selection Mode is useful when you want to allow single-ticket purchases without encouraging customers to leave unnecessary one-seat gaps. When isolated seats are detected, the selector displays guidance explaining this flexible selection behaviour.
Managing Seating for Bookable Events
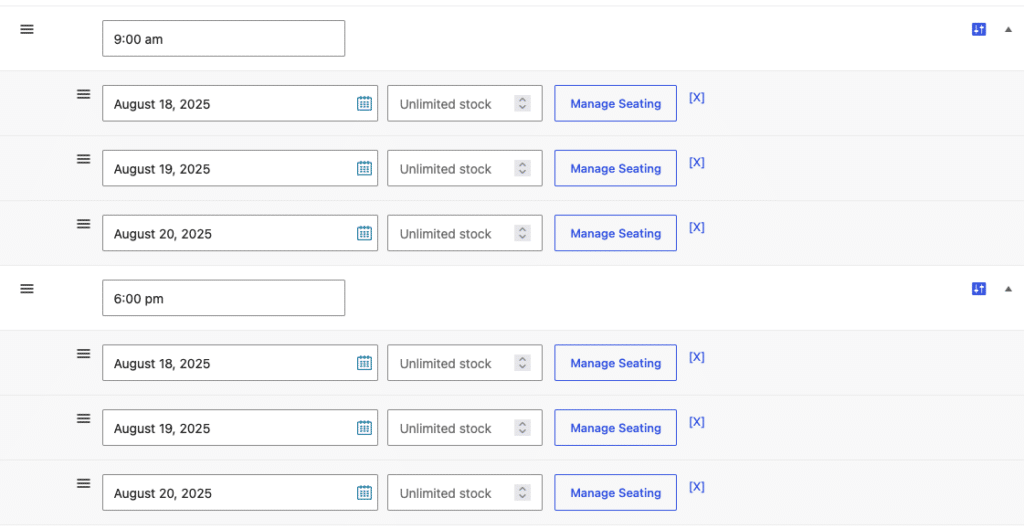
For events using FooEvents Bookings, seating is managed separately for each booking date and time slot combination. This means you can reuse the same seating chart across many dates, while keeping availability and bookings separate for each performance or timeslot.
For example, a theatre could use the same seating layout every night, while still tracking sold and available seats independently for each show.
This gives your team better control and keeps seating accurate across recurring bookings.
WooCommerce Stock Management
When using a seating chart, ticket availability is managed by the availability of seats on the seating chart rather than by WooCommerce stock quantities. Seats that are reserved or booked are automatically marked as unavailable on the seating chart.
As such, it is not necessary to set stock quantities for simple or variable products. The products only need to be set to In stock. Similarly, when using FooEvents Bookings, booking slot availability can be left at the default unlimited amount.
For products that use seating, we recommend configuring WooCommerce stock as follows:
- Edit the WooCommerce product and open the Inventory settings.
- Disable Stock management or Manage stock.
- Set the Stock status to In stock.
- If you are using a variable product, apply these settings to every variation used by the seating chart.
- If you are using a bookable product, leave the booking slot stock quantity blank or set to unlimited.
Setting the product to In stock ensures that customers can access the product and open the seating chart to select their seats. It does not mean that every seat is available. The seating chart remains the authoritative source for seat availability.
Do not enter the total number of seats as the WooCommerce stock quantity. Doing so creates a second, independent availability limit. This could result in WooCommerce preventing a purchase even when the selected seats are still available on the seating chart.
Variation-level stock settings can still prevent valid seat purchases, so make sure stock management is disabled for every variation linked to the seating chart.
The standard WooCommerce In stock message is not normally displayed on shop or product pages when stock quantities are not being managed. However, this can vary depending on your theme or other plugins. If your theme displays an In stock message, we recommend disabling the messaging, as it could incorrectly suggest that seats are still available when the event is fully booked.
Legacy Seating and Migration
The legacy Seating event type is the older V1 seating workflow. The new seating chart settings do not apply to those products.
Existing seating selections from the old seating will not carry over to the new charts, so be sure to only do this for events where seats have not yet been booked.
To move a legacy product to the new system:
- Change the event type from Seating to Single or another supported type.
- Assign a chart in Seating Settings.
- Configure the chart interaction settings.
- Save the product and test the setup from start to finish.
Once all of your legacy seating products have been migrated, you can enable Disable Legacy Seating to simplify the admin experience.
Mapping Seating Sections to Variations
If you are using variable products, you can map specific chart sections to individual variations. This is useful when different seating areas need different pricing.
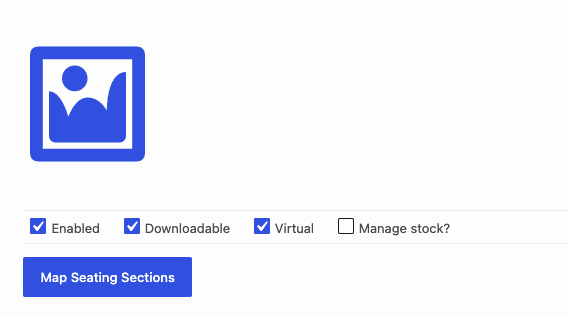
Open the variation settings and press the Map Seating Sections button:
Select the sections that should map to this variation:
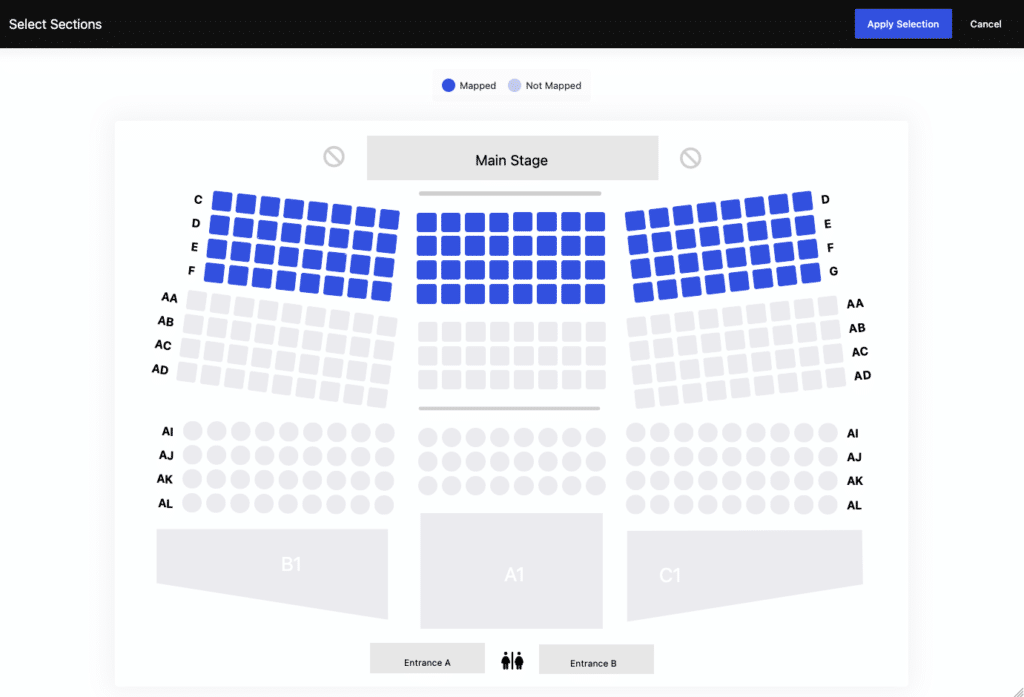
When those areas are selected by customers, the mapped variation is applied to the selected item in the cart.
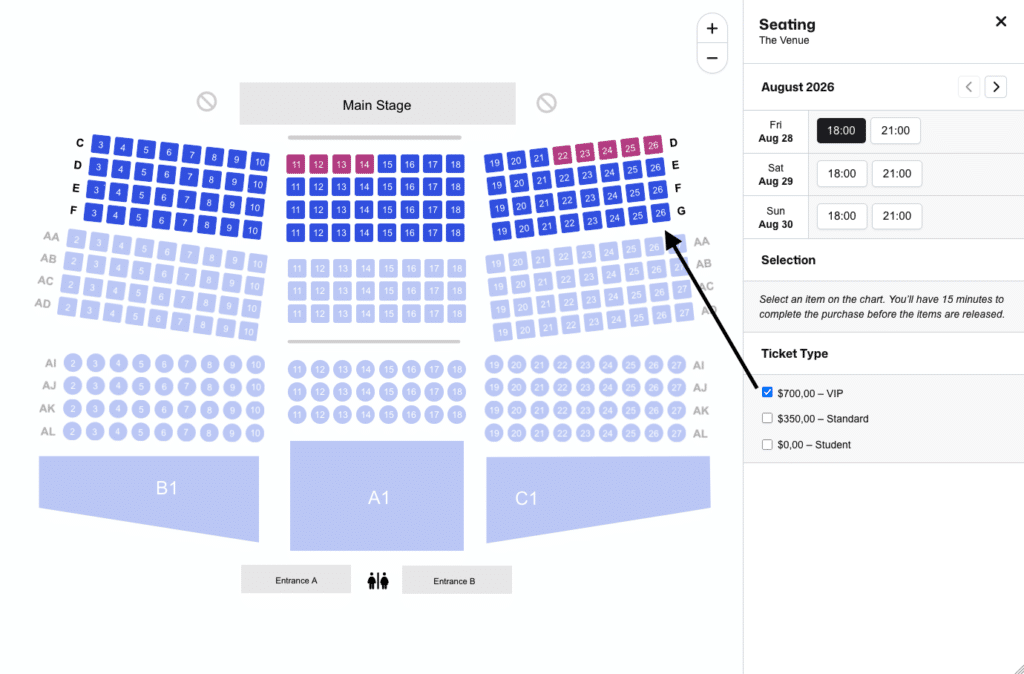
For example:
- Balcony seats could be linked to one variation.
- Floor seats could be linked to another.
Workflow
- Set up your product variations in WooCommerce as usual.
- Open the variation settings and use Map Seating Sections on each variation.
- Select the chart sections that variation should apply to.
- Save the product.
A couple of things to keep in mind:
- Sections that are not mapped will not be available in that variation.
- Customers can only select seats that belong to the chosen variation.
Mobile experience
On mobile, the seating interface guides customers through the booking flow in a more step-by-step way.
- If seat grouping is enabled, customers are first asked how many tickets they want and can adjust the quantity from the selection panel.
- If the ticket quantity is set to one, Single Selection Mode allows isolated seats or lets customers build a contiguous selection one adjacent seat at a time.
- For bookable events, customers then choose the booking date and time slot before selecting seats.
- After selecting chairs or standing areas, customers can use the mobile menu to review tickets, remove selections, or change the booking date where applicable.
- Once they are happy with their selections, they continue using Book Now.
Product Page Experience for Customers
When a seating chart is enabled on a purchasable product, the standard WooCommerce add-to-cart flow is replaced with a Buy Tickets button. This replacement supports both classic WooCommerce single-product templates and current block-based add-to-cart templates.
When customers click Buy Tickets, a full-screen seating interface opens.
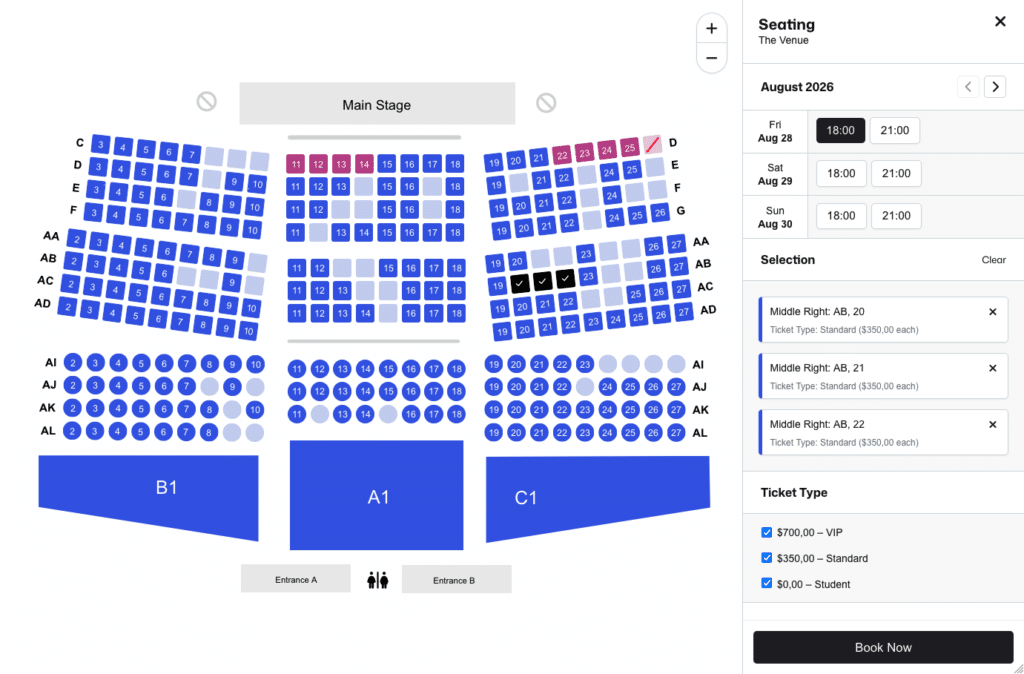
Here they can:
- view the event details,
- choose a booking date or slot if needed (FooEvents Bookings),
- choose mapped variation or ticket options where applicable,
- select seats or standing areas,
- review their selections in a live summary,
- continue using Book Now.
This creates a much clearer experience for customers because they can see exactly what is available before going to checkout.
Checkout, Reservations, and the Seat Lifecycle
Reservation flow
When a customer clicks Book Now:
- FooEvents checks that the selected seats are still available.
- The seats are temporarily reserved.
- They are added to the cart as individual selections.
- The customer is redirected to the cart.
Cart behavior
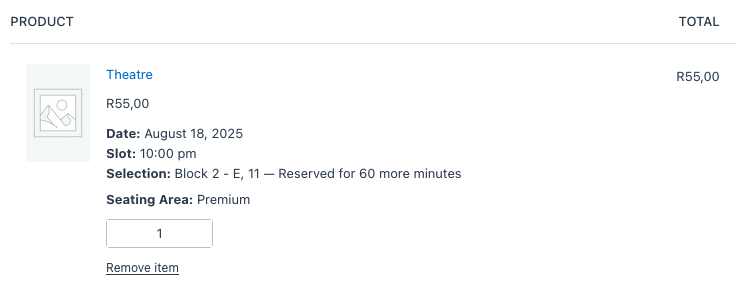
- Customers cannot freely change the quantity of chart-based seat selections in the cart.
- Removing a seating item from the cart releases that reservation, provided it is still tied to that session.
- Reservation time limits are controlled by your global hold setting, and the cart shows the approximate number of minutes remaining.
Checkout behavior
Before checkout is completed, reservations are checked again.
If a reservation has expired or a seat is no longer valid, checkout will be stopped and the customer will need to reselect.
Once checkout successfully creates the order and ticket data, the seat moves from Reserved to Booked.
Reservation Checks
FooEvents Seating checks each selected seat before checkout can continue. These checks help prevent the same seat from being booked more than once.
The system verifies that:
- The seat reservation still exists.
- The seat is still reserved and has not expired.
- The reservation belongs to the current cart/session.
- The seat has not already been booked by another order.
- The seat has not been blocked or marked unavailable.
- The reserved seat is still within the configured reservation hold time.
- Seating products are added as individual seats, not grouped quantities.
- The reserved seat can be safely converted into a booked seat when the order is placed.
- Tickets are only generated after the seat has been successfully booked for the order.
If any of these checks fail, checkout will be stopped and the customer will need to remove the expired or unavailable seat from their cart and select a seat again.
Automatic seat release rules
The Make seats available on order status setting controls if and when seats are released automatically after order status changes.
You can choose to release seats on:
- Cancelled
- Failed
The default and recommended option is Never make seats available automatically, which leaves releases under manual control. Enable Cancelled or Failed only when those statuses reliably mean that the seats can be sold again in your order workflow. Use Failed with particular caution: if a customer can pay a failed order later, its released seats may already have been booked by somebody else.
Managing Tickets and Live Seating
Product-level seating management
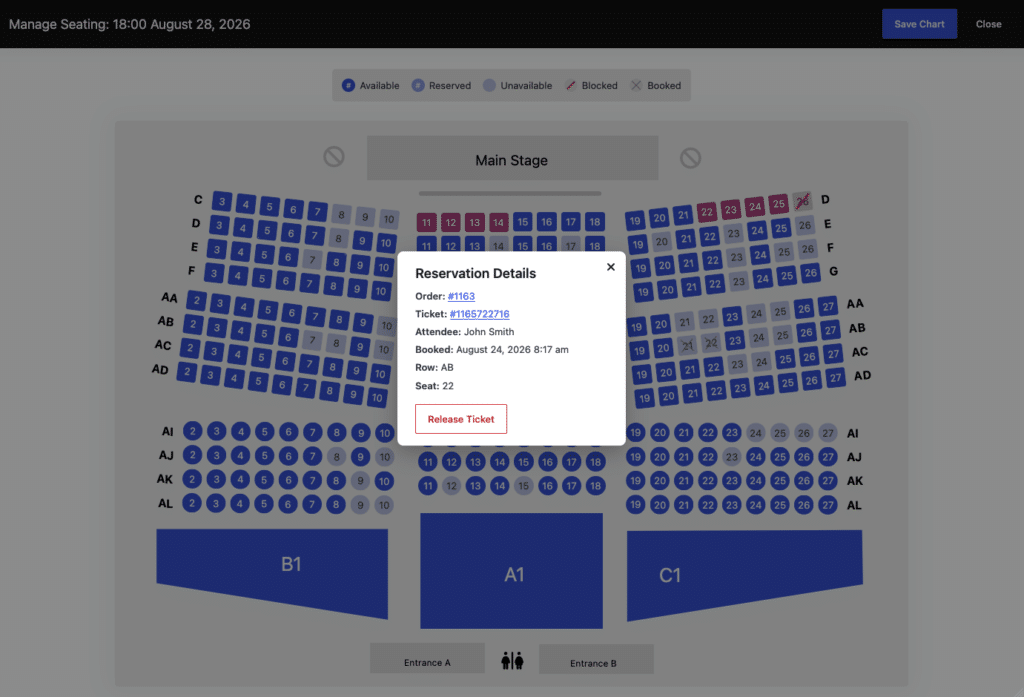
From the product’s Seating Viewer / Manage Seating, admins can:
- update live seat availability,
- see reserved and booked seats,
- open booking details for selected seats,
- release booked seats where needed,
- manage standing-area reservations.
This is especially useful for support teams or venue staff who need to deal with seating issues quickly.
Ticket-level seating management
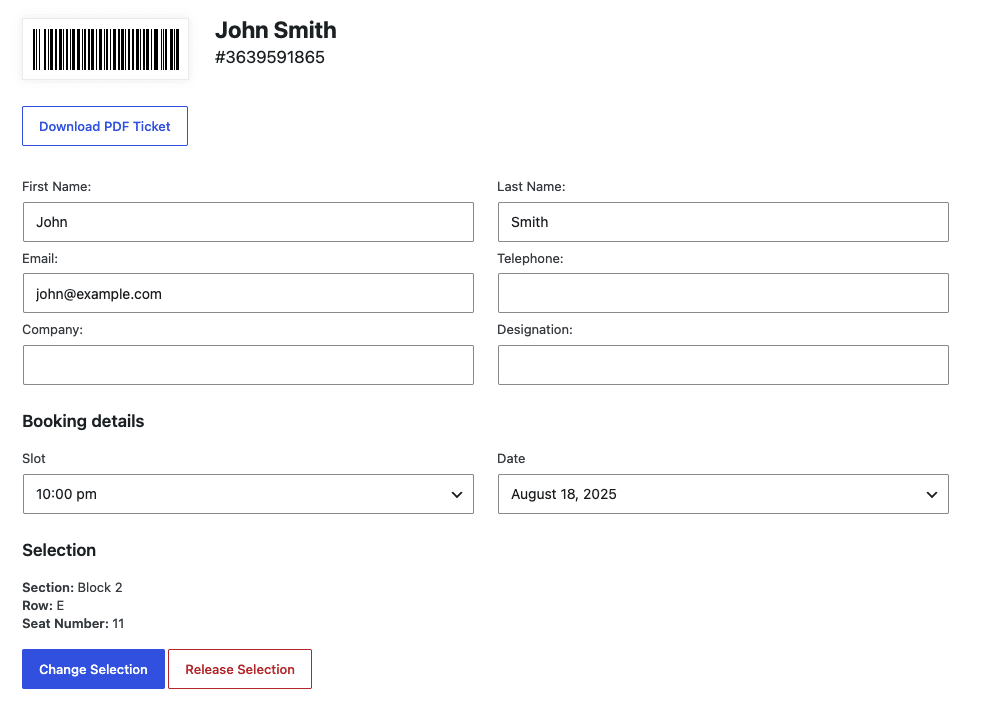
On the ticket edit screen, admins can:
- view the current seat or area,
- use Change Selection to move it,
- use Release Selection to remove it.
If a new seat is not available, the original seat stays unchanged so that no data is lost.
Cancellations and refunds
This is important to understand:
- Canceling or deleting a ticket does not automatically release the seat.
- Refunding an order item does not automatically release the seat.
If you want a seat to become available again, it needs to be released manually through the seating management tools, or handled through your chosen order-status release rules.
Recommended Rollout Plan
A safe way to introduce the new seating system is to do it in stages:
- Enable it on a staging site first.
- Build and test templates for real venue layouts, including curved rows or lines, hidden seats, and pre-blocked seats where applicable.
- Apply charts to a small number of products first.
- Test key flows, including single-day, sequential days, specific days, bookable, and variation-based seating.
- Test selection with grouping disabled, grouped quantities greater than one, and Single Selection Mode with a quantity of one. Include isolated seats, tables, standing areas, and maximum ticket limits where applicable.
- Test both classic and block-based WooCommerce product templates if your site uses them.
- Test reservation expiry, the cart countdown, conflict handling, order-status releases, and manual seat releases.
- Make sure your support or admin team knows how to manage seating live.
- Migrate the rest of your products in phases.
- Disable legacy seating only when you are fully done with V1.
Currently not supported
The following functionality is not yet supported in the FooEvents Seating Version 2 beta:
- FooEvents Check-ins app: Seating Version 2 information is not currently displayed in the publicly available FooEvents Check-ins app. Support will be added before launch.
- FooEvents Point of Sale: Support for FooEvents Seating Version 2 is under development and will be added in a future release.
 English
  German
  Dutch
Dutch  Spanish
  Italian
  Portuguese
  French
  Polish
  Czech
Czech  Greek
Greek