
Multi-day conferences involve more than selling registrations. Organizers need to define which conference dates each ticket covers, manage overall capacity, collect information for every attendee, communicate the schedule clearly and track attendance separately on each day.
FooEvents brings this workflow into WooCommerce, allowing you to sell conference registrations directly from your WordPress website using your preferred WooCommerce payment gateways. FooEvents Multi-day enables a single ticket to provide access across multiple consecutive or selected calendar days, with an independent check-in status for each day.
In this guide, we will walk through a recommended configuration for a multi-day conference running from 24 November to 1 December. It covers ticket structure, capacity, attendee registration, ticket delivery and daily check-ins based on the following requirements:
- 350 tickets must be sold via the event company’s existing WordPress website using WooCommerce.
- The purchaser must select a ticket type, such as Delegate, Standard or Student, which determines the ticket price.
- Each ticket type must have its own stock quantity, with all ticket types totaling 350 available tickets.
- A purchaser must be able to buy tickets on behalf of multiple attendees.
- Attendee details must be captured for each individual ticket.
- Ticket emails should be sent directly to individual attendees.
- Ticket types should be displayed in a table layout where possible.
- The following details should be captured for each attendee: first name, last name, email address, telephone number, company, designation, T-shirt size and dietary requirements.
- Attendee details should be captured using the Attendee Details Page before checkout.
- PDF tickets should be enabled.
- A branded conference ticket theme should be used.
- Once ticket sales close, the event company needs to export a list of attendees that can be imported into their CRM system.
- Attendees need to check in at registration for the relevant day of the conference.
- If required, attendees can also be checked out when they leave the event.
- The event company needs to print name tags that will be handed to attendees at registration.
Here is an example of such an event: Multi-day Conference
The configuration below uses one variable multi-day event product for the main conference pass. Ticket types are managed as WooCommerce variations, while FooEvents Multi-day controls the conference dates and daily check-in records.
This help document assumes that you already have FooEvents and WooCommerce installed on a WordPress website and have a basic understanding of how FooEvents works. If you are new to FooEvents, you should read our Getting Started guide before continuing.
Plan your multi-day conference ticket setup
Products used
- WooCommerce
- FooEvents for WooCommerce
- FooEvents Custom Attendee Fields
- FooEvents Multi-day
- FooEvents PDF Tickets
- FooEvents Ticket Themes
- FooEvents Check-ins apps
- FooEvents POS, if conference tickets or merchandise will be sold on-site
Recommended conference structure
Before configuring the product, decide whether every ticket grants access to the complete conference or whether attendees need to purchase individual days, workshops or sessions. This determines whether the conference can use one multi-day event product or needs additional products.
| Offering | Recommended configuration | Capacity and access |
|---|---|---|
| Full conference pass | One variable multi-day event product with Delegate, Standard and Student variations | Each ticket is valid for every configured conference day and has a separate check-in status for each day |
| Single-day passes | Create a separate Single event product for each day | Each product has independent stock and a ticket that is valid only for that date |
| Capacity-limited workshops or sessions | Use a separate Bookable product | Availability is managed per workshop date and time slot |
| Merchandise or optional add-ons | Use standard WooCommerce products | Standard WooCommerce stock; no conference access unless the product is configured as an event |
| Virtual or hybrid conference access | Use the relevant multi-day virtual event workflow | Online access and integrations are configured separately |
A FooEvents Multi-day ticket provides access to all the calendar days configured on that event; the purchaser does not choose a subset of those days. Use separate event products if you need to sell standalone day passes. If full conference passes and day passes share the same venue capacity, plan their stock allocations together because stock is managed independently for each product.
If attendees must choose a capacity-limited workshop or session, follow the Bookable: Conference with Workshops guide. For an event that only runs on one day, use the Standard: Conference guide. For online access, see the Virtual Event: Conference guide, which uses FooEvents Multi-day for a multi-day online program.
All plugins required to set up a multi-day conference can be purchased individually. They are also included in the FooEvents Premium Bundle, which includes FooEvents for WooCommerce, FooEvents Multi-day, FooEvents Custom Attendee Fields and FooEvents PDF Tickets.
This use case uses FooEvents Multi-day because the conference takes place across multiple calendar days. It also uses Custom Attendee Fields to capture additional attendee information and PDF Tickets to provide attendees with downloadable or printable tickets.
FooEvents POS is optional and is not included in the Premium Bundle. Add it separately or use the appropriate POS bundle if you plan to sell registrations or merchandise at the venue.
Configure tickets, conference days and attendee data
Create an event product
Go to Products > Add Product in the main menu and complete the standard WooCommerce product fields such as the title, main description, short description, product image, gallery, tags and categories.
Use a clear conference name and include the most important event information in the product description. This should usually include the conference dates, venue, who the conference is for, what is included with registration, and any important arrival or registration instructions.
Proceed to the Product Data panel and select Variable product from the product type dropdown. This allows you to create the different conference ticket types as WooCommerce variations.
Configure ticket types, pricing and capacity
Next, create product variations that will allow purchasers to choose between different ticket types. Purchasers will be charged different amounts depending on their selection, and each ticket type can have its own stock quantity.
| Ticket type | Price | Stock allocation |
|---|---|---|
| Delegate | $499 | 100 |
| Standard | $299 | 200 |
| Student | $0 (free) | 50 |
| Total conference capacity | 350 |
Because each ticket is valid on every configured conference day, the combined variation stock represents the maximum number of full-conference attendees. In this example, the three allocations total 350. Disable backorders unless your team has a deliberate oversell or waiting-list process.
Describe what each ticket type includes on the product page. For example, a Delegate ticket might include an exhibitor package, while a Student ticket might require a student number or other eligibility information to be captured as a custom attendee field.
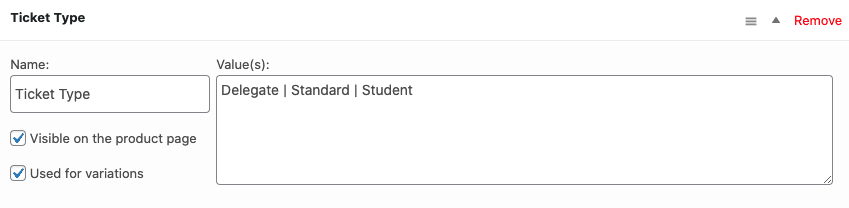
Go to Product Data > Attributes and create an attribute called Ticket Type. In the Values field, specify the different ticket options. Be sure to check the Used for variations option and then click Save attributes.
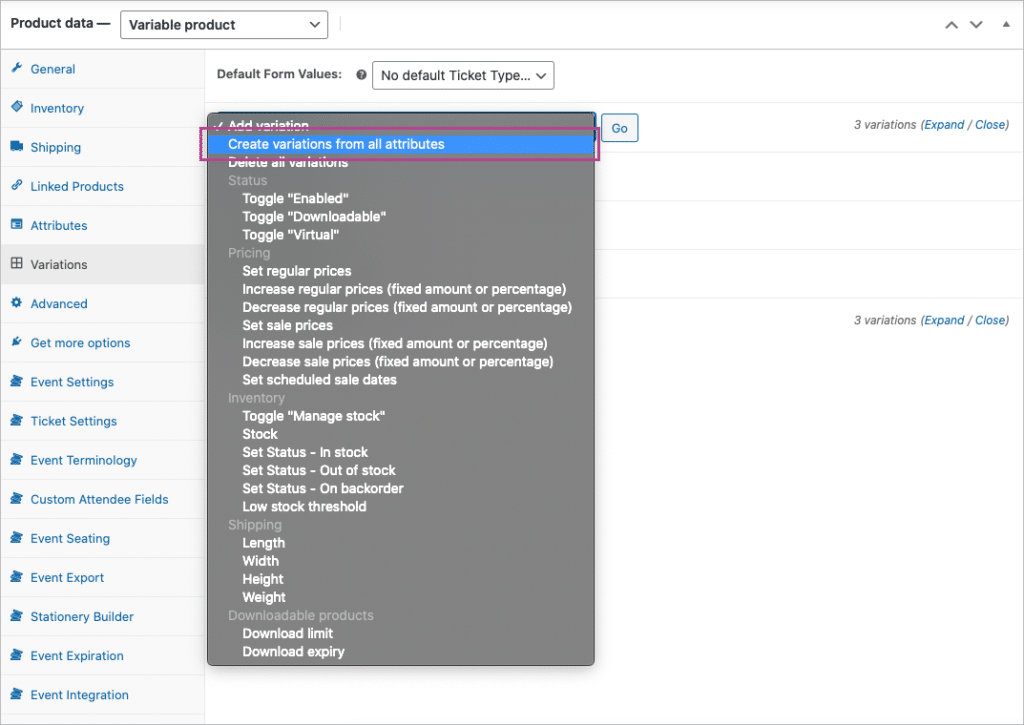
Go to Product Data > Variations. Use the Generate variations option to create a variation for each ticket type.
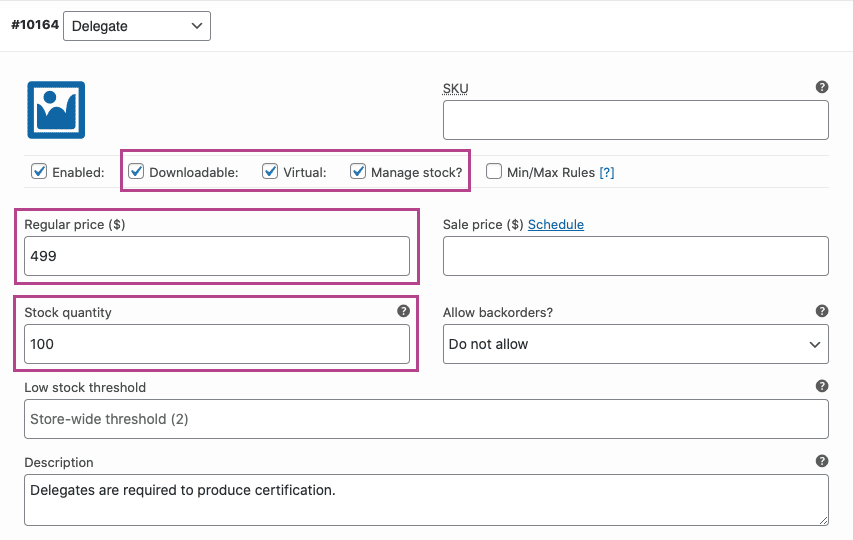
Set each variation to Virtual and set the relevant price. If you want to manage capacity per ticket type, enable Manage stock for each variation and set the number of tickets available using the Stock quantity field.
A free or complimentary ticket should still have managed stock. Enter a price of 0 and assign it a fixed allocation so that free registrations continue to consume conference capacity.
You can also set each variation to Downloadable if that matches your store configuration, but this is not required for FooEvents to generate and send tickets.
Early-bird and other pricing phases
Early-bird, standard and late pricing usually draw from the same physical conference capacity. Avoid creating several unrestricted variations for pricing phases if each variation would create another stock pool for the same places.
- Use a scheduled WooCommerce sale price or update the variation price when the next phase begins; or
- Allocate a fixed portion of capacity to each phase and only release the phases sequentially.
WooCommerce coupons can be used for speakers, sponsors, partners or promotional campaigns without creating another ticket type. Test coupons against the intended variations and confirm that discounted registrations still reduce the correct stock allocation.
Enable the Attendee Details Page
For this multi-day conference setup, attendee details should be collected before checkout using the Attendee Details Page. This provides a dedicated step where purchasers can enter attendee information for each ticket before continuing to WooCommerce checkout.
Important: FooEvents for WooCommerce 2.0.16 and newer enables the Attendee Details Page by default on new installations. Existing installations should confirm that it is enabled. Update FooEvents for WooCommerce and all installed FooEvents extensions before using this workflow, and test any change to an established checkout process on a staging site first.
Go to FooEvents > Settings > Attendee and enable Enable Attendee Details page. FooEvents can automatically create the Attendee Details page, but if you use your own page, make sure it includes the following shortcode:
[fooevents_attendee_form]
Select the page in the Attendee Details page setting and save your changes.
You can also enable the copy attendee details option if you want purchasers to copy details from the first attendee to the remaining attendees. This can be useful when one person registers a group of attendees from the same company.
For more information, see the Attendee Details Page guide.
Configure conference days and times
Go to Product Data > Event Settings.
To activate event functionality, set Is this product an event? to Yes.
The following multi-day options are provided by the FooEvents Multi-day plugin.
For multi-day events, set Event type to either Sequential days or Select days. The latter may be labeled Specific days in your version of the product settings.
- Sequential days should be used when the event runs over a fixed number of consecutive days.
- Select days or Specific days should be used when the event takes place on selected calendar dates that are not necessarily consecutive.
For this example, use Select days or Specific days. Set the Number of days, then enter the date for each conference day. Use Sequential days instead when the program runs on consecutive dates and can be described using a start date and a fixed number of days.
For selected dates, enable Set start/end times globally? when every day follows the same schedule. Leave it disabled if the opening and closing times differ by day, then configure each day’s times individually. Confirm the WordPress timezone under Settings > General before publishing because event dates, ticket information and current-day check-in behavior depend on the site’s date and time configuration.
Review the dates in chronological order and make sure the number of configured days matches the schedule. Each generated ticket receives a separate status for Day 1, Day 2 and so on, so changing the number or order of days after ticket sales have started can confuse check-in records and attendee communications.
Important: Multi-day dates define when the same event repeats and which daily check-in records are available. They do not let the customer choose which conference days to attend. A ticket for this product is valid across all configured days.
Complete the venue details, organizer contact details and any custom messages that should display on the thank-you page or event details tab. For a conference, this could include registration desk opening times, parking information, daily arrival instructions or a reminder to bring a digital or printed ticket.
In the Attendee Details section, enable the attendee fields that should be captured for each ticket. For this conference setup, enable attendee full name, attendee email address, attendee phone number, company name and designation.
These fields ensure that each ticket is linked to the correct attendee rather than only the purchaser. Attendee information will be captured on the Attendee Details Page before checkout.
Options related to bookings can be ignored for this multi-day conference setup. The remaining event options can be configured based on your preferences.
Choose the default check-in day
For multi-day events, staff must check attendees in against the correct conference day. Use Default Check-in Day in the event settings to control which day the FooEvents Check-ins app selects when the event is loaded.
The available options are:
- Automatically based on current date selects the corresponding conference day when the device date matches a configured event date. This is generally the safest choice for a day-by-day registration workflow.
- Manually select a day allows the app user to decide which day is being managed.
- All Days applies a status change to every conference day. Only use this when one scan or status update should intentionally check the ticket in for the complete event.
- A numbered day opens the app on that specific day. This can be useful for a desk or device dedicated to one conference day.
Staff can still change the selected day in the app after the event loads. Include this step in staff training and label dedicated devices or desks clearly so a busy registration team does not update the wrong daily status.
Configure ticket generation and delivery
Go to Product Data > Ticket Settings.
Select the relevant HTML ticket theme and, if FooEvents PDF Tickets is installed and enabled, select the relevant PDF ticket theme. For a professional conference, use a branded ticket theme that includes your conference logo, colors, event name, venue, conference dates, and barcode or QR code.
Set the ticket logo and header image if your selected ticket theme supports these options. You can also change the subject of the ticket email using the Ticket email subject field.
If you would like to convey information that only attendees should receive, use the Ticket email body field. This is useful for arrival times, registration desk location, parking details, event rules or what attendees should bring.
Enable the ticket settings that match your conference workflow. In most cases, you should display attendee details, date and time, barcode or QR code, multi-day details and custom attendee details on the ticket. You should also enable ticket emails and, if you want each attendee to receive their own ticket directly, enable the option to email the ticket to the attendee rather than the purchaser.
FooEvents generates tickets when a WooCommerce order reaches one of the statuses selected under FooEvents > Settings > General > Send on order status. Completed is the default. Select only statuses that represent an approved or intentionally accepted registration in your store so that tickets are not sent for orders that are still awaiting payment or review.
Depending on the options you enable, attendees can receive or access tickets in several ways:
- An HTML ticket displayed in the ticket email
- A PDF ticket attached to the HTML ticket email
- A PDF download from the WooCommerce Thank You or My Account pages when PDF downloads are enabled
- Ticket details in the WordPress admin area under FooEvents > Tickets
Send a ticket theme preview to confirm the branding, but use a ticket generated from a real test order when testing barcode or QR code scanning. Preview tickets contain sample information and are not valid for check-in. See the ticket themes guide for preview instructions.
Test delivery to more than one email provider and use an authenticated SMTP service to improve deliverability, especially when PDF attachments are enabled. If an attendee’s email address is corrected later, update the ticket and use the resend option so the attendee receives the current ticket. See the ticket help section for sending, resending and spam troubleshooting.
FooEvents can also display generated tickets on the WooCommerce Thank You page. If the order has not yet reached a ticket-generating status, the customer will see the configured pending message instead. Review the Thank You Page Tickets guide if you want to change this behavior or message.
For more information, see the ticket configuration guide.
Enable PDF tickets
Requires the FooEvents PDF Tickets plugin.
Go to FooEvents > Settings > PDF Tickets and enable PDF tickets. You can also choose whether PDF tickets should be downloadable and whether they should be attached to the HTML ticket email.
After enabling PDF tickets globally, return to the conference product and confirm that the correct PDF ticket theme is selected under Product Data > Ticket Settings.
PDF tickets are useful for conferences because attendees often expect a printable or downloadable ticket that they can save on their phone or bring to the venue.
For more information, see the FooEvents PDF Tickets guide.
Custom attendee fields
Requires the FooEvents Custom Attendee Fields plugin.
Go to Product Data > Custom Attendee Fields.
Create the custom attendee fields that are specific to your conference registration process. These fields will be captured for each individual attendee and can be viewed in the WordPress admin area, included in exports, displayed on tickets where enabled, and viewed in the FooEvents Check-ins apps.
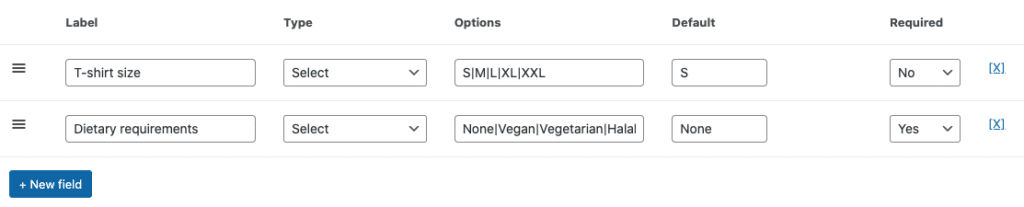
For this conference setup, useful custom attendee fields include T-shirt size and Dietary requirements. If you did not use the standard attendee fields for company and designation, you can also create custom fields for Company and Job title.
For dietary requirements, use a text field or textarea so attendees can provide allergies or special requests. For T-shirt size, use a select field so attendees choose from fixed options such as Small, Medium, Large, XL and XXL.
Use fixed options where the information will be counted or grouped later. A select field makes T-shirt quantities easier to summarize than free-form answers such as “medium”, “M” and “med”. Use free-text fields only when attendees need to explain information that cannot be represented reliably by a short list.
Mark fields as required only when the information is necessary for registration, ticket delivery or conference operations. Required fields must be completed on the Attendee Details Page before the customer can continue to checkout. Avoid collecting personal information that your team does not need, and decide who will be allowed to access exported attendee and dietary data.
Once you have reviewed all settings, click Save or Publish. Your event should then be visible on the front-end of your website.
Variation table layout
By default, WooCommerce displays variations in a dropdown field on the product page:

FooEvents now includes a built-in option to display supported event variations in a table layout. This is useful for conference registration sites because it allows customers to view ticket types, prices and availability in a clearer format.
You can enable the variation table globally by going to FooEvents > Settings > General and enabling Display event variations as a table.
You can also control this per event by going to Product Data > Event Settings > Display Options and setting Display variations as a table to either use the global setting, enable it for this event, or disable it for this event.
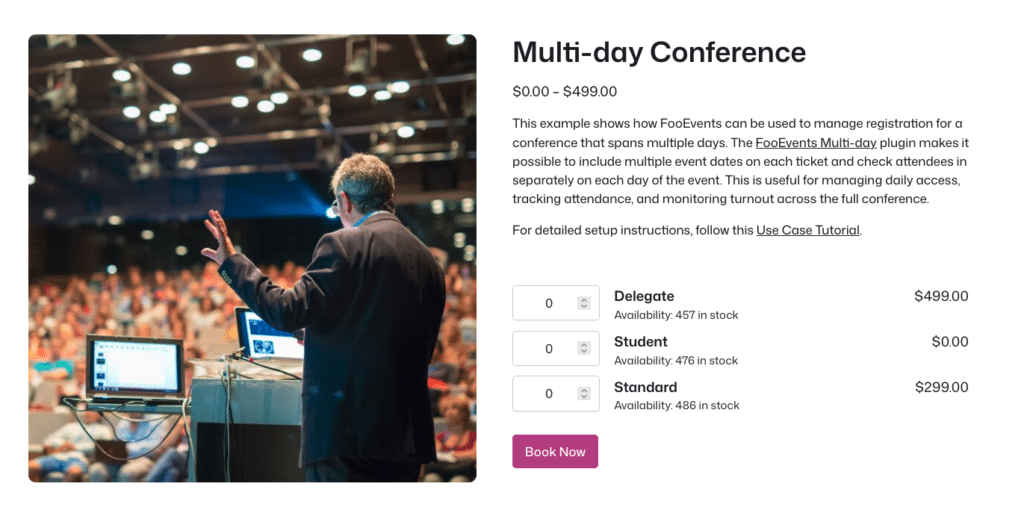
Important: The variation table display depends on the WooCommerce product and variation configuration. Avoid using blank or “Any” variation values for ticket types, as these can prevent the table layout from being used correctly.
Test the registration workflow
Similar to this demo example, customers should be able to select one or more ticket types and add them to the cart. They will then complete the required information for every ticket on the Attendee Details Page before continuing to WooCommerce checkout.
Place a test order containing multiple ticket types. Confirm that variation stock is reduced correctly, required attendee fields cannot be skipped, unique attendee email validation behaves as expected, and the order reaches the intended ticket-generating status.
When tickets are configured to be emailed to attendees, each attendee should receive their own ticket with the correct ticket type, attendee information, custom fields, conference details and every configured conference date.
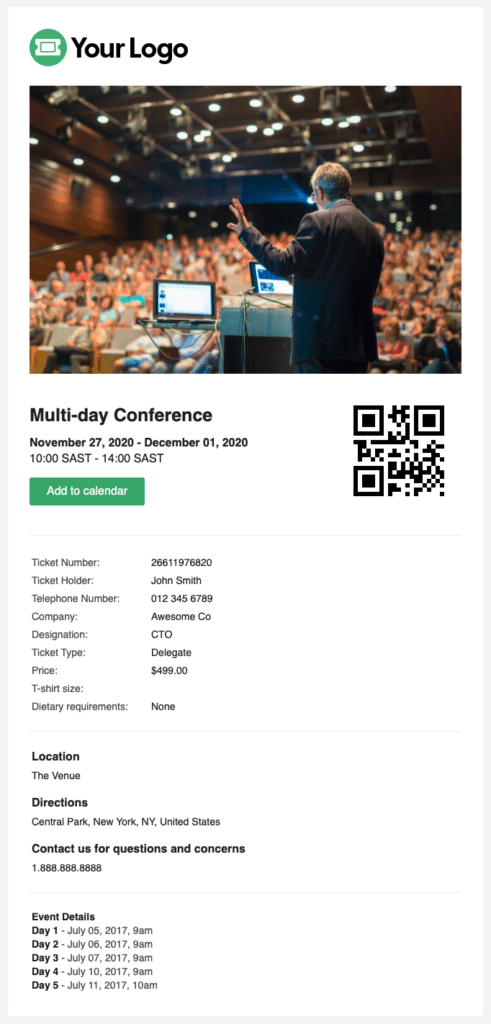
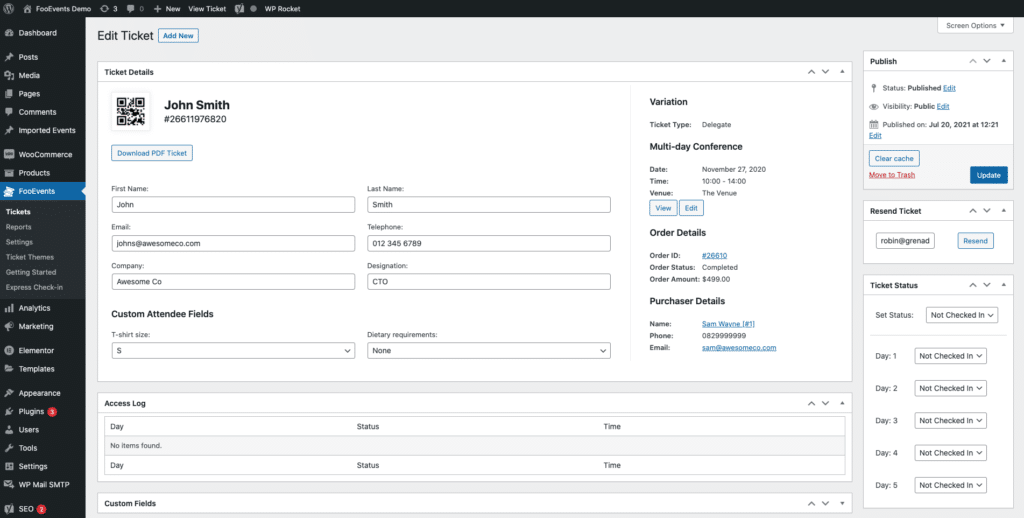
The ticket can also be reviewed in the WordPress admin area. Go to FooEvents > Tickets, open the test ticket and confirm that the daily check-in statuses correspond to the configured number of conference days.
Prepare and manage daily conference entry
Prepare the Check-ins app and devices
Install the latest version of the free FooEvents Check-ins app on every device that will be used at registration. Connect each device to the website, open the conference event and confirm that the ticket list loads successfully.
Review the Check-ins app options under FooEvents > Settings > Check-ins before devices are distributed:
- Use Event listing options to keep staff focused on the conference events they are authorized to manage.
- Review Tickets loaded and enable Include older tickets that have not been checked in if the conference product or test tickets were created outside the normal loading period.
- Reduce Tickets to load per request if the server struggles to load the complete attendee list in one request.
- Enable Hide personal information when check-in staff only need attendee names and ticket status.
Load and synchronize all devices before the registration desks open. Test the built-in camera and any Bluetooth scanners, confirm that auto check-in behaves as expected, provide chargers or power banks, and keep a secure backup device ready.
If the venue has several entrances or unreliable connectivity, plan device ownership and synchronization before the event. Follow the multi-gate events with unreliable connectivity guide rather than improvising an offline workflow on the day.
Check attendees in on the correct day
A multi-day ticket has an independent check-in status for each configured day. At the start of every shift, staff should open the event and confirm the selected conference day before scanning any tickets.
- Confirm the conference name and selected day shown in the app.
- Scan the barcode or QR code, or search for the attendee by name or ticket number when scanning is not possible.
- Review the result before admitting the attendee. A successful result should update only the intended day unless the event is deliberately set to All Days.
- Escalate canceled, unpaid, duplicate or unrecognized tickets to a supervisor instead of overriding the result without verification.
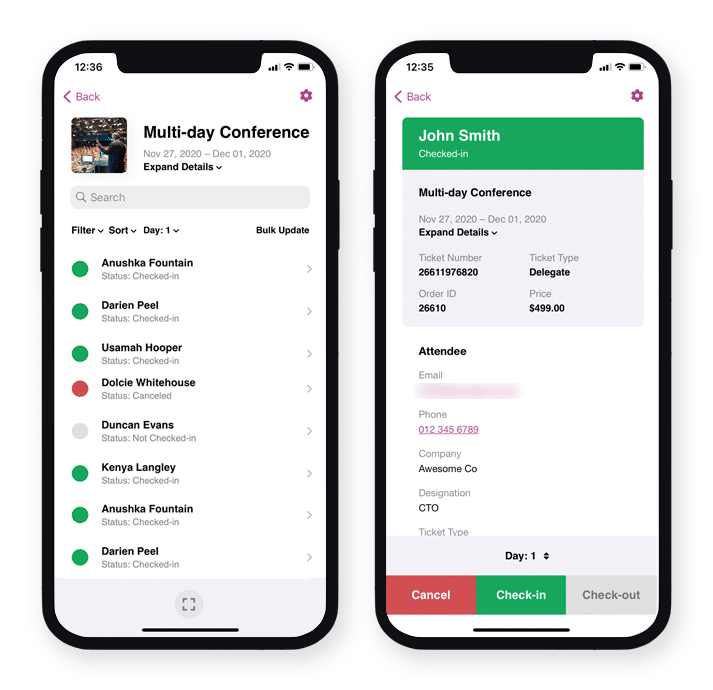
Before the conference, use a real test ticket to complete a check-in for every event day. Confirm that the barcode or QR code scans correctly, the expected day changes to Checked In, the other days remain unchanged, and the update appears in WordPress. Then reset the test ticket if it will be used again.
The app can also warn staff when a ticket date does not match the device’s current date. Enable Restrict attendee check-ins to the current day in the app settings if this warning is appropriate for your workflow. Authorized staff can still choose whether to proceed when an exception is legitimate. See the current-day check-in guide.
For more information, see the FooEvents Check-ins app help guide, the FooEvents Multi-day help section and the attendee check-ins guide.
Manage multiple desks and group arrivals
When devices are online, check-in changes are synchronized through the WordPress website. Keep devices connected and refresh or synchronize them according to the app settings so every desk works from current ticket data.
The Check-in Same Order Tickets option can speed up group arrivals by updating other tickets from the same WooCommerce order and event. Use it only when the complete group is physically present, confirm that the correct conference day is selected, and test the behavior with a group order before enabling it for staff. See check in all tickets for the same order.
Offline warning: Devices operating offline do not synchronize check-ins directly with one another. If the same attendee can reach more than one offline device, duplicate admission is possible. Assign devices to distinct attendee groups or entrance lanes and synchronize them as soon as connectivity is available.
Define re-entry and exception rules
Daily check-in records show whether a ticket has already been used on a particular conference day. Decide whether same-day re-entry is permitted and document the process before training staff.
- If re-entry is allowed, use check-out and check-in consistently, or issue a visible credential such as a badge or wristband and keep the digital status checked in.
- If re-entry is not allowed, treat an already checked-in result as an exception that requires supervisor approval.
- Define how staff should verify identity when an attendee has lost their ticket or their phone is unavailable.
- Decide who can resolve unpaid, canceled, refunded or transferred registrations and how those decisions will be recorded.
A conference-day check-in confirms admission to the overall event for that day. It does not manage capacity or attendance for individual workshops. Use separate Bookable event products when sessions require their own availability and check-in records.
Manage attendees, reporting and on-site operations
Review attendance and export attendee data
Use the FooEvents event reports to review ticket sales and attendance. For a multi-day event, daily check-in information helps the operations team compare registrations with actual attendance and identify unresolved check-in or synchronization issues before the next conference day begins.
You can export a CSV file for the event that includes ticket numbers, custom attendee fields, purchaser details, attendee details and multi-day check-in information. Edit the conference product, go to Product Data > Event Export, configure the export options and download the attendee CSV.
Generate operational exports close enough to the event that recent registrations and attendee changes are included. Restrict access to files containing personal or dietary information, share them only with staff who need them and delete working copies when they are no longer required.
Alternatively, a solution such as WP Fusion can add FooEvents attendees to a supported CRM and apply tags based on the ticket purchased. Test the field mapping and consent workflow before opening registration.
Print badges and registration materials
The built-in FooEvents Stationery Builder can be used to design and print custom name tags, wristbands, tickets, badges and personalized labels.
For a conference, a basic badge could include the attendee name, company, designation, ticket type and barcode or QR code. If you captured a custom badge name field, use that field as the main display name. Do not place private information such as dietary or accessibility requirements on a public-facing badge.
Generate a test sheet before printing the full attendee list and confirm the layout, field mapping, print size and scanner readability. Keep a process for printing individual replacements and badges for late registrations without reprinting the complete batch.
Sell tickets and merchandise on-site
Optional: This workflow requires FooEvents POS in addition to the plugins used for online conference registration.
FooEvents POS can be used to sell remaining conference tickets and merchandise at the venue. When selling an event product, staff can capture the required attendee details and print or email the generated ticket, subject to the order and ticket settings used by the store.
Before the event, complete an on-site test sale for every ticket type that staff will offer. Confirm that the correct variation stock is reduced, attendee details are captured, the multi-day ticket contains all dates, the intended default check-in day is applied and the ticket becomes available in the Check-ins app.
Connectivity: FooEvents POS can capture orders while offline, but event tickets can only be generated and printed once the device has an active connection and the order has synchronized with the website. Plan a connected ticket-collection or registration point if you expect unreliable connectivity. See the FooEvents POS offline mode guide.
Final checks before opening registration
Before opening ticket sales to the public, complete the following checks using a real test order and ticket:
- Confirm that the WordPress timezone and every conference date, day order, start time and end time are correct.
- Verify that the product is a multi-day event and that the number of configured days matches the published conference schedule.
- Confirm that customers understand a multi-day pass covers every configured day and that any separately sold day passes use the intended products and stock allocations.
- Check ticket types, prices, coupons, sale periods and variation stock. Confirm that combined full-pass stock does not exceed conference capacity and that backorders are configured intentionally.
- Add multiple ticket types to the cart and complete the Attendee Details Page. Confirm that required fields cannot be skipped and that details are stored against the correct attendee.
- Complete checkout using every payment method and order-status path that customers will use. Confirm that tickets are generated only at the intended status.
- Verify that HTML and PDF tickets display the correct attendee, ticket type, venue, complete date schedule and scannable barcode or QR code.
- Test ticket email delivery to the purchaser and attendee according to your settings, as well as any Thank You or My Account ticket downloads.
- Open the test ticket under FooEvents > Tickets and confirm that it has a separate status for every conference day.
- Load the event and attendee list on every check-in device, confirm the default check-in day and complete a test scan for each conference day.
- Test duplicate scans, group arrivals, re-entry, canceled or unpaid tickets and the escalation process staff will follow.
- If multiple entrances or offline mode will be used, rehearse device assignment, synchronization and recovery before attendees arrive.
- Generate an attendee export and event report, then confirm that the required custom fields and daily check-in information are present and protected appropriately.
- Generate and scan a sample badge, and document how late registrations, badge replacements and on-site sales will be handled.
Questions and feedback
Have a question before you buy? Please get in touch. If you are ready to get started, you can purchase a license here.
Already purchased and need assistance? Contact our support team.
 English
  German
  Dutch
Dutch  Spanish
  Italian
  Portuguese
  French
  Polish
  Czech
Czech  Greek
Greek