FooEvents for WooCommerce integrates with the AutomateWoo plugin which makes it possible to send automated follow-up emails to attendees based on custom triggers for an event or booking. This is ideal for sending a range of different transactional alerts and reminders (one-to-one) directly from your web server. Here are a few examples of what’s possible using our built-in AutomateWoo integration.
Table of Contents #
- Example Use Cases
- Requirements
- Creating a new email workflow/automation
- Set the Trigger type
- Set the Timing
- Enable Transactional Email
- Apply Custom Rules
- Setup the Workflows Action
- Sending Text Messages
- FooEvents Variables
Example Use Cases
- Before an event or booking
- Send welcome packs and confirm registration details
- Send automated reminders before the day of an event
- Send reminders to bring something to an event or booking
- Setup automated drip emails to build excitement for an event
- After the attendee has arrived
- Send greetings and welcome messages
- Provide attendees with additional information and resources that can be used at an event
- Offer real-time notifications of activities taking place
- After an event or booking
- Send automated thank-you emails to everyone who attended an event with links to the event’s presentations, notes or recordings
- Send a certificate of attendance/completion after a person completes a race or course
- Request a review of your event or business
- Create automations to touch base with attendees or customers at specific time intervals e.g. after attendees have completed a specific course or workshop
- Send out special offers or cross-promote your other events
Requirements
- FooEvents for WooCommerce version 1.19.0 or newer
- AutomateWoo version 6.0.13 or newer
Before proceeding further, it is critical that you are familiar with how the AutomateWoo plugin works and are able to set up automations using the built-in triggers, actions, and timing options. AutomateWoo provides extensive documentation that will guide you through the process of setting up workflows. Once you are comfortable using AutomateWoo, please proceed to the following sections where we will go through the various custom triggers and variables that are added by FooEvents.
Creating a new email workflow/automation in AutomateWoo
- Navigate to AutomateWoo > Workflows in the left sidebar of your WordPress dashboard
- Use the Add Workflow button to create a new automation
- Open the email editor and set the workflow title, e.g ‘Event Reminder Email’
Set the Trigger type

- Navigate to the Triggers meta box
- Select a trigger from the FooEvents section using the triggers drop-down field:
- After create ticket – Action will be triggered when the ticket is created
- After check-in ticket – Action will be triggered when the ticket is checked-in
AutomateWoo Triggers Documentation
Set the Timing
When using AutomateWoo, you can set your workflow to run at any time. The Timing box is located on the right-hand side of your workflow page and has five built-in options to choose from.
- Run Immediately
- Delayed
- Scheduled
- Fixed
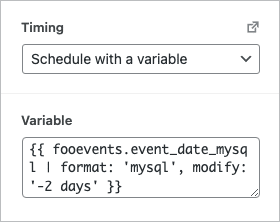
- Scheduled with a Variable
You can use the Scheduled with a Variable option to schedule your workflow to send at a time relative to the event time or booking time. The following custom FooEvents variables can be found in the Variables section at the bottom of the right-hand sidebar of the page:
- {{ fooevents.event_date_mysql }}
- {{ fooevents.event_end_date_mysql }}
- {{ fooevents.bookings_mysql }} (Requires FooEvents Bookings)
You can set the amount of time before or after the event or booking date by adding modifiers. For example, you could schedule a workflow to run two hours before the event by following these steps:
- Select the relevant custom variable in the Variables section in the right-hand sidebar of the page. For this example, we will use fooevents.event_date_mysql
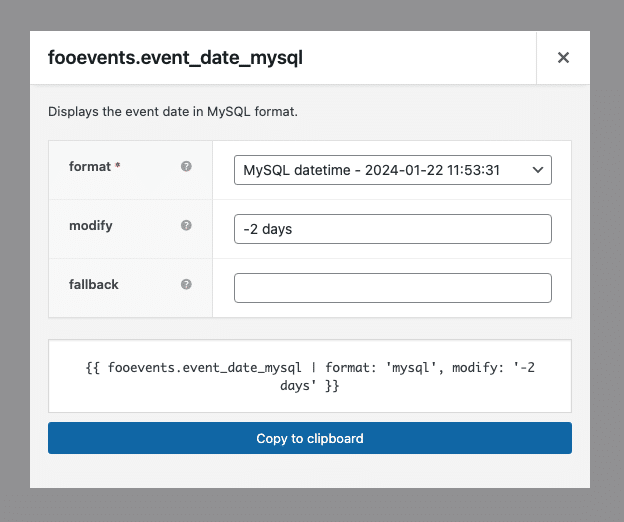
- Once selected, a dialog will display prompting you to set the event date format

- Set the Format field to MySQL datetime
- Set the Modify field to -2 days (i.e 2 days before the event date)
- Press the Copy to clipboard button, or copy the generated variable syntax
- Next, scroll to the top of the page and locate the Timing section in the right-hand sidebar, and paste the variable syntax into the Variable field

- Save the Workflow
- Run a test order on the front end of your website.
- Once your test order has been completed and a test ticket has been generated, navigate to AutomateWoo > Queue and make sure the email is scheduled in the queue correctly and is set to run on the correct date and time.
A negative modifier value (e.g. -5 days) will take place before the supplied date, and a positive value (e.g. +5 weeks) will take place after the supplied date. AutomateWoo supports the ‘month’, ‘day’, and ‘hour’ time modifiers.
When scheduling an action, AutomateWoo will use the date and time provided through a custom FooEvents variable (e.g. 2024-01-29 08:00:00. AutomateWoo does not account for the event’s timezone setting. If you are using an event timezone that is different from your WordPress site’s default timezone, please ensure to adjust for the time difference when scheduling an action.
Used in combination with FooEvents triggers, you can create the following automation:
| Example | Trigger | Timing |
| Immediately after the ticket is issued | After create ticket | Use ‘Immediately’ timing option |
| Immediately after ticket check-in | After check-in ticket | Use ‘Immediately’ timing option |
| 2 days before event | After create ticket | {{ fooevents.event_date_mysql | format: 'mysql', modify: '-2 days' }} |
| 2 days after event | After create ticket | {{ fooevents.event_date_mysql | format: 'mysql', modify: '+2 days' }} |
| 1 week after booking | After create ticket | {{ fooevents.bookings_mysql | format: 'mysql', modify: '+1 week' }} |
| 2 months before booking | After create ticket | {{ fooevents.bookings_mysql | format: 'mysql', modify: '-2 months' }} |
AutomateWoo Timing Documentation
Enable Transactional Email
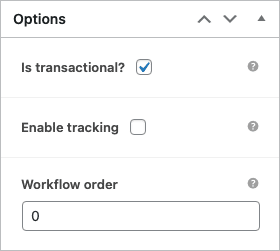
Emails sent in the run-up to an event are typically more transaction in nature (reminders, directions, certificates etc), however, by default, AutomateWoo Workflows are handled as marketing emails that require your audience to opt-in. You can disable this by enabling the Is transactional? option in the Options panel in the right-hand sidebar.

Apply Custom Rules
Rules are optional and can be used to tailor a workflow to your unique requirements by implementing conditional logic. Each rule comes with comparison statements such as is, matches any, is less than, and is greater than which you can pair with the value of each rule. These can be used to create conditional logic without the need for a developer. For example, you could use rules to only apply the workflow to customers based in a specific location who have used a specific coupon.
AutomateWoo Rules Documentation
Setup the Workflows Action
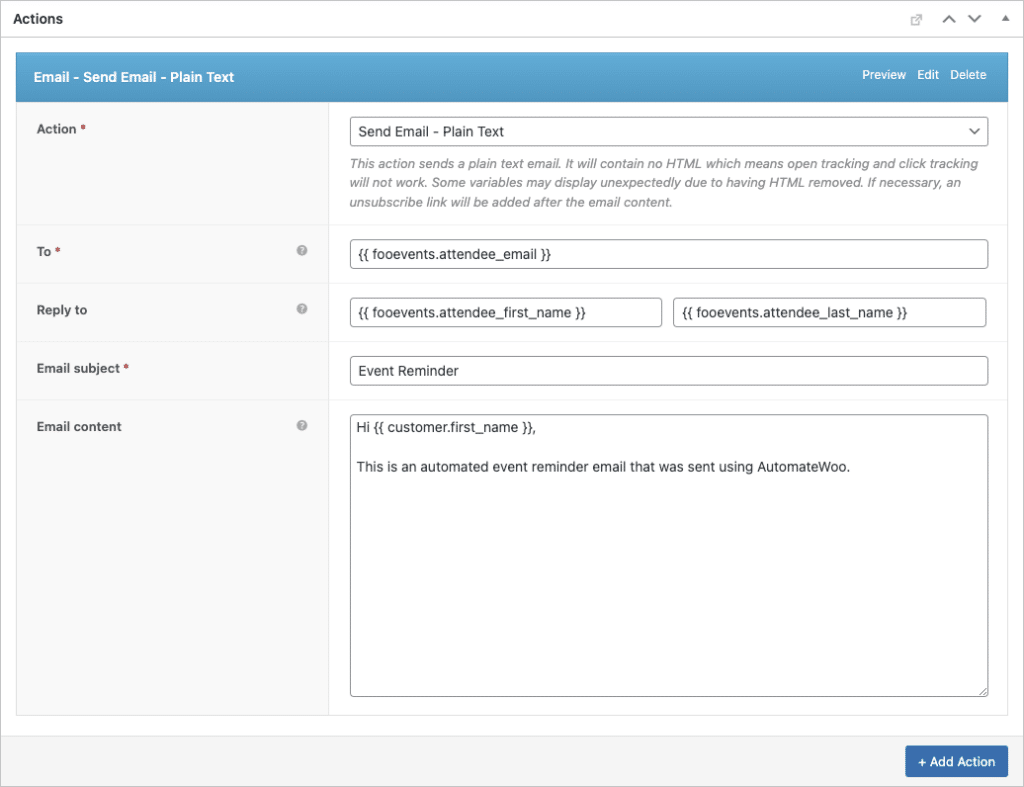
Once you have configured your workflow trigger and timing options, all that is left is to determine what Action must take place. To do so, navigate to the Actions meta box and configure an action based on your requirements.
In the following example, the action is set to send a plain text email to the attendee’s email address (using FooEvents custom variables):

AutomateWoo Actions Documentation
Sending Text Messages
In addition to plain text and HTML emails, you can also set AutomateWoo to send text messages (SMS) using Twilio.
AutomateWoo Twilio Documentation
FooEvents Variables
Personalize your emails using the following FooEvents variables/merge tags:
-
- fooevents.attendee_first_name
- fooevents.attendee_last_name
- fooevents.attendee_email
- fooevents.ticket_id
- fooevents.event_name
- fooevents.event_venue
- fooevents.event_date
- fooevents.event_date_datetime
- fooevents.event_date_mysql
- fooevents.event_hour
- fooevents.event_minutes
- fooevents.event_period
- fooevents.event_end_date
- fooevents.event_end_date_datetime
- fooevents.event_end_date_mysql
- fooevents.event_end_hour
- fooevents.event_end_minutes
- fooevents.event_end_period
- fooevents.bookings_date
- fooevents.bookings_mysql
- fooevents.bookings_date_term
- fooevents.bookings_date_datetime
- fooevents.bookings_slot
- fooevents.bookings_slot_term
- fooevents.seating_row_name
- fooevents.seating_row_name_label
- fooevents.seating_seat_number
- fooevents.seating_seat_number_label
- fooevents.barcode_url